Saltar al contenido principal

Motorola Droid X LCD and Digitizer Replacement

Qué necesitas

  1. Motorola Droid X LCD and Digitizer Replacement, Battery: paso 1, imagen 1 de 2 Motorola Droid X LCD and Digitizer Replacement, Battery: paso 1, imagen 2 de 2
    • Locate the power button at the top of the phone. Depress power button for 2 seconds until a menu appears.

  2. Motorola Droid X LCD and Digitizer Replacement: paso 2, imagen 1 de 2 Motorola Droid X LCD and Digitizer Replacement: paso 2, imagen 2 de 2
    • Once the menu appears, select the "power off" option. Wait until the phone is completely off.

  3. Motorola Droid X LCD and Digitizer Replacement: paso 3, imagen 1 de 2 Motorola Droid X LCD and Digitizer Replacement: paso 3, imagen 2 de 2
    • Place thumb on the back cover, and push down towards the bottom of the device. Once the cover releases, pull it away from the phone and set it aside.

  4. Motorola Droid X LCD and Digitizer Replacement: paso 4, imagen 1 de 2 Motorola Droid X LCD and Digitizer Replacement: paso 4, imagen 2 de 2
    • Find the yellow pull tab located in the upper left corner. Pull the tab until the battery dislodges. Grab the battery by the raised edge, and remove it from the case.

  5. Motorola Droid X LCD and Digitizer Replacement: paso 5, imagen 1 de 1
    • The battery has been successfully removed.

  6. Motorola Droid X LCD and Digitizer Replacement, Motorola Droid X Rear Housing: paso 6, imagen 1 de 1
    • Remove the micro SD card from its connector.

  7. Motorola Droid X LCD and Digitizer Replacement: paso 7, imagen 1 de 3 Motorola Droid X LCD and Digitizer Replacement: paso 7, imagen 2 de 3 Motorola Droid X LCD and Digitizer Replacement: paso 7, imagen 3 de 3
    • Locate the seam between the back case and the end cover on the top edge of the phone.

    • Use the plastic opening tool to detach the two clips by wedging the tool into the right side of the seam and moving right to left. Once the cover comes off set it aside

  8. Motorola Droid X LCD and Digitizer Replacement: paso 8, imagen 1 de 3 Motorola Droid X LCD and Digitizer Replacement: paso 8, imagen 2 de 3 Motorola Droid X LCD and Digitizer Replacement: paso 8, imagen 3 de 3
    • Repeat step 2 on the bottom cover.

  9. Motorola Droid X LCD and Digitizer Replacement: paso 9, imagen 1 de 3 Motorola Droid X LCD and Digitizer Replacement: paso 9, imagen 2 de 3 Motorola Droid X LCD and Digitizer Replacement: paso 9, imagen 3 de 3
    • Use a T5 Torx screwdriver to remove the screws in each corner of the phone.

    • The screws are very small so make sure not to lose them.

  10. Motorola Droid X LCD and Digitizer Replacement: paso 10, imagen 1 de 2 Motorola Droid X LCD and Digitizer Replacement: paso 10, imagen 2 de 2
    • Flip the phone over and locate the screw on the middle of the left side. Unscrew it using the T5 Torx screwdriver and set it aside.

  11. Motorola Droid X LCD and Digitizer Replacement: paso 11, imagen 1 de 2 Motorola Droid X LCD and Digitizer Replacement: paso 11, imagen 2 de 2
    • Identify the screw located in the bottom right corner of the battery case. Remove the screw with a T5 (or in some cases T6) torx screwdriver and set it aside.

  12. Motorola Droid X LCD and Digitizer Replacement: paso 12, imagen 1 de 2 Motorola Droid X LCD and Digitizer Replacement: paso 12, imagen 2 de 2
    • Locate the seam along the right edge of the phone. Use the prying tool to disconnect the two clips along the edge.

  13. Motorola Droid X LCD and Digitizer Replacement: paso 13, imagen 1 de 3 Motorola Droid X LCD and Digitizer Replacement: paso 13, imagen 2 de 3 Motorola Droid X LCD and Digitizer Replacement: paso 13, imagen 3 de 3
    • Locate the two clips on the inside of the case and use the spudger tool to detach them from the case. To detach each clip, use the sharp end to press the small, black plastic in the center of the clip.

  14. Motorola Droid X LCD and Digitizer Replacement: paso 14, imagen 1 de 2 Motorola Droid X LCD and Digitizer Replacement: paso 14, imagen 2 de 2
    • After the clips are detached, remove the back case and set it aside.

  15. Motorola Droid X LCD and Digitizer Replacement, Motherboard: paso 15, imagen 1 de 1
    • Remove the screws along both sides of the motherboard using a T3 Torx screwdriver. On some phones this may require a #1 Phillips Screw Driver.

  16. Motorola Droid X LCD and Digitizer Replacement: paso 16, imagen 1 de 2 Motorola Droid X LCD and Digitizer Replacement: paso 16, imagen 2 de 2
    • Carefully remove the white connecting wire from the motherboard using tweezers.

    • Use caution, this wire is delicate.

  17. Motorola Droid X LCD and Digitizer Replacement: paso 17, imagen 1 de 2 Motorola Droid X LCD and Digitizer Replacement: paso 17, imagen 2 de 2
    • Scrape away the electrical tape that covers the LCD and digitizer cable using the spudger tool or a fingernail.

  18. Motorola Droid X LCD and Digitizer Replacement: paso 18, imagen 1 de 1
    • Use the spudger tool to pop the Digitizer cable off of the motherboard.

  19. Motorola Droid X LCD and Digitizer Replacement: paso 19, imagen 1 de 1
    • Carefully flip the small white connector up and away from the motherboard.

  20. Motorola Droid X LCD and Digitizer Replacement: paso 20, imagen 1 de 1
    • Gently pull the flat gold cable out from the connector.

  21. Motorola Droid X LCD and Digitizer Replacement: paso 21, imagen 1 de 1
    • Carefully lift the motherboard and camera module up. Do not remove it from the phone!

  22. Motorola Droid X LCD and Digitizer Replacement: paso 22, imagen 1 de 1
    • Using the spudger tool, pop the black cable connector off of the motherboard.

  23. Motorola Droid X LCD and Digitizer Replacement: paso 23, imagen 1 de 1
    • It is to safe remove the motherboard from the phone.

  24. Motorola Droid X LCD and Digitizer Replacement, LCD and Digitizer: paso 24, imagen 1 de 2 Motorola Droid X LCD and Digitizer Replacement, LCD and Digitizer: paso 24, imagen 2 de 2
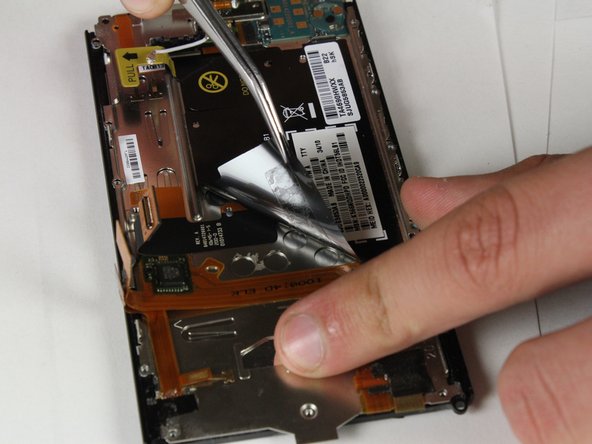
    • Using tweezers, peel back the black safety information sticker.

  25. Motorola Droid X LCD and Digitizer Replacement: paso 25, imagen 1 de 1
    • Using tweezers, peel the orange and black cable away from the device, stopping before reaching the electrical tape at the near the edge of the screen.

  26. Motorola Droid X LCD and Digitizer Replacement: paso 26, imagen 1 de 1
    • Peel black the black electrical tape located near the bottom of the device.

  27. Motorola Droid X LCD and Digitizer Replacement: paso 27, imagen 1 de 1
    • Flip up the cable connector and pull out the small flat cable.

  28. Motorola Droid X LCD and Digitizer Replacement: paso 28, imagen 1 de 2 Motorola Droid X LCD and Digitizer Replacement: paso 28, imagen 2 de 2
    • Carefully pull the long orange cable away from the device.

  29. Motorola Droid X LCD and Digitizer Replacement: paso 29, imagen 1 de 2 Motorola Droid X LCD and Digitizer Replacement: paso 29, imagen 2 de 2
    • Unscrew the screw at the base of the screen using the T4 torx screwdriver .

  30. Motorola Droid X LCD and Digitizer Replacement: paso 30, imagen 1 de 1
    • Peel back the orange and gold connector from the left side of the phone.

  31. Motorola Droid X LCD and Digitizer Replacement: paso 31, imagen 1 de 1
    • Carefully separate the metal plate from the LCD and front housing.

  32. Motorola Droid X LCD and Digitizer Replacement: paso 32, imagen 1 de 2 Motorola Droid X LCD and Digitizer Replacement: paso 32, imagen 2 de 2
    • Lift the LCD out of the front housing.

  33. Motorola Droid X LCD and Digitizer Replacement: paso 33, imagen 1 de 1
    • Remove all dust and smudges from the LCD and front housing before installing the screen.

Conclusión

To reassemble your device, follow these instructions in reverse order.

18 personas más completaron esta guía.

Sam Johnston

Miembro Desde 10/03/12

576 Reputación

4 Guías creadas

Equipo

Cal Poly, Team 18-40, Regan Fall 2012 Miembro de Cal Poly, Team 18-40, Regan Fall 2012

CPSU-REGAN-F12S18G40

3 Miembros

10 Guías creadas

2 comentarios

How much does it cost to get what I need and where can I get it

jacob - Contestar

Thank you. This is very helpful.

Albert Einstine - Contestar

Agregar Comentario

Ver Estadísticas:

Ultimas 24 horas: 0

Ultimos 7 días: 0

Ultimos 30 días: 0

Todo El Tiempo: 14,324