Saltar al contenido principal
Únete a la Comunidad de Reparación - Crear Cuenta

Motorola Droid Turbo Front Facing Camera Replacement

Qué necesitas

    1. Motorola Droid Turbo Front Facing Camera Replacement, Rear Case: paso 1, imagen 1 de 1
      • Prepare an iOpener and lay it over the rear case to soften the adhesive on securing the rear case to the phone.

      Pregunta a FixBot

      Agregar Comentario

    2. Motorola Droid Turbo Front Facing Camera Replacement: paso 2, imagen 1 de 2 Motorola Droid Turbo Front Facing Camera Replacement: paso 2, imagen 2 de 2
      • Use a plastic opening tool to pry the rear case off of the rest of the device.

      • Remove the rear case.

      • The wireless charging coil may try to stick to the rear case, so make sure to remove it from the case before fully separating the rear case from the rest of the device.

      Pregunta a FixBot

      Agregar Comentario

    1. Motorola Droid Turbo Front Facing Camera Replacement, Midframe: paso 3, imagen 1 de 1
      • Remove the midframe bezel.

      Pregunta a FixBot

      Agregar Comentario

    2. Motorola Droid Turbo Front Facing Camera Replacement: paso 4, imagen 1 de 1
      • Remove the four Torx T5 screws securing the midframe plate.

      Pregunta a FixBot

      Agregar Comentario

    3. Motorola Droid Turbo Front Facing Camera Replacement: paso 5, imagen 1 de 1
      • Remove the midframe.

      Pregunta a FixBot

      Agregar Comentario

    1. Motorola Droid Turbo Front Facing Camera Replacement, Front Facing Camera: paso 6, imagen 1 de 2 Motorola Droid Turbo Front Facing Camera Replacement, Front Facing Camera: paso 6, imagen 2 de 2
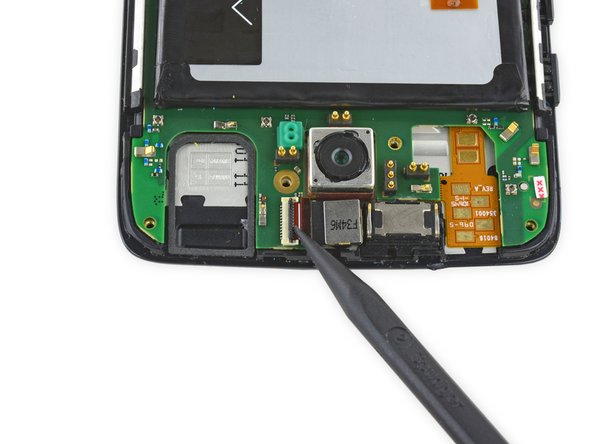
      • Use the pointed end of a spudger to flip up the black retaining flap of the front facing camera's ZIF connector.

      Pregunta a FixBot

      Agregar Comentario

    2. Motorola Droid Turbo Front Facing Camera Replacement: paso 7, imagen 1 de 2 Motorola Droid Turbo Front Facing Camera Replacement: paso 7, imagen 2 de 2
      • Remove the front-facing camera.

      Pregunta a FixBot

      Agregar Comentario

Conclusión

To reassemble your device, follow these instructions in reverse order.

Cancelar: No complete esta guía.

Una persona más ha completado esta guía.

Luis Arangu

Miembro Desde 01/20/16

1,151 Reputación

3 Guías creadas

Equipo

USF Tampa, Team 15-5, Remmell Spring 2016 Miembro de USF Tampa, Team 15-5, Remmell Spring 2016

USFT-REMMELL-S16S15G5

Miembros de 3

48 Guías creadas

0Guía Comentarios

Agregar Comentario

Ver Estadísticas:

Ultimas 24 horas: 0

Ultimos 7 días: 7

Ultimos 30 días: 39

Todo El Tiempo: 2,134