Saltar al contenido principal

Esta guía ha sufrido modificaciones. Revisa la última versión sin revisar.

Disassembling Motorola Droid 2 Motherboard

Qué necesitas

  1. Disassembling Motorola Droid 2 Motherboard, Battery: paso 1, imagen 1 de 3 Disassembling Motorola Droid 2 Motherboard, Battery: paso 1, imagen 2 de 3 Disassembling Motorola Droid 2 Motherboard, Battery: paso 1, imagen 3 de 3
    • Slide the battery cover toward the bottom edge of the phone.

    • Remove the battery cover from the rear of the phone.

  2. Disassembling Motorola Droid 2 Motherboard: paso 2, imagen 1 de 2 Disassembling Motorola Droid 2 Motherboard: paso 2, imagen 2 de 2
    • Lift the battery out of the Droid 2 from the edge closest to the bottom of the phone.

    • Remove the battery from the Droid 2.

  3. Disassembling Motorola Droid 2 Motherboard, Rear Case: paso 3, imagen 1 de 2 Disassembling Motorola Droid 2 Motherboard, Rear Case: paso 3, imagen 2 de 2
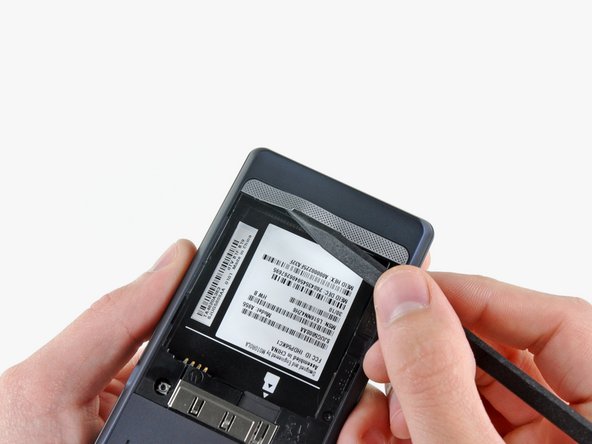
    • Using the tip of a spudger, peel up one corner of the silver ribbon below the battery compartment.

    • Peel the ribbon off the phone.

  4. Disassembling Motorola Droid 2 Motherboard: paso 4, imagen 1 de 1
    • Insert the flat end of a spudger and pry the plastic camera cover up off the phone.

    • The thin plastic cover is attached to the phone with an adhesive. Work slowly and carefully.

  5. Disassembling Motorola Droid 2 Motherboard: paso 5, imagen 1 de 1
    • Use the tip of a spudger to remove the camera bezel stuck to the rear case.

  6. Disassembling Motorola Droid 2 Motherboard: paso 6, imagen 1 de 1
    • Remove the seven 5.5 mm T5 Torx screws securing the rear case to the inner case.

  7. Disassembling Motorola Droid 2 Motherboard: paso 7, imagen 1 de 1
    • Insert the flat end of a spudger and pry downwards to release the plastic tab holding the rear case to the motherboard screw.

  8. Disassembling Motorola Droid 2 Motherboard: paso 8, imagen 1 de 1
    • Gently insert a spudger between the rear case and front case at the top of the phone, near the audio jack.

    • Carefully pry the top edge of the rear case up from the rest of the phone.

  9. Disassembling Motorola Droid 2 Motherboard: paso 9, imagen 1 de 2 Disassembling Motorola Droid 2 Motherboard: paso 9, imagen 2 de 2
    • With the spudger still inserted between the rear case and front case, slide the spudger along the right edge of the device, moving toward the bottom, prying as you go.

    • Continue prying along the bottom edge of the device from right to left, freeing it from the front panel.

  10. Disassembling Motorola Droid 2 Motherboard: paso 10, imagen 1 de 2 Disassembling Motorola Droid 2 Motherboard: paso 10, imagen 2 de 2
    • Continue prying the rear case from the front case along the left side, moving from bottom to top.

    • Lift the rear case up out of the phone.

    • At this point, the button covers on the side of the phone are free and may fall out if you tip the phone upside down.

  11. Disassembling Motorola Droid 2 Motherboard, Speaker: paso 11, imagen 1 de 1
    • Carefully lift the speaker/antenna assembly up and out of the phone.

    • If you are re-assembling your phone, insert any power, camera, or volume buttons that may have fallen out at this point.

  12. Disassembling Motorola Droid 2 Motherboard, Motherboard: paso 12, imagen 1 de 3 Disassembling Motorola Droid 2 Motherboard, Motherboard: paso 12, imagen 2 de 3 Disassembling Motorola Droid 2 Motherboard, Motherboard: paso 12, imagen 3 de 3
    • Use a spudger to pry the antenna cable connectors from their respective sockets on the motherboard and the speaker/antenna board.

    • De-route the antenna cable by pulling it out of the metal clips along the side of the front case.

  13. Disassembling Motorola Droid 2 Motherboard: paso 13, imagen 1 de 1
    • Peel the black rubber sheet covering the side button and display ribbon connectors on the motherboard.

  14. Disassembling Motorola Droid 2 Motherboard: paso 14, imagen 1 de 1
    • Disconnect the power button/volume button connector from its socket on the motherboard using the flat end of a spudger.

  15. Disassembling Motorola Droid 2 Motherboard: paso 15, imagen 1 de 1
    • Disconnect the display ribbon connector from its socket on the motherboard using the flat end of a spudger.

  16. Disassembling Motorola Droid 2 Motherboard: paso 16, imagen 1 de 1
    • Use the flat end of a spudger to remove the small black plastic piece stuck to the battery connector.

  17. Disassembling Motorola Droid 2 Motherboard: paso 17, imagen 1 de 1
    • Remove three 3.8 mm T5 Torx screws securing the motherboard to the front case.

    • Don't attempt to remove the motherboard yet, it is still attached by the keypad ribbon connector.

  18. Disassembling Motorola Droid 2 Motherboard: paso 18, imagen 1 de 1
    • Carefully lift the motherboard from the front case and lay it next to the Droid 2, minding the keypad connector that is still attached.

    • Disconnect the keypad connector by prying it straight up off its socket on the motherboard.

    • Remove the motherboard from the Droid 2.

Conclusión

To reassemble your device, follow these instructions in reverse order.

6 personas más completaron esta guía.

0 comentarios

Agregar Comentario

Ver Estadísticas:

Ultimas 24 horas: 0

Ultimos 7 días: 2

Ultimos 30 días: 9

Todo El Tiempo: 9,896