Saltar al contenido principal

Minolta Dimage Xt Flash Capacitor Replacement

Qué necesitas

  1. Minolta Dimage Xt Flash Capacitor Replacement, Casing: paso 1, imagen 1 de 3 Minolta Dimage Xt Flash Capacitor Replacement, Casing: paso 1, imagen 2 de 3 Minolta Dimage Xt Flash Capacitor Replacement, Casing: paso 1, imagen 3 de 3
    • Locate and remove the silver screws on each side of the camera.

    • Use the Phillips #00 Screwdriver to unscrew all 2.0mm (4 instances) and 4.0mm (2 instances) screws.

  2. Minolta Dimage Xt Flash Capacitor Replacement: paso 2, imagen 1 de 3 Minolta Dimage Xt Flash Capacitor Replacement: paso 2, imagen 2 de 3 Minolta Dimage Xt Flash Capacitor Replacement: paso 2, imagen 3 de 3
    • Then, carefully pry apart the front and back outer casing away from the internal components.

    • Be aware of the ribbon wire that will disconnect when the casing is detached.

  3. Minolta Dimage Xt Flash Capacitor Replacement, Flash Capacitor: paso 3, imagen 1 de 2 Minolta Dimage Xt Flash Capacitor Replacement, Flash Capacitor: paso 3, imagen 2 de 2
    • Caution: Touching the capacitor leads may cause serious injury. Use a capacitor discharge probe to safely rid the capacitors of dangerous charges.

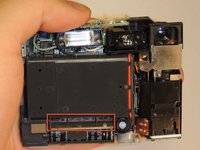
    • On the front side of the camera, locate the flash battery holder.

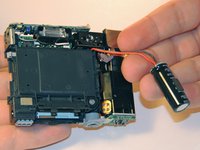
    • Lift the housing and remove the battery.

    • After removing the battery, clip the wires and solder the replacement battery.

Conclusión

To reassemble your device, follow these instructions in reverse order.

Una persona más ha completado esta guía.

Qqq

Miembro Desde 03/11/13

19 Reputación

1 Guía escrita

Un comentario

Its a cap not a battery :D

Eigirdas Gedgaudas - Contestar

Agregar Comentario

Ver Estadísticas:

Ultimas 24 horas: 0

Ultimos 7 días: 3

Ultimos 30 días: 7

Todo El Tiempo: 990