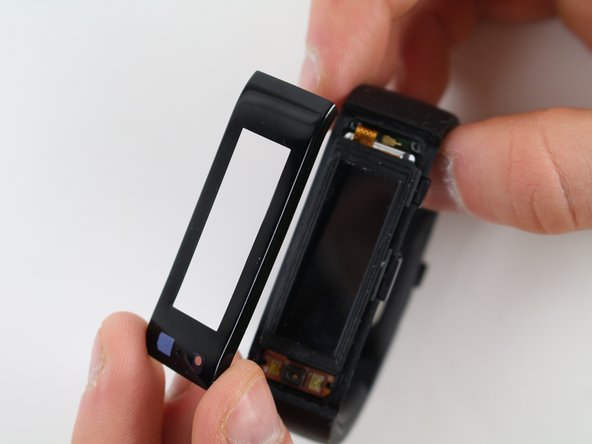
Saltar al contenido principal

Microsoft Band LCD Screen Replacement

Qué necesitas

  1. Microsoft Band LCD Screen Replacement, Screen Frame: paso 1, imagen 1 de 1
    • To avoid burning your hands, make sure to hold only the thin edges of the iOpener.

    • Heat the iOpener. Instructions on how to do this can be found here: iOpener Instructions

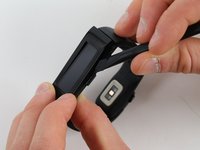
    • Firmly press the frame of the band against the iOpener, and hold it in place for about 90 seconds.

    • When using the iOpener, make sure to wrap it partially around the sides.

  2. Microsoft Band LCD Screen Replacement: paso 2, imagen 1 de 1
    • Using a spudger, lightly press upwards against one corner of the frame, then the other along the corner of the short edge.

    • Alternating between the same two corners, continue pressing until there's about a 1-2 mm gap between that end of the frame and the body.

  3. Microsoft Band LCD Screen Replacement: paso 3, imagen 1 de 2 Microsoft Band LCD Screen Replacement: paso 3, imagen 2 de 2
    • Do not pull the frame away too quickly. The screen may be stuck to the frame, and pulling on it could cause damage. If the screen is still attached, lightly push on the screen with a finger and it should pop out.

    • Insert the spudger into the gap under the frame, and lightly slide it about 3/4 of the way down one of the long edges, then repeat with the other.

    • If the frame doesn't simply pop off, try sliding the spudger the rest of the way down the long edges, and lightly lift the frame with your fingers.

    • When re-assembling, make sure the frame's microphone hole is on the same side as the sensor board underneath.

  4. Microsoft Band LCD Screen Replacement, LCD Screen: paso 4, imagen 1 de 1
    • Do not rip the yellow ribbon cable from the motherboard.

    • Gently lift the LCD screen from the components using your fingertips.

  5. Microsoft Band LCD Screen Replacement: paso 5, imagen 1 de 1
    • Lightly pry up the black connector from the motherboard using a spudger.

    • Pull the entire LCD screen gently upward to detach the yellow ribbon cable.

Conclusión

To reassemble your device, follow these instructions in reverse order.

2 personas más completaron esta guía.

Equipo

Cal Poly, Team 17-34, Amido Winter 2015 Miembro de Cal Poly, Team 17-34, Amido Winter 2015

CPSU-AMIDO-W15S17G34

4 Miembros

6 Guías creadas

Un comentario

Where do you buy the lcd screens from?

moymunoz50 - Contestar

Agregar Comentario

Ver Estadísticas:

Ultimas 24 horas: 0

Ultimos 7 días: 0

Ultimos 30 días: 2

Todo El Tiempo: 2,790