Introducción
Esta semana, Apple actualizó su línea de periféricos de entrada, por lo que estamos reuniendo toda la fuerza de desmontaje que podemos. Hasta ahora, hemos conseguido abrir la segunda generación 'Magic Trackpad' y la primera 'Magic Keyboard' , y ahora estamos centrando nuestros esfuerzos en el Magic Mouse 2. ¿Resistirá este nuevo diseño el paso del tiempo? ¡Únete a nosotros mientras lo descubrimos!
¿Este desmontaje hace clic contigo? Mantente al día con nuestras últimas investigaciones siguiéndonos en Twitter, Instagram, o Facebook
Error
Example:
[video|http://vimeo.com/1234] or [video|http://vimeo.com/1234]Optional Caption[/video]
Current text:
[video | https: //www.youtube.com/watch? v = 801l3oz3fIs]
Qué necesitas
-
-
Este mouse promete ser el más funcional hasta el momento. Veamos qué tiene que ofrecer:
-
Control de gestos multitáctil
-
Conectividad inalámbrica Bluetooth
-
Puerto Lightning (para cargar y emparejar)
-
Batería interna de iones de litio
-
-
-
Encontramos un nuevo número de modelo escondido entre las marcas de FCC y el puerto Lightning: A1657.
-
Estamos muy emocionados de ver el primer mouse recargable de Apple, pero tenemos que decir que es un lugar curioso para un puerto Lightning.
Apple’s opt-criticized decision to put the lightning port on the bottom makes a lot of sense to me— the clear message here is that when you see “mouse battery low” warnings, plug your mouse in to charge the next time you walk away from your computer— over lunch, or at the end of the day. Since it’s a 2-month-lasting battery and Apple’s low battery predictions are often accurate and give you plenty of time, you really have 2-3 days before it’s dead, so even the most forgetful of users will have multiple chances to plug the thing in overnight.
But this really seems like an intentional design choice to prevent users from using the mouse with a cable plugged-in permanently. Corded mice almost always have the cable built-in rather than having a female plug for good reason— moving a mouse around can and will put a lot of strain on a plug. So Apple made the decision that rather than warning users not to use the mouse while plugged in for extended periods of time, to make it impossible to use while charging.
A few (too many) have griped about the horrible seething pain of not having the freedom to ignore low battery warnings repeatedly and then once it’s dead, use it as a corded mouse for a while. Apple decided that if you choose to ignore all the warnings, you can later let your mouse charge for 2 1/2 hours without using it… but in reality, if you just need a charge to last until the end of the day, a 15-30 minute charge will do the job, and you can charge it the rest of the way over night.
There have been so many gripes about this from the Apple community, it feels like the Apple-hating 1990s all over again. Here’s the deal— the product works well and gives plenty of leeway. It doesn’t work like your favorite rock-bottom-priced PC accessory, but it also doesn’t instant-die without warning, nor does the internal connector break after a year like that PC accessory. Both build quality and design (in terms of user experience) are responsible for a mouse that’ll last a decade or more.
-
-
-
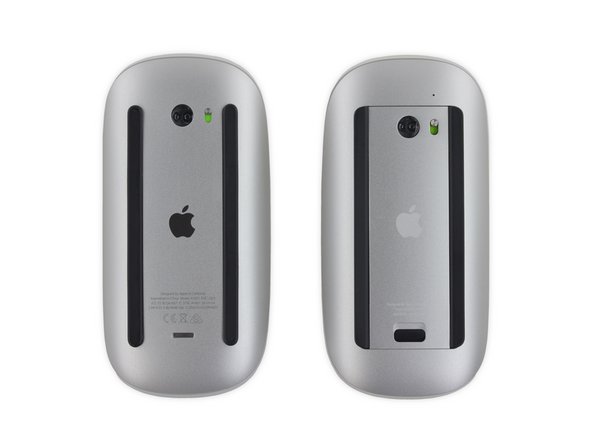
A primera vista, el nuevo Magic Mouse (izquierda) se parece a su hermano mayor. ¡Ratones gemelos!
-
Sin embargo, desde abajo, las diferencias son más evidentes.
-
Obviamente, el Magic Mouse 2 recargable ha prescindido de la puerta de la batería y ha cambiado el pestillo de la batería por su nuevo puerto Lightning.
-
Apple también cambió el color de la impresión y eliminó el LED de estado, tal vez para que combine con el resto de los periféricos.
-
-
-
Esta no es nuestra primera vez con un Magic Mouse, así que sabemos que tendremos que poner nuestro iOpener a trabajar.
-
En el modelo anterior, un fuerte adhesivo aseguraba el vientre de aluminio al ratón. No esperamos que este modelo sea diferente en ese sentido.
esos adhesivos donde los venderan???
-
-
-
-
Apple ha mencionado que su ratón tiene un "diseño de pie optimizado". Pensamos en despegar esos pies por si el nuevo modelo escondía tornillos debajo.
-
Después de mucho calor y media docena de herramientas de palanca encajadas debajo de la carcasa, el ratón se libera parcialmente del lío pegajoso que se encuentra debajo.
-
Eones más tarde, finalmente separamos la carcasa inferior del ratón y obtenemos nuestra primera vista de su (aún pegajoso) esqueleto.
is the lower casing material now real aluminium or just aluminium looking plastic as it was before?
It was NEVER silver painted plastic. Maybe you should have a closer look - VERY thin, hardened aluminium can appear _like_ plastic, but be assured - it's REAL aluminium. This isn't HP here.
well, having a closer look at my magic mouse 1, all i see is where the shinier silver-colored outer metallic coating has worn away in a splotchy and spotty manner from where my fingers gripped it on both sides; gross. what's underneath looks and feels very much like gray plastic.
so, is the new 2 a single piece of solid aluminum? really want to know, especially for that price. $80 for a mouse that will need a new battery in 2-3 years AND has it's outer coating disintegrate to human touch is not a good deal.
PS -
tuck it guy if u dnt
do it why, heavens open all day. not headed there why ask
pull your finger out of your whatever - it's aluminium and always been aluminium. Repaired a dozen of these, so yeah - aluminium.
Unless you have a cheap chinese knockoff not genuine magic mouse :D
DigiHead -
I’m a little perplexed by this as I have both iterations in front of me. While I only needed my thumbnails to separate the case on both, my Magic Mouse 1 is, without doubt, Aluminum. The Magic Mouse 2 base is just regular silver coloured plastic.
Mit dem Wissen, wie und wo die vier Haken sitzen, ist das Öffnen der Maus auch ohne das mühsame Entfernen des Klebers ganz einfach: In den Ecken nacheinander mit einem Spatel unter die Kante des Oberteils fassen, mit dem Spatel das Oberteil seitlich verschieben, so dass der Haken herausspringt. Damit ist das Öffnen eine Sekundensache.
There is an easier way to taking this apart, if you didnt already know and you are looking to repair one of these this will help. All that needs to be done is to pry the top half along the sides with a flat head screw driver, you should hear a click. Repeat this u till all is off. https://youtu.be/thNxWVfLrr4 here is the video i found for reference, this way is a lot better as you can repair it in a shorter amount of time and it is less damaging
-
-
-
Abrir cuatro clips de plástico abiertos nos permite llegar al compartimento de la batería.
-
Atento al acrílico transparente. Está pintado solo en la parte inferior, dejando la parte superior y los lados despejados, ¡así de fácil!
-
Con la carcasa superior levantada, obtenemos una visión clara de lo que hace que este ratón sea tan sensacional, esa matriz capacitativa.
-
-
-
¡Por fin, algo que entendemos! ¡Tornillos! Desafortunadamente, están fijando un soporte sobre un cable plano que nos impide separar las partes del ratón por el momento... pero bueno, por lo menos ese cable plano hará de cinturón de seguridad y le permitirá al ratón soportar mejor las caídas.
-
Finalmente separada de la base del ratón, la carcasa superior proporciona una vista más clara de su matriz capacitiva táctil.
-
Un pequeño muelle proporciona cierta resistencia y distribuye la fuerza cuando se hace clic en el ratón, lo que hace que parezca que el pequeño botón de la derecha ocupa todo el ancho del mouse. ¡Guaay!
https://guide-images.cdn.ifixit.com/igi/...
You broke the lock, top-right side !!Right-click result when left-clicking... it was that "little spring" all along!
"A little spring provides some resistance and distributes force when the mouse is clicked, making it seem like the small button on the right occupies the whole width of the mouse. Cooool!
My Magic Mouse 2, annoyingly and frequently delivered right-clicks when left-clicking. Many posts on line mention this, and suggest settings, resets and other software/electronic remedies: none of these worked for me. Plus my other Magic Mouse (Type 1) did not do this.
Emboldened by this article to open it, I inspected the little spring, its attitude, and where it landed on the underside of the top.
Cut to the chase: I aligned it crossways to better center it on the dark plastic rib which the end touches, and for good measure, bent it up slightly to increase the upward force on the mouse top.
And... fixed! No more annoying right-click outcomes of left-clicking.
P.S: The little spring appears to provide ALL the resistance...
-
-
-
¡Esta placa lógica tiene muy buena pinta!
-
Solución Bluetooth de velocidad de datos mejorada de chip único Broadcom BCM20733
-
Chip desconocido 303S0499, probablemente un controlador táctil patentado de Apple
-
Chip de carga NXP 1608A1
-
Chip Texas Instruments 56AYZ21
-
Chip ST Microelectronics 72 MHz de 32 bits RISC ARM Cortex-M3 STM32F103VB
Good morning, I'm speaking from Brazil.
Could you indicate me a supplier of the integral card (photo 8), because my Mac is not recognizing the bluetooth of the magic mouse 2 . Thank you very much, I look forward to it.
Bom dia, estou falando do Brasil.
Você poderia me indicar um fornecedor da placa integral (photo 8), pois meu Mac não está reconhecendo o bluetooth do magic mouse 2 . Muito obrigado, aguardo.
-
-
-
Escondido debajo de la placa lógica, encontramos un pequeño interruptor que permite que el ratón haga su clic (sin motor háptico de momento).
-
Afortunadamente, solamente está sujeto por la placa lógica, y es un alivio bienvenido después de lidiar con el resto de este martirio.
-
Como parte común de fallas para ratones, se aprecia que Apple haya usado un interruptor bastante estándar y fácil de encontrar, aunque su reemplazo requerirá pelear con todo ese pegamento (y soldar el interruptor de reemplazo).
-
-
-
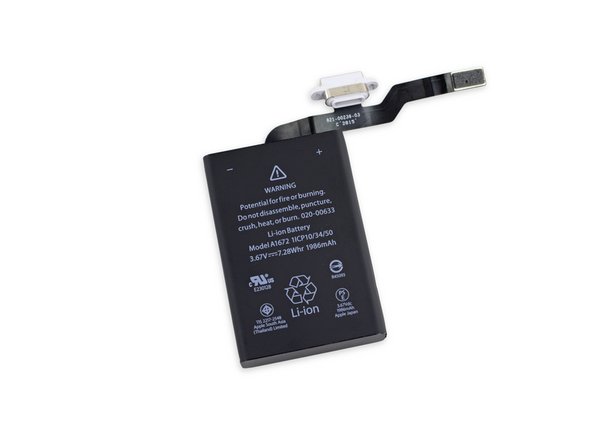
Dirigimos nuestra atención a la batería, que se ajusta muy ceñida en su pequeña caja de plástico, por lo que es un fastidio extraerla.
-
Resulta que eso no es lo único que la mantiene en su sitio, también hay un montón de pegamento con el que lidiar. Quitar la batería es aún menos divertido de lo que temíamos.
-
Este pequeño accesorio no es ningún chiste: ¡la batería de ion-litio de 3,67 V, 7,28 Wh y 1986 mAh contiene aproximadamente un 9% más de jugo que el del iPhone 6s!
-
-
-
Puntuación de reparabilidad del Magic Mouse 2: 2 de 10 (siendo 10 más fácil de reparar)
-
El puerto Lightning y la batería se pueden reemplazar (como un solo componente), independientemente de la placa lógica (si consigues abrir el dispositivo).
-
Reemplazar un interruptor que no funciona bien requiere abrirse paso a través de pegamentos fuertes y soldaduras.
-
El uso excesivo de adhesivo fuerte hace que sea muy difícil quitar el panel posterior, dificultando el acceso a todos los componentes internos.
-
Es muy difícil abrir el mouse sin dañar los componentes internos si no dispones de un manual de servicio, como el sensor óptico y el interruptor de encendido.
I don't quite agree. I mean, I can just remove the glued-on lower case with a screwdriver in a few minutes. I would give it a 7/10 score instead.
-


Un agradecimiento especial a estos traductores:
100%


Estos traductores nos están ayudando a reparar el mundo! ¿Quieres contribuir?
Empezar a traducir ›
52 comentarios
hmmm... what was wrong with just replacing batteries?
Now we have a device that has a limited life span of about 2-5 years due to the battery (which can develop faults)....
I dont like Apple purposely creating limit life span products, and using tones of glue to make them difficult to repair - this is not good and quite distrusting of Apple... Steve Jobs would hate all this glue -- what ever happened to good well-built great designed products???
On keyboards, little. On mice, I get through a lot of batteries.
alex -
And there was plenty of glue around in Apple products where SJ was running the show.
98% of these mice will never need repairing outside warranty. That glue makes for a product that is less likely to go wrong.
Of course iFixit doesn't care [in a positive sense] about reliability. They want products that they can sell you a fix for.
alex -
On the contrary, it was after Steve Jobs return to Apple that they moved away from maintanable hardware to gluey messes. And honestly, there's nothing wrong with that. Apple banks on the fact that the vast majority of its customers will accept nigh non-existent repairability in exchange for sleek form factors, and they're absolutely right. That means that the few percent of computer users who value repairability and upgradeability can take their business elsewhere, and honestly, that sort of person wasn't in the market for an overpriced product that's more fashion accessory than it is a tool in the first place.
dbgrogg -
There was a flaw with their battery holder, I always had issues where the batteries wouldn’t make proper contact with the positive end of the AA cell, and disconnect, I fixed the problem with a blob of solder on the contact, but this was a temporary solution to a problem with the design.
Has anyone tried this?
DetroitBORG did: https://www.youtube.com/watch?v=qn6fz_6_... (at 4:14)
seems some guy is also selling a charging dock for these now to combat the terrible charging deisgn http://www.ebay.com/itm/252379999994
In step 8, photo 2 of the board top there's an unpopulated usb port footprint on the right edge of the board. Looks like they ran a revision with the usb port coming out the front.
You know what? As a repair and service engineer of 25 years, I wouldn't let iFixit ANYWHERE NEAR my Magic Mouse if they think that spinning it around on its back is a good idea - that'll scratch the plastic top shell - WHY WOULD YOU DO THAT, YOU CRAZY PEOPLE? Talk about stupid - that video is just a staff member showing off, trying to make the video "interesting" - well don't - we are not fools.
Matt you're impractically critical and it sounds like you're insecurely threatened by a company that teaches people how to fix their own stuff versus spending money on you, the bitchy "repair tradesman".
Your trumped up title does a good job at introducing the rest of you.
Guess I'll hold on to my first gen Magic keyboard and mouse rather than the inconvenience of recharging, waiting, and throwing out a less-than-friendly keyboard/mouse set. But i guess if it lasts 3-5 years that's all we can expect. I still prefer consumer-friendly devices though so I'll hold onto my first gen devices as long as I can.
where can i find those spare black feet
The battery stopped holding a charge 13 1/2 months after we bought it…out of warranty for 1 1/2 months. Apple initially said tough luck! Took some more complaining to get it a replacement. How can Apple claim to be green when you can’t replace the battery?
Thank you for your information;
typically I thought that I could open the Magic Mouse without reading any instructions…boy was I wrong! Oh well, I actually prefer Logitech or other cheaper mouses than Apple’s offering anyhow. I’ve been a loyal Apple fan since Apple began. They may be the biggest brand but they got there by royally screwing those who got them there
Bob W.
Use first version of magic mouse. Use rechargeable batteries. Saves a lot of time. No gimmicks.
My father let it sit in a drawer for a year and I fear the Li battery has lost it’s ability to charge. Seems to be a common issue with electronics today. If you leave them discharged for long enough, they won’t charge again. And with these tightly integrated batteries, fixing it becomes a hard sell.
Thanks for your great JOB, i’ve repaired my Magic Mouse 2
You have got to be kidding me with a battery that lasted (3) months.
The proprietary flat cable is soldered to the battery in a manner that no one should try to un-solder it. It’s fun to take apart, but unlikely that mortals could safely un-solder the cable from the battery. A wonderful example of an “unrepairable-by-design” item.
I was able to open the MM2 with a spudger - the plastic clips pictured in step 6 were the only thing holding the top on mine. From there I had access to the rest of the internal parts, making it easy to swap the clicker with a silent one. Worked well and was way easier than I thought… No mess with adhesive, not too much fuss with reseating the ribbon. Maybe I just got lucky?
This. Actually the whole process of tearing apart the metal cover with heat is totally not needed. Both halves are kept together with just 4 clips.
Do you have any photos/videos showing how this can be done?
Chris -
no need to remove wear strips on bottom, just twist the top shell off with plastic spudger tool - you can use screw driver but take care not to damage the plastic edges and aluminium bottom half
I have a Magic Mouse 2 and the onscreen pointer jumps all around the place.
I have looked and got all the cat hair and dust i could - yet it still jumps around.
Please advise:
There is no need to remove the glued bottom, the mouse pops open relatively easily…..four spots 1.5 inches from the front and back on both sides
Hello! I have this problem. I click on magic mouse but the key don’t come back and so I can’t click again. Can I or someone repair it? Or do I have to buy another?
Hey Paolo, if you pry off the white top using a thick guitar pick or spudger (just use force about 3 cm from the top and end of the device, inside the seams) you can bend up the spring a little bit. This may help. Alternatively, shake and tap the ouse on a table to see if anything falls out.
Laurens -
You don’t actually have to contend with any glue when disassembling this mouse. Nor do you need to solder anything. Replacing the battery/port combo could realistically take around 10 minutes for a semi skilled tech.
Hi iFixit,
Thanks for all your hard work! I have used this to tackle replacing a battery. As you say, it’s NOT easy! I thought I’d let you know I have managed to do it. I found a battery for £21.50. I didn’t bother taking the feet off, I did heat the case with a hair dryer and was attempting to remove the base from the the internal structure, using a few ‘plectrum’ prying leavers … !! but somehow I managed to release a couple of the four clips, I went on to undo the others and it opened! The motherboard does need to come off to get the battery ribbon under it. Out of curiosity I wondered if I could do it again, and I did! There is a knack to it, but it does save the un-gluing! Why so much glue under the battery! it ain’t going anywhere with the tight fitting enclosure around it. I removed all the double sided tape off the new battery before installing it, in case I replace it again in the future. Thanks!! For the cost of the battery I now have a piece of Apple E waste that’s now worth £40-£50!
Best, Gavin
ain’t this a kick in the cargo pants. my (purchased in 2017) MM2 has sprung to life…dunno what was going on. i pried off the skids and tried lifting the bottom shell with my spongers…but set it side…put the skids back on and pushed it to the side. i had left the bluetooth system pane open, and i saw it listed, it was turned off, so i pushed the switch to on and it now recognised….huzzah for monkey prying!
Apple updated the Magic Mouse 2 in August 2021 and dropped the “2” from the name. I’m not sure what has changed internally, but Apple said it has a longer battery life, so possibly other things have changed internally as well. That could justify a new teardown! (hint: please do)
5 Years battery's died. 2/10 to replace. Reverted to ordinary USB mouse which was actually older than the MM2. Apple should be landfill/climate change taxed to death for this kind of product.
Lucky for you to get 5 years out of it. Mine died after only 3 years with very light usage. Now it's a fancy 80 USD paperweight. Anything Apple says about the environment is pure marketing BS when they're still selling this piece of e-waste garbage to this very day.
I'm gonna replace the battery instead when it goes kaput.
Oh my gosh I hate ADHESIVE!!!!!!!!!!!!!!!! my dad's mouse stoped holding a charge (not like it was easy to tell because there's not even an indication that the thing is charged without connecting it to a Mac) had to replace the battery. It worked but I wanted to just throw the thing out and buy a new one for him( which is what apple wants)
There is a much simpler way to get into the mouse by just unclipping four clips. Check out this video: https://youtu.be/MeEmI8B5YkU
I think mine (at work) died. Just wanted to check the battery but couldn't figure out how to open it. After this guide, I think it's not worth it. I've never used an Apple product outside of my work, and I don't think I ever will.
I can confirm that the outer touch surface can be swapped between same-model mice. Even if one is black, one is white. You'll need to plug it in via lightning cable to re-recognize after assembly, and the icon color (black/white) will still reflect the original base, not the newly swapped different-colored top.