Saltar al contenido principal

Esta versión puede contener ediciones incorrectas. Cambie a la última instantánea verificada.

Qué necesitas

  1. , Tapa inferior: paso 1, imagen 1 de 1
    • Retire los ocho tornillos Phillips de 4 mm que sujetan la carcasa inferior al MacBook.

  2. : paso 2, imagen 1 de 3 : paso 2, imagen 2 de 3 : paso 2, imagen 3 de 3
    • La carcasa inferior está construida de aluminio recubierto de goma. No doble excesivamente el aluminio durante la extracción, ya que cualquier deformación permanente causará problemas de tolerancia después del reensamblaje.

    • Levante ligeramente la tapa inferior cerca de la abertura de ventilación.

    • Continúa pasando los dedos entre la parte superior e inferior hasta que salgan los clips de retención.

    • La ubicación de estos tres clips se muestra en la tercera imagen.

  3. , Batería: paso 3, imagen 1 de 1
    • Por precaución, aconsejamos que desconectes el conector de la batería de la placa lógica para evitar ninguna descarga eléctrica. Este paso es opcional y no es requerido.

    • Usar la punta plana de una spudger para levantar el conector de la batería de su enchufe en la placa lógica.

    • Puede ser mas fácil usar tus uñas para levantar el conector en ambos lados

  4. Este paso está sin traducir. Ayuda a traducirlo

    : paso 4, imagen 1 de 1
    • Use a spudger to pry the AirPort/Bluetooth ribbon cable connector straight up off the logic board.

    • Gently bend the AirPort/Bluetooth ribbon cable away from the fan.

  5. Este paso está sin traducir. Ayuda a traducirlo

    : paso 5, imagen 1 de 3 : paso 5, imagen 2 de 3 : paso 5, imagen 3 de 3
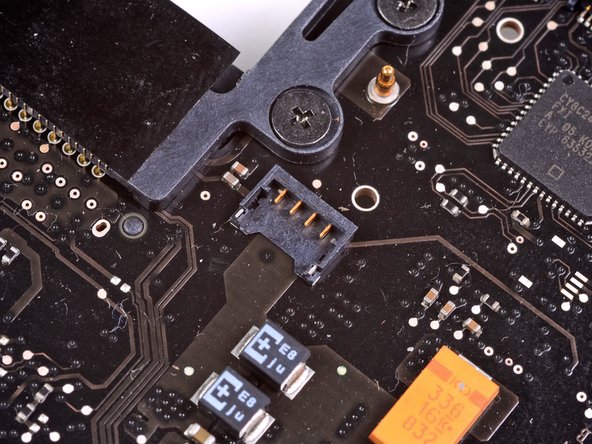
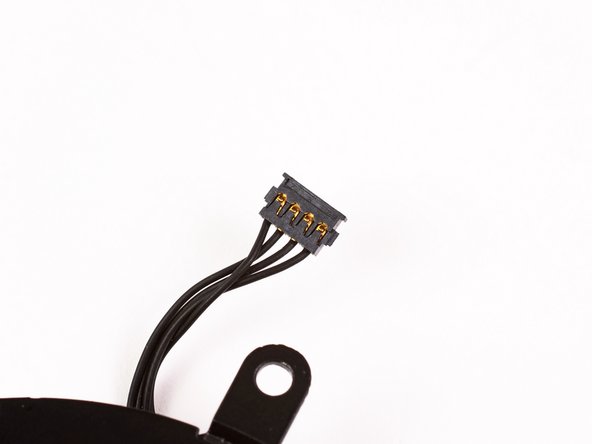
    • Use the flat end of a spudger to pry the fan connector straight up off the logic board.

    • It is useful to twist the spudger axially from beneath the fan cable wires to release the connector.

    • The fan socket and the fan connector can be seen in the second and third pictures. Be careful not to break the plastic fan socket off the logic board as you use your spudger to lift the fan connector straight up and out of its socket. The layout of the logic board shown in the second picture may look slightly different than your machine but the fan socket is the same.

  6. Este paso está sin traducir. Ayuda a traducirlo

    : paso 6, imagen 1 de 1
    • Remove the following three screws securing the fan to the upper case:

    • One 7.1 mm Phillips

    • Two 5.3 mm Phillips

  7. Este paso está sin traducir. Ayuda a traducirlo

    : paso 7, imagen 1 de 1
    • Lift the fan out of the upper case.

Linea de Meta

79 personas más completaron esta guía.

3 comentarios

Replaced the fan with an used one. After booting the fan made a very loud sound as if it was running on max speed. A SMC reset fixed the issue and the fan returned to normal speed and sound.

Maurice - Contestar

Wish I had read Maurices comment. I did this fix because my fan had a noisy bearing. But I found the sound of the fan running at full speed after the replacement to be more annoying. So I swapped it back. didn’t think top reset the SMC.

Paul Ceccato - Contestar

Simple and concise…Thanks a whole bunch for the instructions.

Glenn - Contestar

Agregar Comentario

Ver Estadísticas:

Ultimas 24 horas: 3

Ultimos 7 días: 17

Ultimos 30 días: 42

Todo El Tiempo: 44,071