Introducción
Restore sound to your laptop by replacing the subwoofer and right speaker.
Qué necesitas
-
-
With the case closed, place the Unibody top-side down on a flat surface.
-
Depress the grooved side of the access door release latch enough to grab the free end. Lift the release latch until it is vertical.
-
-
-
Grab the white plastic tab and pull the battery up and out of the Unibody.
Great tutorial ! great step !
-
-
-
Remove the following eight screws securing the lower case to the chassis:
-
One 3 mm Phillips screw.
-
Three 13.5 mm Phillips screws.
-
Four 3.5 mm Phillips screws.
Make sure you have a good quality Phillips screwdriver. Mine had removable tips and had a small play at the connection. As a result I didn't have a good feel and damaged my screws (those securing the fan and the top left in step 23). Game over for me installing new thermal paste...
Be very carefull with your screws! Especially those on the inside.
You can get away with a Phillips #00 for many of the screws involved but the 4 at the bottom case split are likely to strip if you don’t use a JIS #00 or, in a pinch, a Phillips #000.
I used the Phillips #00 tip from my Pro Tech Toolkit, and it worked well enough. But yes, maybe #000 might have been better on the lower row of screws. Note to myself: Always read the comments first.
When replacing these screws, the order to replace them in is as follows:
1, Top left
2. Top right
3. Top center-left
4. Top center-right
5. Bottom center-right
6. Bottom center-left
7. Bottom right
8. Bottom left
I hope this information is helpful.
I followed my usual process of putting in all the screws loosely, then tightening them gradually in distributed pattern, to help ensure that the panel settles in place evenly. But maybe some orders are better.
-
-
-
Using both hands, lift and remove the lower case off the upper case.
Thanks for the guide!
It's implicit in the two photos, but worth mentioning because it blocked my progress in this step for a bit: You have to put the release latch back into its horizontal, closed position before you can lift off the lower-case panel.
-
-
-
-
Using the flat end of a spudger, pry the subwoofer connector straight up off the logic board.
Me, too, broke the subwoofer connector from the motherboard. I'd suggest removing the padding first so that you can see what kind of connector it is, then pry it loose (insert spudger where the cables enter the connector).
DO NOT REMOVE THE SUBWOOFER CONNECTION. Step 6 IS NOT NESCESSARY.
You can complete this guide without doing step 6 just BE CAREFUL as you already should be.
Oops, I followed Step-6 and my subwoofer connector came off from the motherboard!!! Please suggest me what needs to be done now?
Happened the same to me ... step 6 is a @%#$$. You should put now a way to repair the damage done. I just have four small tin marks on the board ...
Happened the same problem to me ... step 6 is a @%#$$**%%#. You should put now a way to repair the damage done. I just have four small tin marks on the board ... and looking to sky for help
There are two variants of this connector. In one, there are pins that come up from the motherboard and the connector can be pried directly up without damage.
The other variant of the connector that everyone commenting here has is soldered to the motherboard. To repair this type, first pull off the small square of foam padding on top of the connector. Then gently pull out the four black and red wires, leaving the soldered connector attached to the logic board. After you have installed the new speaker and subwoofer, you will remove the connector on the replacement component and carefully feed the red and black wires into the connector that is still attached to the motherboard (paying careful attention to their correct order). Then replace the square of black foam.
If you have removed the soldered on the connector, your two options are to solder it on yourself or to find a repair shop that can do that for you. There are instructables online for soldering tiny components that can help you.
Reading all of these comments prior to beginning the work, I didn’t even try to investigate the type of connector my laptop had. I just DIDN’T attempt removal of this connector, worked around it, and as others have mentioned, it is truly unnecessary to remove this connector. You can move the subwoofer (after removal of its other screws) out of the way just enough to slip out the old drive and slip in the new drive.
-
-
-
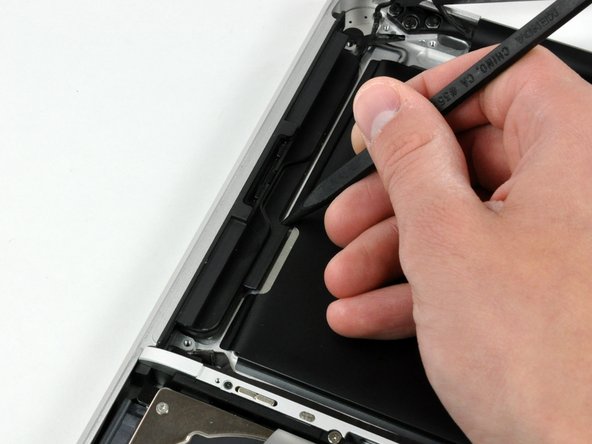
Disconnect the camera cable by pulling the male end straight away from its socket.
The lack of warning “Be careful not to pull up on the cable as you remove it from the socket.” here, as is displayed on a similar step on the “MacBook Unibody Model A1278 AirPort Card Replacement” guide, has caused me to break the cable. My WiFi is not working anymore. How can I replace only this cable? Thank you.
Bonjour J’ai eu le malheur de toucher à ce câble et depuis je n’ai plus de retro-éclairage sur mon écran. Est-ce lié ?
Hello I had the misfortune to touch this cable and since then I have no more backlight on my screen. Is it related? (but the computer works fine when I plug in a screen)
-
-
-
Remove the two Phillips screws securing the camera cable bracket to the upper case.
-
-
-
Remove the three 2.5 mm Phillips screws securing the optical drive to the upper case.
-
-
-
Peel back the small piece of black tape covering the right speaker cable.
-
Use the tip of a spudger to pry the right speaker up off the adhesive securing it to the upper case.
-
Lift the subwoofer and right speaker assembly out of the upper case.
-


To reassemble your device, follow these instructions in reverse order.
To reassemble your device, follow these instructions in reverse order.
Cancelar: No complete esta guía.
33 personas más completaron esta guía.

6 comentarios
I have good sound again, thanks.
2008 MacBook (aluminum).
The hardest part was starting the optical drives hold down screws, my jewelers screwdriver maginetic tip is weak.
Total time was about a half hour.
If all you have are Phillips screwdrivers, be very careful with the screws at the split of the bottom case and all of the internal ones. You may have to drop to a Phillips #000 if you don’t have a JIS #00, which appears to be the correct tool for them, based on the actual fit of the bits in my (iFixit) set.
I bought the speakers in Ali express for less than 9 € and my late 2008 MacBook unibody sounds well again. Thanks for your help.
Great instructions except for Step 6: CAUTION!! On some models the subwoofer connector is SOLDERED TO THE LOGIC BOARD and will BREAK if you pry it off. If you need to replace the speaker/subwoofer, comments state that you can pull back foam padding on the connector and remove the red and black wires to disconnect. You will need to reinsert the wires from new speaker to reconnect.
If you are not replacing the subwoofer and only need to remove the optical drive you DO NOT need to release the subwoofer connector shown in this step.
This is not a a1278 unibody MacBook Pro. A1278 MacBooks backs are one solid metal piece not two separate pieces. This guide is for a different MacBook Pro.
Brad Burgeson - Contestar
This guide isn’t for a pro; it’s a MacBook unibody.
Nicholas -
So, it turns out that Apple used the model code A1278 for quite a few different Mac models, including both Pro and non-Pro versions! This guide is for the non-Pro Macbooks. There’s also one for the Pro models with the same A1278 identifier.
tempelmann - Contestar