Saltar al contenido principal

MacBook Unibody Model A1278 Subwoofer & Right Speaker Replacement

Qué necesitas

  1. MacBook Unibody Model A1278 Subwoofer & Right Speaker Replacement, Access Door: paso 1, imagen 1 de 1
    • With the case closed, place the Unibody top-side down on a flat surface.

    • Depress the grooved side of the access door release latch enough to grab the free end. Lift the release latch until it is vertical.

  2. MacBook Unibody Model A1278 Subwoofer & Right Speaker Replacement: paso 2, imagen 1 de 1
    • The access door should now be raised enough to lift it up and out of the Unibody.

  3. MacBook Unibody Model A1278 Subwoofer & Right Speaker Replacement, Battery: paso 3, imagen 1 de 1
    • Be sure the access door release latch is vertical before proceeding.

    • Grab the white plastic tab and pull the battery up and out of the Unibody.

  4. MacBook Unibody Model A1278 Subwoofer & Right Speaker Replacement, Lower Case: paso 4, imagen 1 de 1
    • Remove the following eight screws securing the lower case to the chassis:

    • One 3 mm Phillips screw.

    • Three 13.5 mm Phillips screws.

    • Four 3.5 mm Phillips screws.

  5. MacBook Unibody Model A1278 Subwoofer & Right Speaker Replacement: paso 5, imagen 1 de 1
    • Using both hands, lift and remove the lower case off the upper case.

  6. MacBook Unibody Model A1278 Subwoofer & Right Speaker Replacement, Optical Drive: paso 6, imagen 1 de 1
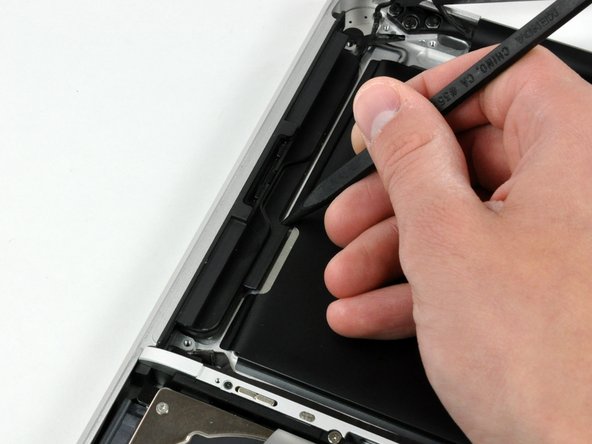
    • Using the flat end of a spudger, pry the subwoofer connector straight up off the logic board.

    • On some models, the subwoofer connector is soldered to the logic board and will break if you pry it off. If you need to replace the speaker/subwoofer, you can pull back the foam padding on the connector and remove the red and black wires to disconnect. You will need to reinsert the wires from the new speaker to reconnect.

    • If you are only removing the optical drive and not replacing the speaker/subwoofer, you do not need to disconnect this connector.

  7. MacBook Unibody Model A1278 Subwoofer & Right Speaker Replacement: paso 7, imagen 1 de 1
    • Disconnect the camera cable by pulling the male end straight away from its socket.

  8. MacBook Unibody Model A1278 Subwoofer & Right Speaker Replacement: paso 8, imagen 1 de 1
    • Use a spudger to pry the optical drive connector straight up off the logic board.

  9. MacBook Unibody Model A1278 Subwoofer & Right Speaker Replacement: paso 9, imagen 1 de 1
    • Remove the two Phillips screws securing the subwoofer to the upper case.

    • The longer of the two screws is on the right.

  10. MacBook Unibody Model A1278 Subwoofer & Right Speaker Replacement: paso 10, imagen 1 de 1
    • The subwoofer is still connected to the right speaker, so don't completely remove it just yet.

    • Lift the subwoofer off the optical drive, and set it above the computer.

  11. MacBook Unibody Model A1278 Subwoofer & Right Speaker Replacement: paso 11, imagen 1 de 1
    • Remove the two Phillips screws securing the camera cable bracket to the upper case.

    • The leftmost screw may remain captive in the camera cable.

  12. MacBook Unibody Model A1278 Subwoofer & Right Speaker Replacement: paso 12, imagen 1 de 1
    • Remove the three 2.5 mm Phillips screws securing the optical drive to the upper case.

  13. MacBook Unibody Model A1278 Subwoofer & Right Speaker Replacement: paso 13, imagen 1 de 1
    • Lift the optical drive from its right edge and pull it out of the computer.

    • The hard drive cable may become disconnected from the logic board when removing the optical drive. Ensure it is connected during reassembly.

  14. MacBook Unibody Model A1278 Subwoofer & Right Speaker Replacement, Subwoofer & Right Speaker: paso 14, imagen 1 de 3 MacBook Unibody Model A1278 Subwoofer & Right Speaker Replacement, Subwoofer & Right Speaker: paso 14, imagen 2 de 3 MacBook Unibody Model A1278 Subwoofer & Right Speaker Replacement, Subwoofer & Right Speaker: paso 14, imagen 3 de 3
    • Peel back the small piece of black tape covering the right speaker cable.

    • Use the tip of a spudger to pry the right speaker up off the adhesive securing it to the upper case.

    • Lift the subwoofer and right speaker assembly out of the upper case.

Conclusión

To reassemble your device, follow these instructions in reverse order.

33 personas más completaron esta guía.

6 comentarios

I have a Macbook Pro 13, mid-2009, A1278 and the speaker broke it.

Can I put a speaker A1278 a macbook pro 13 mid-2012?

All speakers A1278 model work in any model of Macbook Pro A1278, regardless of the year?

Mrgustavo - Contestar

I have good sound again, thanks.

2008 MacBook (aluminum).

The hardest part was starting the optical drives hold down screws, my jewelers screwdriver maginetic tip is weak.

Total time was about a half hour.

kqc7011huts - Contestar

If all you have are Phillips screwdrivers, be very careful with the screws at the split of the bottom case and all of the internal ones. You may have to drop to a Phillips #000 if you don’t have a JIS #00, which appears to be the correct tool for them, based on the actual fit of the bits in my (iFixit) set.

Bill Cole - Contestar

Hi guys, does anyone know if the subwoofer spare part is the same for the model A1278 from late 2008 and 2009 and so on? thanks in advance

Micro - Contestar

I bought the speakers in Ali express for less than 9 € and my late 2008 MacBook unibody sounds well again. Thanks for your help.

Antonio Alvarez - Contestar

Agregar Comentario

Ver Estadísticas:

Ultimas 24 horas: 1

Ultimos 7 días: 18

Ultimos 30 días: 102

Todo El Tiempo: 44,071