Saltar al contenido principal

MacBook Unibody Model A1278 Logic Board Replacement

Qué necesitas

  1. MacBook Unibody Model A1278 Logic Board Replacement, Access Door: paso 1, imagen 1 de 1
    • With the case closed, place the Unibody top-side down on a flat surface.

    • Depress the grooved side of the access door release latch enough to grab the free end. Lift the release latch until it is vertical.

  2. MacBook Unibody Model A1278 Logic Board Replacement: paso 2, imagen 1 de 1
    • The access door should now be raised enough to lift it up and out of the Unibody.

  3. MacBook Unibody Model A1278 Logic Board Replacement, Battery: paso 3, imagen 1 de 1
    • Be sure the access door release latch is vertical before proceeding.

    • Grab the white plastic tab and pull the battery up and out of the Unibody.

  4. MacBook Unibody Model A1278 Logic Board Replacement, Lower Case: paso 4, imagen 1 de 1
    • Remove the following eight screws securing the lower case to the chassis:

    • One 3 mm Phillips screw.

    • Three 13.5 mm Phillips screws.

    • Four 3.5 mm Phillips screws.

  5. MacBook Unibody Model A1278 Logic Board Replacement: paso 5, imagen 1 de 1
    • Using both hands, lift and remove the lower case off the upper case.

  6. MacBook Unibody Model A1278 Logic Board Replacement, Mid Wall: paso 6, imagen 1 de 1
    • Remove the four 10.3 mm Phillips screws securing the mid wall to the upper case.

  7. MacBook Unibody Model A1278 Logic Board Replacement: paso 7, imagen 1 de 1
    • Lift the mid wall out of the upper case.

  8. MacBook Unibody Model A1278 Logic Board Replacement, Fan: paso 8, imagen 1 de 3 MacBook Unibody Model A1278 Logic Board Replacement, Fan: paso 8, imagen 2 de 3 MacBook Unibody Model A1278 Logic Board Replacement, Fan: paso 8, imagen 3 de 3
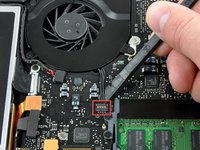
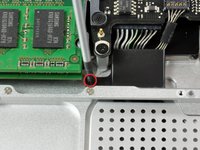
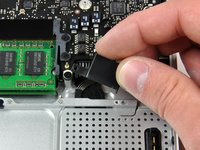
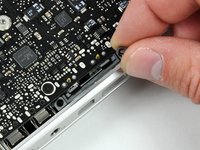
    • Use a spudger to pry the fan connector straight up off the logic board.

    • It is useful to twist the spudger axially from beneath the fan cable wires to release the connector.

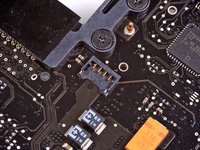
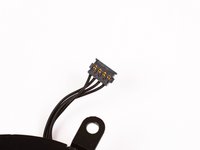
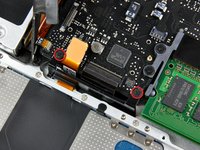
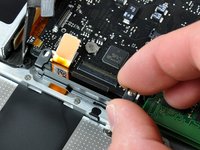
    • The fan socket and the fan connector can be seen in the second and third pictures. Be careful not to break the plastic fan socket off the logic board as you use your spudger to lift the fan connector straight up and out of its socket. The layout of the logic board shown in the second picture may look slightly different than your machine but the fan socket is the same.

  9. MacBook Unibody Model A1278 Logic Board Replacement: paso 9, imagen 1 de 1
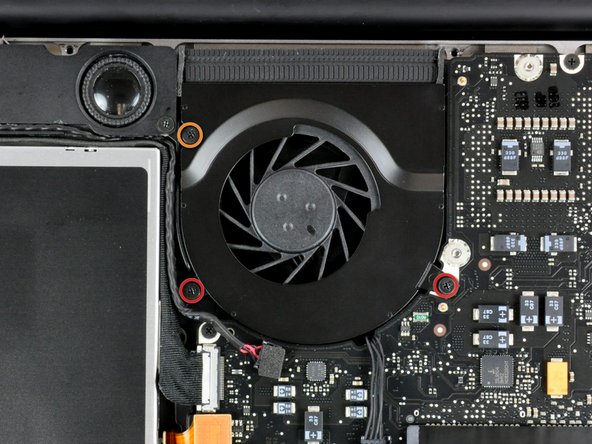
    • Remove the following three screws securing the fan to the upper case:

    • Two 5 mm Phillips screws.

    • One 7 mm Phillips screw.

    • The longer of the three screws belongs in the upper left corner of the fan.

  10. MacBook Unibody Model A1278 Logic Board Replacement: paso 10, imagen 1 de 1
    • Lift the fan out of the upper case.

  11. MacBook Unibody Model A1278 Logic Board Replacement, Logic Board: paso 11, imagen 1 de 1
    • In the next few steps, you will disconnect the highlighted cables which connect the logic board to the upper case.

    • Each connector is different, so the following steps will show you how disconnect each in detail.

  12. MacBook Unibody Model A1278 Logic Board Replacement: paso 12, imagen 1 de 2 MacBook Unibody Model A1278 Logic Board Replacement: paso 12, imagen 2 de 2
    • Remove the single Phillips screw securing the battery cable cover to the upper case.

    • Remove the battery cable cover from the upper case.

  13. MacBook Unibody Model A1278 Logic Board Replacement: paso 13, imagen 1 de 1
    • Use a spudger to pry the battery level indicator cable connector straight up off the logic board.

  14. MacBook Unibody Model A1278 Logic Board Replacement: paso 14, imagen 1 de 1
    • Disconnect the battery cable connector by pulling it straight away from the logic board.

    • If you cannot grasp the cable with your fingers, a spudger and tweezers may be helpful for removal.

  15. MacBook Unibody Model A1278 Logic Board Replacement: paso 15, imagen 1 de 3 MacBook Unibody Model A1278 Logic Board Replacement: paso 15, imagen 2 de 3 MacBook Unibody Model A1278 Logic Board Replacement: paso 15, imagen 3 de 3
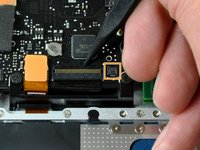
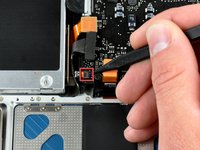
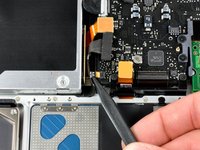
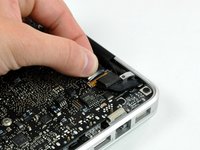
    • Using the tip of a spudger, flip up the keyboard ribbon cable retaining flap.

    • Pull the keyboard ribbon cable straight out of its socket.

    • If the smaller connector at the right side of the keyboard ribbon cable is populated by another small black ribbon cable, remove it in a similar way to the above.

  16. MacBook Unibody Model A1278 Logic Board Replacement: paso 16, imagen 1 de 1
    • Use the flat end of a spudger to pry the trackpad connector straight up off the logic board.

  17. MacBook Unibody Model A1278 Logic Board Replacement: paso 17, imagen 1 de 2 MacBook Unibody Model A1278 Logic Board Replacement: paso 17, imagen 2 de 2
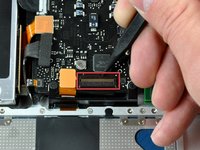
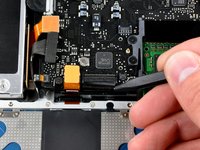
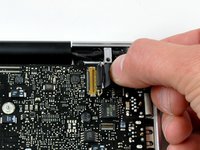
    • Use the tip of a spudger to flip up the locking lever to release the IR sensor ribbon cable from its socket.

    • Use the tip of a spudger to pull the IR sensor ribbon cable straight away from the logic board.

  18. MacBook Unibody Model A1278 Logic Board Replacement: paso 18, imagen 1 de 1
    • Use the flat end of a spudger to pry the hard drive cable connector straight up off the logic board.

  19. MacBook Unibody Model A1278 Logic Board Replacement: paso 19, imagen 1 de 1
    • Use the flat end of a spudger to pry the optical drive cable connector straight up off the logic board.

  20. MacBook Unibody Model A1278 Logic Board Replacement: paso 20, imagen 1 de 1
    • Disconnect the display data cable by pulling the male end straight away from its socket.

  21. MacBook Unibody Model A1278 Logic Board Replacement: paso 21, imagen 1 de 1
    • Use the flat end of a spudger to pry the subwoofer cable connector straight up off the logic board.

  22. MacBook Unibody Model A1278 Logic Board Replacement: paso 22, imagen 1 de 2 MacBook Unibody Model A1278 Logic Board Replacement: paso 22, imagen 2 de 2
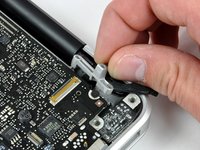
    • Grab the plastic pull tab secured to the display data cable lock and rotate it toward the DC-in side of the computer.

    • Pull the display data cable connector straight away from its socket.

  23. MacBook Unibody Model A1278 Logic Board Replacement: paso 23, imagen 1 de 2 MacBook Unibody Model A1278 Logic Board Replacement: paso 23, imagen 2 de 2
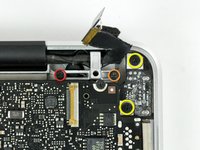
    • Remove the following two screws securing the display data cable bracket to the upper case:

    • One 7mm Phillips screw.

    • One 5mm Phillips screw.

    • Remove the two 7 mm Phillips screws from the DC-in board.

    • Lift the display data cable bracket out of the upper case.

  24. MacBook Unibody Model A1278 Logic Board Replacement: paso 24, imagen 1 de 2 MacBook Unibody Model A1278 Logic Board Replacement: paso 24, imagen 2 de 2
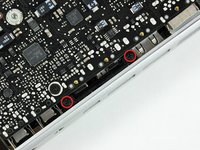
    • If present, remove the two 4mm Phillips screws securing the bottom case clip to the upper case.

    • Lift the bottom case clip out of the upper case.

  25. MacBook Unibody Model A1278 Logic Board Replacement: paso 25, imagen 1 de 2 MacBook Unibody Model A1278 Logic Board Replacement: paso 25, imagen 2 de 2
    • Remove the two 5mm Phillips screws securing the keyboard flex bracket to the upper case.

    • Lift the keyboard flex bracket out of the upper case.

  26. MacBook Unibody Model A1278 Logic Board Replacement: paso 26, imagen 1 de 1
    • Use the tip of a spudger to release the microphone from the upper case.

  27. MacBook Unibody Model A1278 Logic Board Replacement: paso 27, imagen 1 de 2 MacBook Unibody Model A1278 Logic Board Replacement: paso 27, imagen 2 de 2
    • Remove the following five screws securing the logic board to the upper case:

    • Four 3mm Phillips screws.

    • One 3.5mm Phillips screw.

    • Lift the logic board from its left edge and pull it out of the upper case.

  28. MacBook Unibody Model A1278 Logic Board Replacement, Heat Sink: paso 28, imagen 1 de 1
    • Remove the four 8.5 mm Phillips screws securing the heat sink to the logic board.

    • A spring is held under each of these screws.

  29. MacBook Unibody Model A1278 Logic Board Replacement: paso 29, imagen 1 de 1
    • Use the flat end of a spudger to pry the thermal sensor connector up off the logic board.

  30. MacBook Unibody Model A1278 Logic Board Replacement: paso 30, imagen 1 de 1
    • Gently lift the heat sink off the logic board.

    • If you need to mount the heat sink back into the laptop, we have a thermal paste guide that makes replacing the thermal compound easy.

  31. MacBook Unibody Model A1278 Logic Board Replacement, Logic Board: paso 31, imagen 1 de 1
    • Disconnect the DC-In Board from the logic board by pulling its connector straight away from the socket on the logic board.

  32. MacBook Unibody Model A1278 Logic Board Replacement: paso 32, imagen 1 de 1
    • Use the flat end of a spudger to pry the left speaker connector up off the logic board.

  33. MacBook Unibody Model A1278 Logic Board Replacement: paso 33, imagen 1 de 1
    • Use the flat end of a spudger to pry the microphone connector up off the logic board.

  34. MacBook Unibody Model A1278 Logic Board Replacement: paso 34, imagen 1 de 1
    • Use the flat end of a spudger to separate the adhesive securing the left speaker assembly to the logic board.

  35. MacBook Unibody Model A1278 Logic Board Replacement: paso 35, imagen 1 de 1
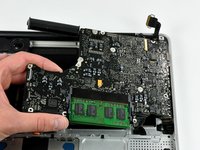
    • Release the tabs on each side of the RAM chip by simultaneously pushing each tab away from the chip.

    • These tabs lock the chip in place and releasing them will cause the chip to "pop" up.

  36. MacBook Unibody Model A1278 Logic Board Replacement: paso 36, imagen 1 de 1
    • After the RAM chip has popped up, pull it straight out of its socket.

    • Repeat this process if a second RAM chip is installed.

    • When reinstalling your logic board, don't forget to apply a new layer of thermal paste.

Conclusión

To reassemble your device, follow these instructions in reverse order.

76 personas más completaron esta guía.

11 comentarios

alright. I'm that guy that broke the fan socket off the logic board... gulp... help??

David - Contestar

I have a A128 late 2008 13" MacBook with 2ghz processor. Can I upgrade the logic board to a 2.4ghz logic board that I buy I eBay for the same model I have a1278? Can I simply swap it out? The options for my model were 2ghz or 2.4ghz so I would like to extend the life of my Macbook by adding the 2.4ghz. So is it a simple swap out if I can get my hands on a 2.4ghz logic board from a A1278? THANKS!

14vs35 - Contestar

I would love to have the answer too, please help us.

Leo Etcheverry -

Just to reiterate with some more info: I have a late 2008 Macbook 13" A1278 MB466LL/A that is 2Ghz. If I bought a 2.4ghz logic board would I be able to simply swap out my current 2ghz board and replace it with this 2.4ghz board? Would it be an exact fit with no issues at all and would I just be able to boot it right back up with no software or operating system issues (ie. booting up with a completely different logic board, of course same model but just the 2.4ghz version)?? I really apprciate any advice for comfort before I invest money into my older Macbook.

Best Regards,

-Ruperto XIII Jr. M.S. M.H B.A. C.P. & M.B.A

14vs35 - Contestar

Did anyone ever get an answer to this question?

Tony Bergen -

Agregar Comentario

Ver Estadísticas:

Ultimas 24 horas: 8

Ultimos 7 días: 28

Ultimos 30 días: 174

Todo El Tiempo: 147,070