Esta versión puede contener ediciones incorrectas. Cambie a la última instantánea verificada.
Qué necesitas
-
-
Con la carcasa cerrada, coloca el Unibody con la parte superior hacia abajo sobre una superficie plana.
-
Presiona el lado ranurado de la pestaña de apertura de la puerta de acceso, lo suficiente como para poder agarrar el extremo libre. Levanta la pestaña de apertura hasta que quede vertical.
-
-
-
-
Retira los siguientes ocho tornillos que aseguran la carcasa inferior al chasis:
-
Un tornillo Phillips de 3 mm.
-
Tres tornillos Phillips de 13.5 mm.
-
Cuatro tornillos Phillips de 3.5 mm.
-
-
Este paso está sin traducir. Ayuda a traducirlo
-
Use a spudger to pry the fan connector straight up off the logic board.
-
-
Este paso está sin traducir. Ayuda a traducirlo
-
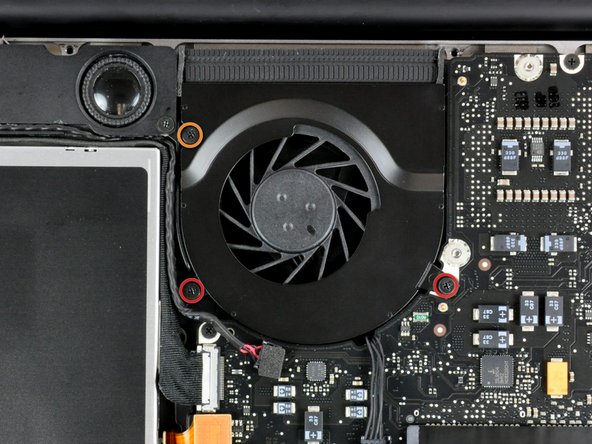
Remove the following three screws securing the fan to the upper case:
-
Two 5 mm Phillips screws.
-
One 7 mm Phillips screw.
-


Cancelar: No complete esta guía.
113 personas más completaron esta guía.

5 comentarios
This doesn't look ANYTHING like my A1278. You should check that not every A1278 is the same.
All Non-Retina 13" MacBook Pros and the Late 2008 Aluminum MacBook have the same A1278 Model Number (I guess due to the almost identical chassis).
Bonjour. j’ai bien réalisé toutes les étapes mais l’ordinateur ne redémarre plus et l’écran s’allume mais reste “sombre” (pas d’apparition de la pomme non plus)…
J’ai réinstallé les anciens ventilateurs mais le problème persiste (initialement, j’avais bien vérifié que mon macbook s’allumait correctement avant le changement des ventilos).
Quelqu’un aurait une solution? Les forums indiquent le reset SMC, mais ça ne donne rien… Merci
Vérifie la petite prise qui relie le chassis principal avec l’écran. Elle se débranche facilement sans crier gare, l’écran fonctionne anormalement ou pas du tout et la pomme au dos reste éteinte. C’est pas grave, rien n’est cassé mais c’est c….t ! A rebrancher avec précaution. Apple adore les connecteurs minuscules fragiles. Ceci dit je ne remplacerai pas mon Mac de sitôt !
This is a very straightforward job. I was on the point of changing my laptop when I realised how easily and cheaply I could change the fan, getting rid of the annoying noise of a worn out fan. One tip: use a vacuum cleaner to clear the dust from the air intake and general area of the fan.