Introducción
Utiliza esta guía para sustituir la unidad óptica de su MacBook Pro. La placa Bluetooth y el cable de la unidad óptica no se incluyen con una unidad óptica nueva.
Qué necesitas
-
-
Retira los diez tornillos que aseguran la carcasa inferior al ordenador:
-
Tres tornillos Phillips de 13.5 mm
-
Siete tornillos Phillips de 3 mm.
-
-
-
Introduce los dedos entre la carcasa inferior y la rejilla de ventilación, y levántala para liberar los dos clips que sujetan la carcasa inferior a la superior.
-
Retira la carcasa superior
-
-
-
Si está presente, agarre la lengüeta de plástico unida al conector de la batería y tire de ella hacia el borde frontal del dispositivo. En los modelos Late-2011, el conector de la batería no tiene lengüeta y es simplemente un enchufe que se inserta directamente en la placa base.
This step is a little difficult in reverse, that is, when re-attaching the battery. It helps to tilt the laptop up so you can see the edge of the board that accepts the plug. It may look like there are two slots for it, it goes in the bigger slot that is further away from the board.
Is this step really necessary? It is not part of the instructions how to replace the HDD in Apple's User Manual of the 2011 17" MBP.
As it says in the step: "Whenever working near the logic board, it is always wise to first disconnect the battery to avoid short circuits." It is not required, but it is simple insurance to avoid a $1000+ repair should you accidentally short components on the board with something metal.
There was no tab on my model. Battery is affixed to board and screws must be removed.
Mine also, and looks as if removing connector could damage motherboard.
Stephen -
The battery on my 17” mid-2010 (MC024LL/A -A1297 ) is held by 3 specialty screws CR-V1 (3-wings similar to Mercedes-Benz tri-star)
It has a tab which I pulled straight up
The connector to the motherboard came away easily by pulling toward the front edge.
* There is no tab on the A1297 (late 2011) model's battery connector. Be careful with the connector, it chips off the edges easily! Otherwise the same as bhodges2 & Stephen's notes.
** (Pleas also include the exact Model and Part numbers like P/N: MD311D/A; Mod.: A1297 in the comments and notes for your MBP)
Why are there no guides for the Late 2011 17" MacBook Pro A1297 (2.4GHz i7 quad core, MD311LL/A)??? I just replaced the RAM in mine and discovered that not only is there no tab on the battery connector, but the connector pulls straight up, perpendicular to the logic board, rather than parallel. I almost ripped the wires out of the connector by trying to pull it out parallel to the logic board like this guide instructed! After finally getting it out, my advice to those with the Late 2011 model is to use a spudger to loosen the edges of the connector then lift the connector straight up to get it out safely.
I replaced the display on my late 2011 model and noticed that it was quite different than the tutorial given here so I detailed all the differences to help others with late-2011 models on my blog: http://johnfixesstuff.blogspot.com/2014/...
jmueller -
With some dexterity and carefulness, the MagSafe could be removed from its place without the need to remove the whole logic board!
Same here, I used a head-band light to see it and got it done without removing anything but the battery connection, the charging port and the display data cable. Then I had to do it again because amazone sent me the wrong charging port, the board has different width between screw holes, and on closer look, different components soldered on, also. AND, one is labeled 2008, the other 2009… make sure you get the correct one, the other ( “wrong”? ) might work, but I’m not risking it! So why does the 2008 fit in my 17” macbook pro(5,2) mid-2009 and the one labeled 2009 does not fit ? It is what it is…
The battery on my 17” mid-2010 (MC024LL/A -A1297 ) is held by 3 specialty screws CR-V1 (3-wings similar to Mercedes-Benz tri-star)
It has a tab which I pulled straight up
The connector to the motherboard came away easily by pulling toward the front edge.
-
-
-
Utiliza la punta de un spudger para empujar el pequeño retén de plástico del cable y separarlo de la toma del cable de la cámara, de modo que quede espacio suficiente para retirar el cable de la cámara.
This step does not apply to the A1297.
Yes, as Katherine says, this does not seem to apply to the early 2011 model. The camera cable is instead attached to the logic board in the corner between the fan and the optical drive. You pull it out horiontally (and carefully, perhaps with help from the spudger tip at the "wings" on the end of the cable.
-
-
-
Tira del cable de la cámara hacia la abertura de la unidad óptica para desconectarlo de la placa lógica.
My A1297 looks very different from this picture. The camera cable is not affixed with any plastic piece, it was a small blade connector that was at the top left corner of the mobo. It is removed by pulling it horizontally from the socket. It is my least favorite type of cable connection and the one most likely to be bent in the process (or the socket, be careful).
My mid2010 1297 was also different. Camera cable is per "step 7" here (http://www.shareyourrepair.com/2014/11/h...). Very very delicate.
-
-
-
-
Tira con cuidado del cable Bluetooth hacia los ventiladores para desconectarlo de la placa Bluetooth.
Once again, this step, and the rest that follow regarding the bluetooth board, bears no resemblance to my A1297. Luckily, it looks like things have been made simpler. Remove the camera cable from it's socket, the bluetooth cable (flat, black, just shy of .5" wide), and the DVD cable from their sockets. Remove the screw from the top right side of the black plastic piece that holds the bluetooth board and all the skinny black cables. Remove the screw at the top of this piece that fastens to the hinge (look for the shiny metal). Then just lift that piece out of the way, remove the 3 screws holding the DVD in place, and you can pull the drive out (I just grab it by the orange cable and pull it out, but that's probably not the preferred method).
Again, also mid 2010 A1297, the large flat cable crosses the drive. Remove on logic board end by prying carefully "UP" away from the board. Step 8 here: (http://www.shareyourrepair.com/2014/11/h...)
I was switching the optical drive from my non-functioning 17" to my 15" (same early 2011 MBP) and I was confused, as the arrangement looked almost exactly like the arrangement in my 15" machine rather than what is pictured here. So one can follow the instructions for the 15" MBP here on iFixit instead if you don't recognise what you see!
-
-
-
Utiliza el extremo plano de un spudger para despegar la fina cubierta de plástico de la parte superior y los laterales de la carcasa de la placa Bluetooth.
Is there any real need to remove these cables from the Bluetooth Board? Are you not able to simply conduct step 14 here instead, leaving cables in place, therefor not jeopardising integrity of the housing?
Does the indicated Dual HDD housing replicate the holes found on the Optical Drive to allow this?
mid 2010 A1297 again. Different configuration. I had a black plastic housing along this whole side. The large flat ribbon connects to it and I LEFT THE RIBBON IN PLACE on this housing. I removed 3 screws here to allow this black housing to be lifted off the drive and to the side, along with the camera line (held down by 3rd screw). When REPLACING this black housing after installation is complete, note there is a small tab on the disc slot side of the housing that needs to be inserted into a slot for correct placement. Then SKIP TO STEP 10 on this IFIXIT tutorial.
On the A1297, there is a 4” black bracket held by two screws. Remove those, a short and long one. The cable runs along the lower edge of the bracket and connects near the fan screw, near the optical drive connection. Remove that cable by print toward the optical drive in the direction of the cable, NOT UPWARDS.
-
-
-
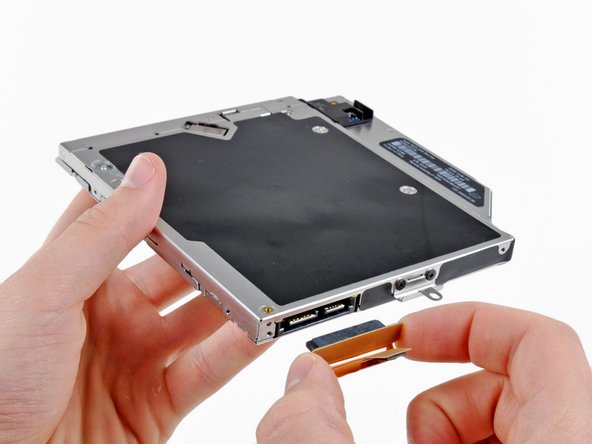
Sujeta el cable de la unidad óptica por el conector y sepáralo del cuerpo del disco duro.
-
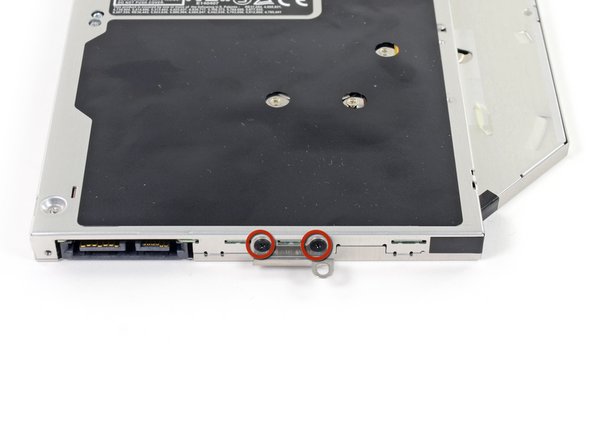
Retira los dos tornillos Phillips nº 0 negros que sujetan el pequeño soporte de montaje metálico. Transfiere este soporte a tu nueva unidad óptica o carcasa de disco duro.
-
-
-
Retira los dos tornillos Phillips de 2,2 mm que sujetan la placa Bluetooth al lateral del disco óptico.
mid 2010 A1297. This is NOT HERE. Skip Step 14-15.
Step 16 ((NEW)) (unless I am crazy, this was not detailed). After removing original drive, remove bracket (2 screws) from its side, and reuse on new drive. If you are confused which bracket, the drive is held in place with 3 screws. The 3rd screw on the center of the logic board side, goes through this bracket that you need to reuse. Top view of bracket can also be seen in Step 11 picture.
-
-
-
Retira la placa Bluetooth del disco óptico.
-
Solo queda el disco óptico.
what happens to the bluetooth board once you've removed it?
install it on the new drive
-


Para volver a montar el dispositivo, sigue estas instrucciones en orden inverso.
Para volver a montar el dispositivo, sigue estas instrucciones en orden inverso.
Cancelar: No complete esta guía.
59 personas más completaron esta guía.
Un agradecimiento especial a estos traductores:
100%

¡ Mariana Roca nos está ayudando a reparar el mundo! ¿Quieres contribuir?
Empezar a traducir ›

7 comentarios
Not sure which Unibody model is pictured, but my Late 2011 17” looks entirely different from this one.
I’m attempting to replace the internal optical drive with optical bay hard drive enclosure on a Model A1297 MacBook Pro 17" Unibody, but the interior looks a lot different from this guide. Have you had any luck getting a correct guide for your model?
Andrew/iFixit Team,
Do you know of any third-party blu-ray player/burner that can be used to replace the standard DVD Burner/Player? Thanks so much for any advise? All the best. - emil
I have installed a Matshita UJ167AM DVDRW/BDROM which is a direct replacement.
Working fine with MacGo Bluray player.
Haven’t got around to a Bluray burner yet, I just wanted to play bluray.
I started off with this guide but my MacBook Pro 17-Inch "Core i5" 2.53GHz Mid-2010 MC024LL/A - 6,1 - A1297 - 2352 doesn’t look anything like this model shown but the iFixit MacBook Pro 15" Unibody Mid 2010 Optical Drive Replacement guide was more similar enough to help me install a new optical drive.
important to reassemble the "lower case" successfully: the threads of the seven 3mm phillips screws are drilled at an angle :-/
mysterioes - Contestar
Same issue with me. After reassembling my 13-inch and my 17-inch, one of the screws are sticking out ever so slightly. Very annoying, especially since I scratch whatever surface I'm on now.
Kyle Spadaro -
Very important note; this guide is NOT correct for the Macbook Pro 17" A1297 late '11.
The A1297 has an assembly adjacent to the optical drive, identifiable by 4 antenna connectors, 1 usb cable (with very small connector) and one PCI-e flat cable running across the optical drive.
I did not take pictures, but found one on the web. I'm very new to iFixit and have no idea yet on how to create a guide, but here's the picture showing the assembly on top (this pic only has 3 antenna wires, the A1297 has 4, but at least you'll know what to look for.
- carefully undo all connections and 2 screws
- remove the assembly and flip it over
- again carefully remove the shielding tape
- undo 3 tiny screws
- gently pry the airport card from the assembly (the flat cable will be a bit of a pain)
- reverse process with replacement card.
image can be found here:
https://dl.dropboxusercontent.com/u/2446...
Remon - Contestar
It helps if you mark the holes where the long screws go so you can easily find them when the time comes to button things up. Also, a little dish or custard cup to hold those tiny screws is essential.
Human - Contestar
3 x 13.5 mm screws are actually TWO different types! Return to EXACT SAME HOLES.
-I discovered this on my mid-2010, but from comments, sounds like it may affect other models as well
2 x 13.5 mm screws are pointed ends
1 x 13.5 mm screw is a FLAT end <- CORNER HOLE
These areTWO slightly different lengths, and must return to correct holes. If you put the flat end screw in the wrong hole, it will stick out slightly. If you put either of the pointed screws in the wrong hole, they will go in all the way, but will not catch threads, and will simply fall out when laptop is flipped back over.
scottbernardis - Contestar
I printed out the image above and taped each screw to the photo as I removed each one, just to make sure I put them in the right location.
Grace Morris - Contestar
This is a brilliant suggestion! I did this for all the steps that involved removing screws, numbered the sheets, and that made it very easy to put it all back together in reverse. Thanks!
Steve Adamczyk -
Be sure to use Loctite on the screws when re-attaching the bottom of the computer. The screws can and will fall out once they have been removed for repairs if you do not put Loctite on them when you reuse them. Otherwise, purchase new screws before repairing the computer as the new screws come with Loctite material on them. (I have personal experience with this problem.)
johnpartridge - Contestar
Be sure NOT to Buy this Battery from iFixit. I bought it from eustore.ifixit.com and the Condition of Battery is : Service Battery ,
from the &&^&^$^ first day.
Till today my battery Cycle Count is: 80.
I’ve tried everything as: Battery Calibration, resetting the SMC, PRAM, reinstalling the battery,
and Service Battery warning still there.
Just DO NOT BUY crappy, trash from here.
I have very bad experience.
Doruntin Koci - Contestar
Hi Doruntin,
we’re more than sorry to hear about your bad experience.
I’ll inform our customer service team who’ll reach out to you and offer either a replacement or reimbursement.
If ever you’d need assistance again, please feel free to directly write to eustore@ifixit.com, as comments are not regularly checked for service issues.
I’m confident that we’ll find the solution that suits you best!
Sandra Hiller -
PLEASE OBSERVE: The image of the left speaker used is NOT for a 2011 model. A 17inch MacBook Pro A1297 - LEFT SPEAKER + MICROPHONE - 2011 has IDENTIFYING NUMBER: Apple Part #:922-9821, 922-9822. And its COMPATIBILITY: 17 inch MacBook Pro Unibody A1297 - Early 2011 MC725LL/A 2.2 i7 - Early 2011 MC725LL/A 2.3 i7 - Late 2011 MD311LL/A 2.4 i7 - Late 2011 MD311LL/A 2.5 i7
kenneth krabat - Contestar