Saltar al contenido principal

MacBook Pro 17" Models A1151 A1212 A1229 and A1261 AirPort Extreme Replacement

Qué necesitas

  1. MacBook Pro 17" Models A1151 A1212 A1229 and A1261 AirPort Extreme Replacement, Battery: paso 1, imagen 1 de 1
    • Use your fingers to push both battery release tabs away from the battery and lift the battery out of the computer.

  2. MacBook Pro 17" Models A1151 A1212 A1229 and A1261 AirPort Extreme Replacement, RAM Shield: paso 2, imagen 1 de 1
    • Remove the four identical Phillips 3.4 mm screws from the memory door. These screws have 4 mm diameter heads rather than the 3 mm heads on the body screws.

  3. MacBook Pro 17" Models A1151 A1212 A1229 and A1261 AirPort Extreme Replacement: paso 3, imagen 1 de 1
    • Lift the memory door up enough to get a grip on it, and slide it toward you, pulling it away from the casing.

  4. MacBook Pro 17" Models A1151 A1212 A1229 and A1261 AirPort Extreme Replacement, Upper Case: paso 4, imagen 1 de 1
    • Remove the three Phillips screws in the battery compartment near the latch. Apple was nice enough to tilt these screws at a slight angle to make them easier to remove. On the A1261 these screws have 4 mm diameter heads rather than the 3 mm heads on the body screws.

  5. MacBook Pro 17" Models A1151 A1212 A1229 and A1261 AirPort Extreme Replacement: paso 5, imagen 1 de 1
    • Remove the following six screws:

    • Two 14.5 mm T6 Torx screws on either side of the RAM slot.

    • Four 3.4 mm Phillips screws along the hinge.

  6. MacBook Pro 17" Models A1151 A1212 A1229 and A1261 AirPort Extreme Replacement: paso 6, imagen 1 de 1
    • Remove the four 3.4 mm Phillips screws on the port side of the computer.

  7. MacBook Pro 17" Models A1151 A1212 A1229 and A1261 AirPort Extreme Replacement: paso 7, imagen 1 de 1
    • Rotate the computer 90 degrees and remove the two Phillips screws from the rear of the computer.

  8. MacBook Pro 17" Models A1151 A1212 A1229 and A1261 AirPort Extreme Replacement: paso 8, imagen 1 de 1
    • Rotate the computer 90 degrees again and remove the four Phillips screws from the side of the computer.

  9. MacBook Pro 17" Models A1151 A1212 A1229 and A1261 AirPort Extreme Replacement: paso 9, imagen 1 de 1
    • Do not yank the upper case off quickly. The case is attached to the logic board via a ribbon cable.

    • Lift up the back of the case and work your fingers along the sides, freeing the case as you go. Once you have freed the sides, you may need to rock the case up and down to free the front of the upper case.

  10. MacBook Pro 17" Models A1151 A1212 A1229 and A1261 AirPort Extreme Replacement: paso 10, imagen 1 de 1
    • Disconnect the trackpad and keyboard ribbon cable from the logic board.

    • Remove the upper case.

  11. MacBook Pro 17" Models A1151 A1212 A1229 and A1261 AirPort Extreme Replacement, AirPort Extreme: paso 11, imagen 1 de 3 MacBook Pro 17" Models A1151 A1212 A1229 and A1261 AirPort Extreme Replacement, AirPort Extreme: paso 11, imagen 2 de 3 MacBook Pro 17" Models A1151 A1212 A1229 and A1261 AirPort Extreme Replacement, AirPort Extreme: paso 11, imagen 3 de 3
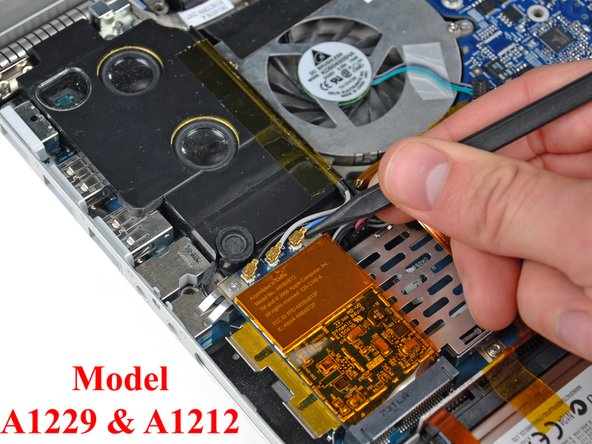
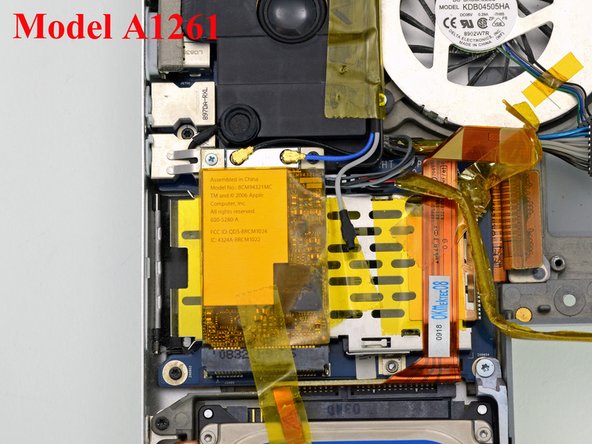
    • Disconnect the two antenna cables attached to the AirPort Extreme card.

    • The cable with the gray shielding attaches to the left side connector, while the cable with the white shielding attaches to the right side.

    • If you have a MacBook Pro 17" Model A1229 or A1212, there are three antenna cables attached to the AirPort Extreme card instead of two.

    • If you have a MacBook Pro 17” Model A1261 the cable with the black shielding attaches to the left side of the connector, while the cable with blue shielding attaches to the right side.

  12. MacBook Pro 17" Models A1151 A1212 A1229 and A1261 AirPort Extreme Replacement: paso 12, imagen 1 de 1
    • Remove the single black T6 Torx screw from the top right corner of the AirPort Extreme card.

  13. MacBook Pro 17" Models A1151 A1212 A1229 and A1261 AirPort Extreme Replacement: paso 13, imagen 1 de 1
    • Lift the AirPort Extreme card up and slide it out of its connector.

    • Note the position of the grounding clip attached to the left side of the card. On some models, the clip is mounted on the upper surface of the airport Extreme card to make contact with the upper case. On other models, the clip is mounted on the underside and makes contact with the headphone connector body.

  14. MacBook Pro 17" Models A1151 A1212 A1229 and A1261 AirPort Extreme Replacement, AirPort Extreme: paso 14, imagen 1 de 1
    • Turn the Airport Extreme card over and remove the single silver Phillips screw from the top right corner of the Airport card.

    • Don't forget to transfer the grounding clip to the new Airport Extreme Card.

Conclusión

To reassemble your device, follow these instructions in reverse order.

32 personas más completaron esta guía.

2 comentarios

This was SO helpful. Sad to say that for me it does not last. I have had to do this 3 times because within 8+ years since I bought the 1261 new, the cards fail by turning off. The times between card shut off get shorter and shorter until I have to do it again. Maybe the cards though new are not that good (though cheap) or maybe its something else. I continue to want to keep it running because with the latest OS it works so well. Now with 1TB SSD and the screen it came with, why get a new one when screens are smaller? So happy with this website!

Jim in Chicago

James Smith - Contestar

Is there any way I can use this card in my desktop? What kind of adapter would I need?

Zero G - Contestar

Agregar Comentario

Ver Estadísticas:

Ultimas 24 horas: 1

Ultimos 7 días: 5

Ultimos 30 días: 33

Todo El Tiempo: 34,307