Esta versión puede contener ediciones incorrectas. Cambie a la última instantánea verificada.
Qué necesitas
-
-
Remueve los siguientes diez tornillos que aseguran la cubierta trasera a la cubierta superior.
-
Tres tornillos tipo Philips (punta cruz) de 13.5 mm (14.1 mm)
-
Cuando remuevas estos tornillos, ten en cuenta cómo salen en un ángulo ligero. Deben volverse a instalar de igual forma.
-
-
-
Use el extremo plano de un spudger para levantar el conector del cable AirPort / Bluetooth de la placa lógica.
-
Con cuidado, despegue el cable de cinta AirPort / Bluetooth de la parte superior de la carcasa de plástico negro AirPort / Bluetooth.
-
-
-
Este paso está sin traducir. Ayuda a traducirlo
-
Disconnect the camera cable by pulling its connector away from the socket on the logic board.
-
-
Este paso está sin traducir. Ayuda a traducirlo
-
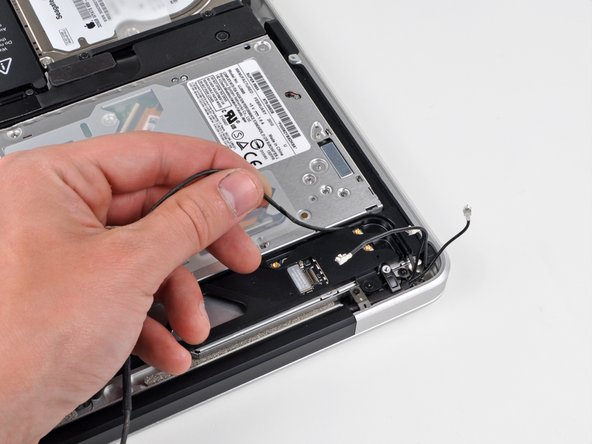
Pry the AirPort and Bluetooth antenna connectors (3 total) up off the AirPort/Bluetooth board.
-
-
Este paso está sin traducir. Ayuda a traducirlo
-
De-route all three antenna cables from their channels in the black plastic AirPort/Bluetooth housing.
-
-
Este paso está sin traducir. Ayuda a traducirlo
-
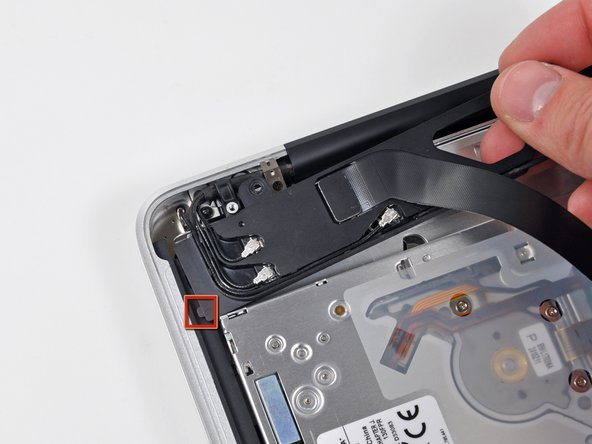
Remove the two Phillips screws securing the AirPort/Bluetooth board housing to the upper case.
-
Carefully remove the AirPort/Bluetooth assembly from the lower case.
-
-
Este paso está sin traducir. Ayuda a traducirlo
-
Remove the two Phillips screws securing the AirPort/Bluetooth board to the AirPort/Bluetooth board housing.
-
-
Este paso está sin traducir. Ayuda a traducirlo
-
Remove the AirPort/Bluetooth board from its black plastic housing.
-


Cancelar: No complete esta guía.
31 personas más completaron esta guía.

5 comentarios
I didn't even have to replace my daughterboard -- I ordered a used one, but simply "reseating" (removing and attaching it again) the ribbon cable to the daughter board fixed my problem that the WiFi and Bluetooth card was invisible to the OS.
Thanks anyway for these great instructions! Without them I hadn't even thought about that the WiFi functionality was on a daughterboard... I thought other than in most "Windows laptops" that functionality was integrated into the main board.
Excellent guide! The whole thing took me about 30 minutes and as soon as I turned on my mac again the WiFi worked perfectly.
I replaced both the card and the ribbon cable. Still get the message that there is no WiFi device installed. 15" MBP, mid-2010. The Bluetooth and Ethernet still work. But it is very inconvenient not having WiFi. Any thoughts on what else to try would be appreciated.
Raymond Steinbart
Excellentguide as usual, but not sure the anntena cables should have be replaced in their housings before the Airport/ Bluetooth bracket was secured. Was there a reason I missed.
Is it possible to upgrade? Is there any “successor” known for Bluetooth 4.0 ?
Thanks