Saltar al contenido principal
Únete a la Comunidad de Reparación - Crear Cuenta

MacBook Pro 15" Unibody Mid 2009 Heat Sink Replacement

Qué necesitas

  1. MacBook Pro 15" Unibody Mid 2009 Heat Sink Replacement, Lower Case: paso 1, imagen 1 de 1
    • Remove the following ten screws securing the lower case to the upper case:

    • Seven 3 mm Phillips screws.

    • Three 13.5 mm Phillips screws.

    Pregunta a FixBot

    Agregar Comentario

  2. MacBook Pro 15" Unibody Mid 2009 Heat Sink Replacement: paso 2, imagen 1 de 2 MacBook Pro 15" Unibody Mid 2009 Heat Sink Replacement: paso 2, imagen 2 de 2
    • Using both hands, lift the lower case near the vent to pop it off two clips securing it to the upper case.

    • Remove the lower case and set it aside.

    Pregunta a FixBot

    Agregar Comentario

  3. MacBook Pro 15" Unibody Mid 2009 Heat Sink Replacement, Battery: paso 3, imagen 1 de 1
    Herramienta utilizada en este paso:
    P6 Pentalobe Screwdriver 2009 15" MacBook Pro Battery
    $5.49
    • Remove the two 5-Point Pentalobe screws along the top edge of the battery.

    • You do not necessarily have to follow steps 3-6 to remove the battery in order to replace the hard drive. However it is recommended to remove all power sources from electronics before working on them.

    Pregunta a FixBot

    Agregar Comentario

  4. MacBook Pro 15" Unibody Mid 2009 Heat Sink Replacement: paso 4, imagen 1 de 1
    • Use the tip of a spudger to bend back the finger of the "Warning: Do not remove the battery" sticker while you remove third five-point Pentalobe screw hidden underneath.

    Pregunta a FixBot

    Agregar Comentario

  5. MacBook Pro 15" Unibody Mid 2009 Heat Sink Replacement: paso 5, imagen 1 de 2 MacBook Pro 15" Unibody Mid 2009 Heat Sink Replacement: paso 5, imagen 2 de 2
    • Lift the battery by its plastic pull tab and slide it away from the long edge of the upper case.

    • Do not try to completely remove the battery just yet.

    Pregunta a FixBot

    Agregar Comentario

  6. MacBook Pro 15" Unibody Mid 2009 Heat Sink Replacement: paso 6, imagen 1 de 1
    • Tilt the battery back enough to access the battery cable connector.

    • Pull the battery cable connector away from its socket on the logic board and remove the battery from the upper case.

    • If you're installing a new battery, you should calibrate it after installation.

    Pregunta a FixBot

    Agregar Comentario

  7. MacBook Pro 15" Unibody Mid 2009 Heat Sink Replacement, Logic Board: paso 7, imagen 1 de 3 MacBook Pro 15" Unibody Mid 2009 Heat Sink Replacement, Logic Board: paso 7, imagen 2 de 3 MacBook Pro 15" Unibody Mid 2009 Heat Sink Replacement, Logic Board: paso 7, imagen 3 de 3
    • Use a spudger to pry the fan connector straight up off the logic board.

    • It is useful to twist the spudger axially from beneath the fan cable wires to release the connector.

    • The fan socket and the fan connector can be seen in the second and third pictures. Be careful not to break the plastic fan socket off the logic board as you use your spudger to lift the fan connector straight up and out of its socket. The layout of the logic board shown in the second picture may look slightly different than your machine but the fan socket is the same.

    Pregunta a FixBot

    Agregar Comentario

  8. MacBook Pro 15" Unibody Mid 2009 Heat Sink Replacement: paso 8, imagen 1 de 2 MacBook Pro 15" Unibody Mid 2009 Heat Sink Replacement: paso 8, imagen 2 de 2
    • Remove the three T6 Torx screws securing the left fan to the logic board.

    • Lift the fan out of the upper case.

    Pregunta a FixBot

    Agregar Comentario

  9. MacBook Pro 15" Unibody Mid 2009 Heat Sink Replacement: paso 9, imagen 1 de 1
    • Use the flat end of a spudger to disconnect the left fan connector from the logic board.

    • Pry up from beneath the wires.

    Pregunta a FixBot

    Agregar Comentario

  10. MacBook Pro 15" Unibody Mid 2009 Heat Sink Replacement: paso 10, imagen 1 de 2 MacBook Pro 15" Unibody Mid 2009 Heat Sink Replacement: paso 10, imagen 2 de 2
    • Remove the three T6 Torx screws securing the left fan to the logic board.

    • Lift the left fan out of the upper case.

    Pregunta a FixBot

    Agregar Comentario

  11. MacBook Pro 15" Unibody Mid 2009 Heat Sink Replacement: paso 11, imagen 1 de 1
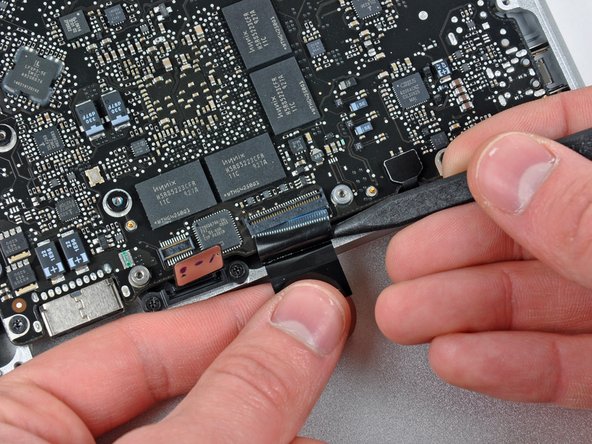
    • The camera cable connector is not secured by any locking or snapping mechanism. Hence, Apple sticks a small strip of black plastic with adhesive applied to the side facing the logic board behind the camera cable connector to keep it in its socket.

    • When moving the strip (cable retainer) out of the way, be sure not to break any surface-mounted components off the logic board.

    • Hold the end of the cable retainer down with one finger while you use the tip of a spudger to slightly lift the other end and rotate it away from the camera cable connector.

    • Disconnect the camera cable by pulling the male end straight away from its socket.

    • Pull the connector parallel to the face of the logic board, not straight up.

    Pregunta a FixBot

    Agregar Comentario

  12. MacBook Pro 15" Unibody Mid 2009 Heat Sink Replacement: paso 12, imagen 1 de 1
    • Disconnect the camera cable by pulling the male end straight away from its socket.

    • Pull the connector parallel to the face of the logic board, not straight up.

    Pregunta a FixBot

    Agregar Comentario

  13. MacBook Pro 15" Unibody Mid 2009 Heat Sink Replacement: paso 13, imagen 1 de 1
    • Use the flat end of a spudger to pry the optical drive cable connector up off the logic board.

    Pregunta a FixBot

    Agregar Comentario

  14. MacBook Pro 15" Unibody Mid 2009 Heat Sink Replacement: paso 14, imagen 1 de 1
    • Using the flat end of a spudger, pry the subwoofer connector straight up from the connector jack.

    • Be careful to pry the connector, not the socket. It's possible to accidentally pry the socket up from the logic board.

    • Removing the foam applied to the top of the connector will make it easier to see and avoid prying up the socket.

    Pregunta a FixBot

    Agregar Comentario

  15. MacBook Pro 15" Unibody Mid 2009 Heat Sink Replacement: paso 15, imagen 1 de 1
    • Use the flat end of a spudger to pry the hard drive/IR sensor cable connector up off the logic board.

    Pregunta a FixBot

    Agregar Comentario

  16. MacBook Pro 15" Unibody Mid 2009 Heat Sink Replacement: paso 16, imagen 1 de 2 MacBook Pro 15" Unibody Mid 2009 Heat Sink Replacement: paso 16, imagen 2 de 2
    • Remove the two 1.5 mm Phillips screws securing the cable cover to the logic board.

    • Lift the cable cover out of the upper case.

    Pregunta a FixBot

    Agregar Comentario

  17. MacBook Pro 15" Unibody Mid 2009 Heat Sink Replacement: paso 17, imagen 1 de 1
    • Use a spudger to pry the trackpad flex ribbon cable connector up off the logic board.

    Pregunta a FixBot

    Agregar Comentario

  18. MacBook Pro 15" Unibody Mid 2009 Heat Sink Replacement: paso 18, imagen 1 de 2 MacBook Pro 15" Unibody Mid 2009 Heat Sink Replacement: paso 18, imagen 2 de 2
    • Use your fingernail to flip up the locking flap on the ZIF socket for the keyboard ribbon cable. The locking flap is located at the opposite side of the socket compared to the keyboard ribbon cable. Hook your fingernail under it and carefully lift it up vertically.

    • Do not attempt to slide the keyboard ribbon cable out of its socket before you have unlocked the ZIF socket. Ribbon cables are fragile and excessive force will easily break them.

    • Use the tip of a spudger to slide the keyboard ribbon cable out of its socket.

    Pregunta a FixBot

    Agregar Comentario

  19. MacBook Pro 15" Unibody Mid 2009 Heat Sink Replacement: paso 19, imagen 1 de 1
    • Use a spudger to pry the battery indicator ribbon cable connector up off the logic board.

    Pregunta a FixBot

    Agregar Comentario

  20. MacBook Pro 15" Unibody Mid 2009 Heat Sink Replacement: paso 20, imagen 1 de 2 MacBook Pro 15" Unibody Mid 2009 Heat Sink Replacement: paso 20, imagen 2 de 2
    • Remove the single 7 mm Phillips screw securing the display data cable retainer to the upper case.

    • This screw may remain captive in the display data cable ground loop. If replacing the display, be sure to transfer this screw to the new unit.

    • Remove the display data cable retainer from the upper case.

    Pregunta a FixBot

    Agregar Comentario

  21. MacBook Pro 15" Unibody Mid 2009 Heat Sink Replacement: paso 21, imagen 1 de 2 MacBook Pro 15" Unibody Mid 2009 Heat Sink Replacement: paso 21, imagen 2 de 2
    • Grab the plastic pull tab secured to the display data cable lock and rotate it toward the DC-in side of the computer.

    Pregunta a FixBot

    Agregar Comentario

  22. MacBook Pro 15" Unibody Mid 2009 Heat Sink Replacement: paso 22, imagen 1 de 1
    • Pull the display data cable connector straight away from its socket.

    • Make sure to pull the connector parallel to the face of the logic board, not straight up from its socket.

    Pregunta a FixBot

    Agregar Comentario

  23. MacBook Pro 15" Unibody Mid 2009 Heat Sink Replacement: paso 23, imagen 1 de 2 MacBook Pro 15" Unibody Mid 2009 Heat Sink Replacement: paso 23, imagen 2 de 2
    • Using the tip of a spudger, flip up the keyboard backlight ribbon cable retaining flap.

    • Pull the keyboard backlight ribbon cable straight out of its socket.

    Pregunta a FixBot

    Agregar Comentario

  24. MacBook Pro 15" Unibody Mid 2009 Heat Sink Replacement: paso 24, imagen 1 de 1
    • Remove the following screws:

    • Seven 3.3 mm T6 Torx screws securing the logic board to the upper case.

    • Two 8 mm T6 Torx screws securing the DC-In board to the upper case.

    • Do not remove the logic board yet! There are components on the underside of the logic board attached to the the upper case that must first be disconnected.

    Pregunta a FixBot

    Agregar Comentario

  25. MacBook Pro 15" Unibody Mid 2009 Heat Sink Replacement: paso 25, imagen 1 de 1
    • Carefully lift the logic board assembly from the left side and work it out of the upper case, minding the port side that may get caught during removal.

    • Do not entirely remove the logic board yet!

    Pregunta a FixBot

    Agregar Comentario

  26. MacBook Pro 15" Unibody Mid 2009 Heat Sink Replacement: paso 26, imagen 1 de 1
    • Lift the logic board enough to gain clearance and use a spudger to pry the microphone up off the upper case.

    • Slide the logic board away from the port openings and lift the assembly out of the upper case.

    • Before reinstalling the logic board, it is easiest to press the microphone down into its housing in the left speaker to keep it in place.

    Pregunta a FixBot

    Agregar Comentario

  27. MacBook Pro 15" Unibody Mid 2009 Heat Sink Replacement: paso 27, imagen 1 de 1
    • Slide the logic board away from the port openings and lift the assembly out of the upper case.

    • Before reinstalling the logic board, it is easiest to press the microphone down into its housing in the left speaker to keep it in place.

    Pregunta a FixBot

    Agregar Comentario

  28. MacBook Pro 15" Unibody Mid 2009 Heat Sink Replacement, Heat Sink: paso 28, imagen 1 de 1
    • Lay the logic board down on a soft flat surface with the heat sink facing up.

    • If present, remove the small black sticker covering one of the heat sink screws.

    Pregunta a FixBot

    Agregar Comentario

  29. MacBook Pro 15" Unibody Mid 2009 Heat Sink Replacement: paso 29, imagen 1 de 1
    • Remove the eight Phillips screws securing the heat sink to the logic board.

    • Keep track of the springs under each of the screws as you remove them.

    • Do not press down on the screws excessively while breaking them free.

    • Carefully lift the heat sink off the logic board.

    • If the heat sink appears to be stuck to the logic board after removing all eight screws, it may be helpful to use a spudger to separate the two components.

    • If you need to mount the heat sink back into the laptop, we have a thermal paste guide that makes replacing the thermal compound easy.

    Pregunta a FixBot

    Agregar Comentario

  30. MacBook Pro 15" Unibody Mid 2009 Heat Sink Replacement: paso 30, imagen 1 de 1
    • Carefully lift the heat sink off the logic board.

    • If the heat sink appears to be stuck to the logic board after removing all eight screws, it may be helpful to use a spudger to separate the two components.

    • If you need to mount the heat sink back onto the logic board, we have a thermal paste guide that makes replacing the thermal compound easy.

    Pregunta a FixBot

    Agregar Comentario

Conclusión

To reassemble your device, follow these instructions in reverse order.

Cancelar: No complete esta guía.

25 personas más completaron esta guía.

3Guía Comentarios

I did use a common flathead screwdriver for 5-point and 6-point screws. It' worked well.

Thank you very much for this guide !

Thomas Jarrand - Contestar Compartir

I just used this guide to pull out my logic board and clean about 6 years of dust out. Also was able to take apart the fans and throw a little bit of wd40 on the axels. We are back to whisper quiet computing and about 10-15 degrees cooler.

takjackson - Contestar Compartir

I messed up something because the machine doesn't turn on (

nagy emeric - Contestar Compartir

Agregar Comentario

Ver Estadísticas:

Ultimas 24 horas: 1

Ultimos 7 días: 9

Ultimos 30 días: 66

Todo El Tiempo: 23,095