Saltar al contenido principal

MacBook Pro 15" Unibody 2.53 GHz Mid 2009 Logic Board Replacement

Qué necesitas

  1. MacBook Pro 15" Unibody 2.53 GHz Mid 2009 Logic Board Replacement, Lower Case: paso 1, imagen 1 de 1
    • Remove the following ten screws securing the lower case to the upper case:

    • Seven 3 mm Phillips screws.

    • Three 13.5 mm Phillips screws.

  2. MacBook Pro 15" Unibody 2.53 GHz Mid 2009 Logic Board Replacement: paso 2, imagen 1 de 1
    • Using both hands, lift the lower case near the vent to pop it off two clips securing it to the upper case.

    • Remove the lower case and set it aside.

  3. MacBook Pro 15" Unibody 2.53 GHz Mid 2009 Logic Board Replacement, Battery: paso 3, imagen 1 de 1
    Herramienta utilizada en este paso:
    P6 Pentalobe Screwdriver 2009 15" MacBook Pro Battery
    $5.49
    Comprar
    • Three Pentalobe screws secure the battery to the upper case. They can be removed with this special driver.

    • If you don't have a Pentalobe driver, a 1.5 mm flathead screwdriver can be used in a pinch. Be sure the head of your flathead screwdriver fits snugly across two of the five "points" of the screw head before trying to break the screw free, as a loose fit will easily strip the screw head.

    • If the head of your screwdriver fits too loosely, find a bigger bit and file it down until it fits snugly before proceeding.

    • You do not necessarily have to follow steps 3-7 to remove the battery in order to replace the hard drive. However, it is recommended to remove all power sources from electronics before working on them.

  4. MacBook Pro 15" Unibody 2.53 GHz Mid 2009 Logic Board Replacement: paso 4, imagen 1 de 1
    • Remove the two exposed five-point Pentalobe screws along the top edge of the battery.

  5. MacBook Pro 15" Unibody 2.53 GHz Mid 2009 Logic Board Replacement: paso 5, imagen 1 de 1
    • Use the tip of a spudger to bend back the finger of the "Warning: Do not remove the battery" sticker while you remove the five-point Pentalobe screw hidden underneath.

  6. MacBook Pro 15" Unibody 2.53 GHz Mid 2009 Logic Board Replacement: paso 6, imagen 1 de 2 MacBook Pro 15" Unibody 2.53 GHz Mid 2009 Logic Board Replacement: paso 6, imagen 2 de 2
    • Lift the battery by its plastic pull tab and slide it away from the long edge of the upper case.

    • Do not try to completely remove the battery just yet.

  7. MacBook Pro 15" Unibody 2.53 GHz Mid 2009 Logic Board Replacement: paso 7, imagen 1 de 1
    • Tilt the battery back enough to access the battery cable connector.

    • Pull the battery cable connector away from its socket on the logic board and remove the battery from the upper case.

    • If you're installing a new battery, you should calibrate it as soon as possible.

  8. MacBook Pro 15" Unibody 2.53 GHz Mid 2009 Logic Board Replacement, Fan: paso 8, imagen 1 de 3 MacBook Pro 15" Unibody 2.53 GHz Mid 2009 Logic Board Replacement, Fan: paso 8, imagen 2 de 3 MacBook Pro 15" Unibody 2.53 GHz Mid 2009 Logic Board Replacement, Fan: paso 8, imagen 3 de 3
    • Use the flat end of a spudger to pry the fan cable connector up off its socket on the logic board.

    • It is useful to twist the spudger axially from beneath the fan cable wires to release the connector.

    • The fan socket and the fan connector can be seen in the second and third pictures. Be careful not to break the plastic fan socket off the logic board as you use your spudger to lift the fan connector straight up and out of its socket. The layout of the logic board shown in the second picture may look slightly different than your machine but the fan socket is the same.

  9. MacBook Pro 15" Unibody 2.53 GHz Mid 2009 Logic Board Replacement: paso 9, imagen 1 de 1
    • Remove the three identical T6 Torx screws securing the fan to the upper case.

  10. MacBook Pro 15" Unibody 2.53 GHz Mid 2009 Logic Board Replacement: paso 10, imagen 1 de 1
    • Lift the fan out of the upper case.

  11. MacBook Pro 15" Unibody 2.53 GHz Mid 2009 Logic Board Replacement, Logic Board: paso 11, imagen 1 de 1
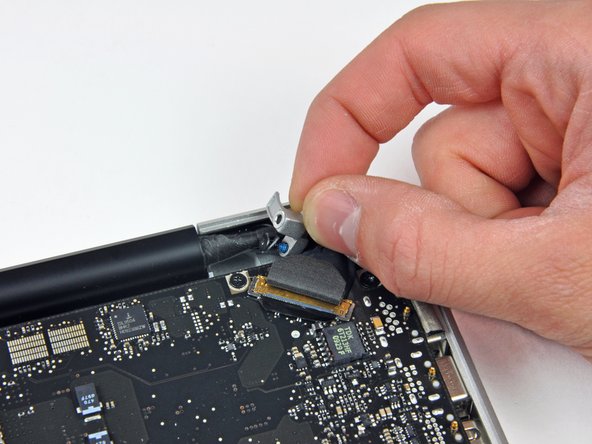
    • Apple sticks a small strip of clear plastic with adhesive applied to one side to the logic board behind the camera cable connector to keep it in its socket. When moving it out of the way, be sure not to break any surface-mount components off the logic board.

    • Hold the end of the cable retainer down with one finger while you use the tip of a spudger to slightly lift the other end and rotate it away from the camera cable connector.

  12. MacBook Pro 15" Unibody 2.53 GHz Mid 2009 Logic Board Replacement: paso 12, imagen 1 de 1
    • Disconnect the camera cable by pulling the male end straight away from its socket.

    • Pull the connector parallel to the face of the logic board, not straight up.

  13. MacBook Pro 15" Unibody 2.53 GHz Mid 2009 Logic Board Replacement: paso 13, imagen 1 de 1
    • Use the flat end of a spudger to pry the optical drive cable connector up off the logic board.

  14. MacBook Pro 15" Unibody 2.53 GHz Mid 2009 Logic Board Replacement: paso 14, imagen 1 de 1
    • Using the flat end of a spudger, pry the subwoofer connector straight up off the logic board.

  15. MacBook Pro 15" Unibody 2.53 GHz Mid 2009 Logic Board Replacement: paso 15, imagen 1 de 1
    • Use the flat end of a spudger to pry the hard drive/IR sensor cable connector up off the logic board.

  16. MacBook Pro 15" Unibody 2.53 GHz Mid 2009 Logic Board Replacement: paso 16, imagen 1 de 2 MacBook Pro 15" Unibody 2.53 GHz Mid 2009 Logic Board Replacement: paso 16, imagen 2 de 2
    • Remove the two 1.5 mm Phillips screws securing the cable cover to the logic board.

    • Lift the cable cover out of the upper case.

  17. MacBook Pro 15" Unibody 2.53 GHz Mid 2009 Logic Board Replacement: paso 17, imagen 1 de 1
    • Use a spudger to pry the trackpad flex ribbon cable connector up off the logic board.

  18. MacBook Pro 15" Unibody 2.53 GHz Mid 2009 Logic Board Replacement: paso 18, imagen 1 de 1
    • Using the tip of a spudger, flip up the keyboard ribbon cable retaining flap.

    • Pull the keyboard ribbon cable straight out of its socket.

  19. MacBook Pro 15" Unibody 2.53 GHz Mid 2009 Logic Board Replacement: paso 19, imagen 1 de 1
    • Use a spudger to pry the battery indicator ribbon cable connector up off the logic board.

  20. MacBook Pro 15" Unibody 2.53 GHz Mid 2009 Logic Board Replacement: paso 20, imagen 1 de 2 MacBook Pro 15" Unibody 2.53 GHz Mid 2009 Logic Board Replacement: paso 20, imagen 2 de 2
    • Remove the single 7 mm Phillips screw securing the display data cable retainer to the upper case.

    • This screw may remain captive in the display data cable ground loop. If replacing the display, be sure to transfer this screw to the new unit.

    • Remove the display data cable retainer from the upper case.

  21. MacBook Pro 15" Unibody 2.53 GHz Mid 2009 Logic Board Replacement: paso 21, imagen 1 de 2 MacBook Pro 15" Unibody 2.53 GHz Mid 2009 Logic Board Replacement: paso 21, imagen 2 de 2
    • Grab the plastic pull tab secured to the display data cable lock and rotate it toward the DC-in side of the computer.

    • Pull the display data cable connector straight away from its socket.

    • Make sure to pull the connector parallel to the face of the logic board, not straight up from its socket.

  22. MacBook Pro 15" Unibody 2.53 GHz Mid 2009 Logic Board Replacement: paso 22, imagen 1 de 2 MacBook Pro 15" Unibody 2.53 GHz Mid 2009 Logic Board Replacement: paso 22, imagen 2 de 2
    • Using the tip of a spudger, flip up the keyboard backlight ribbon cable retaining flap.

    • Pull the keyboard backlight ribbon cable straight out of its socket.

  23. MacBook Pro 15" Unibody 2.53 GHz Mid 2009 Logic Board Replacement: paso 23, imagen 1 de 1
    • Remove the following screws:

    • Eight 3.5 mm T6 Torx screws securing the logic board to the upper case.

    • Two T6 Torx screws securing the DC-In board to the upper case.

    • Do not remove the logic board yet! There are connectors attached to the underside of the logic board that must first be disconnected.

  24. MacBook Pro 15" Unibody 2.53 GHz Mid 2009 Logic Board Replacement: paso 24, imagen 1 de 1
    • Carefully lift the logic board assembly from the left side and work it out of the upper case, minding the port side that may get caught during removal.

    • Do not entirely remove the logic board yet!

    • Ensure that the logic board is free from all connections to the upper case (except the battery connector) before proceeding.

  25. MacBook Pro 15" Unibody 2.53 GHz Mid 2009 Logic Board Replacement: paso 25, imagen 1 de 2 MacBook Pro 15" Unibody 2.53 GHz Mid 2009 Logic Board Replacement: paso 25, imagen 2 de 2
    • Lift the logic board enough to gain clearance and use a spudger to pry the microphone up off the upper case.

    • Slide the logic board away from the port openings and lift the assembly out of the upper case.

    • Before reinstalling the logic board, it is easiest to press the microphone down into its housing in the left speaker to keep it in place.

  26. MacBook Pro 15" Unibody 2.53 GHz Mid 2009 Logic Board Replacement, Heat Sink: paso 26, imagen 1 de 1
    • Remove six Phillips screws securing the heat sink to the logic board.

    • A spring is held under each of these screws.

  27. MacBook Pro 15" Unibody 2.53 GHz Mid 2009 Logic Board Replacement: paso 27, imagen 1 de 1
    • Gently lift the heat sink off the logic board.

    • If you need to mount the heat sink back into the laptop, we have a thermal paste guide that makes replacing the thermal compound easy.

  28. MacBook Pro 15" Unibody 2.53 GHz Mid 2009 Logic Board Replacement, Logic Board: paso 28, imagen 1 de 1
    • Disconnect the DC-In Board connector from the logic board by pulling it straight away from its socket.

  29. MacBook Pro 15" Unibody 2.53 GHz Mid 2009 Logic Board Replacement: paso 29, imagen 1 de 1
    • Remove the two 5 mm Phillips screws securing the left speaker to the logic board assembly.

  30. MacBook Pro 15" Unibody 2.53 GHz Mid 2009 Logic Board Replacement: paso 30, imagen 1 de 2 MacBook Pro 15" Unibody 2.53 GHz Mid 2009 Logic Board Replacement: paso 30, imagen 2 de 2
    • If necessary, peel up the tape covering the left speaker connector.

    • Use the flat end of a spudger to pry the left speaker connector up off the logic board.

  31. MacBook Pro 15" Unibody 2.53 GHz Mid 2009 Logic Board Replacement: paso 31, imagen 1 de 1
    • Lift the left speaker assembly out of the logic board.

  32. MacBook Pro 15" Unibody 2.53 GHz Mid 2009 Logic Board Replacement: paso 32, imagen 1 de 1
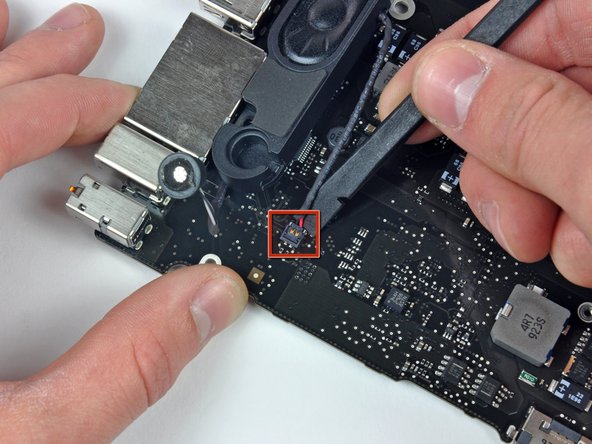
    • Use a spudger to pry the microphone cable connector up off the logic board.

  33. MacBook Pro 15" Unibody 2.53 GHz Mid 2009 Logic Board Replacement: paso 33, imagen 1 de 2 MacBook Pro 15" Unibody 2.53 GHz Mid 2009 Logic Board Replacement: paso 33, imagen 2 de 2
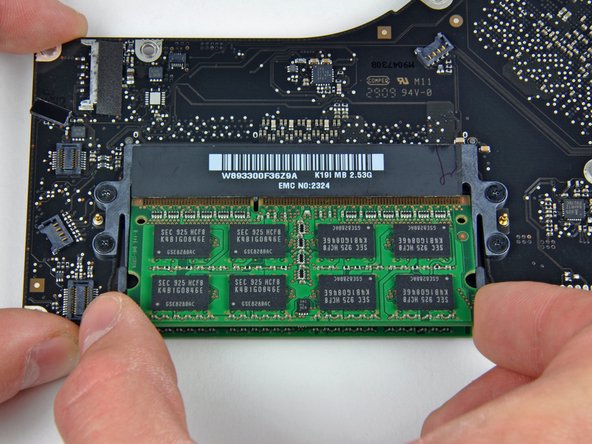
    • Release the tabs on each side of the RAM chip by simultaneously pushing each tab away from the chip.

    • These tabs lock the chip in place and releasing them will cause the chip to "pop" up.

    • After the RAM chip has popped up, pull it straight out of its socket.

    • Repeat this process if a second RAM chip is installed.

    • When reinstalling your logic board, don't forget to apply a new layer of thermal paste.

Conclusión

To reassemble your device, follow these instructions in reverse order.

30 personas más completaron esta guía.

4 comentarios

Hello,

Do you know the purpose of the component that is not welded in the lower right corner of the red square on the picture of step 12: http://d3nevzfk7ii3be.cloudfront.net/igi...

Someone tells me I can not have my backlight re-working without this component, but I think it simply does not work because of a liquid.

Any ideas ?

Thanks in advance

Belmondo - Contestar

I just replaced the logic board, and all went fine, as far as I can tell. However, my new battery is still in transit, i.e: I do not have it at hand. My question is, how critical is it to have a battery in this model....given all the "do not remove battery or else" warnings. Is it OK to try to boot it just with the regular power supply? I do not want to fry my new logic board, so I need some informed opinion on this...

Jurgen - Contestar

I greatly appreciated your comment in Step 11 saying: “Apple sticks a small strip of clear plastic with adhesive applied to one side to the logic board behind the camera cable connector to keep it in its socket“.

My problem was that I had an old Macbook Pro whose camera cable was out of its socket and I could not get it in because this piece of plastic was in the way. I had no idea what it was. It was not clear to me if it was an IC or some other important component. Your comment clarified what it was and its purpose.

Pushing down on it at one end did not achieve anything, so I have just lifted it up and off the board using a small scalpel blade.

I will use some tape to hold the cable connector in its socket.

Thank you

Michael Walsh - Contestar

Hi,

Your article does not mention the WiFi (wireless) or Bluetooth cable connector.

Does WiFi connectivity come into the logic board via the camera cable, or some other cable?

Thank you

Michael Walsh - Contestar

Agregar Comentario

Ver Estadísticas:

Ultimas 24 horas: 1

Ultimos 7 días: 17

Ultimos 30 días: 36

Todo El Tiempo: 53,617