Introducción
Cómo quitar el disco duro, junto con su cable y soporte de tu ordenador.
Qué necesitas
-
-
Usa tus dedos para empujar ambas lengüetas de liberación de la batería lejos de la batería, y levanta la batería de la computadora.
-
-
-
Retira los tres tornillos idénticos Phillips de 2 mm de la puerta de la memoria.
-
Levanta la puerta de la memoria lo suficiente como para agarrarla y deslizarla hacia ti, separándola de la carcasa.
These screws are different from the rest, they should be kept separate from the others.
Concur, my screws were Phillips #0 as
-
-
-
Retira los dos tornillos Phillips de 2,8 mm en el compartimento de la batería cerca del pestillo.
These screws are different from the rest, they should be kept separate from the others.
Keep these two Philips screws separate. The screws are approximately 0.5mm shorter in length. When using one or two of the other longer screws in the battery compartment when reassembling, the lid will not open because the screw(s) do yam the lid button.
I had a logic board replaced by Apple (bad nVidia GPU), and believe it or not the Apple tech mixed up the screws. My latch did not work as good until I discovered and swapped the misplaced screws.
No believe it or not about it! I had same board replacement job done, and a screw was angled and crossthreaded, and the memory cover was hacked into place with insulating sheet lifted and crumpled.
I removed the memory here as you would normally if you were changing it.
-
-
-
-
Retira los cuatro Phillips PH00 de 3.2 mm en el lado de los puertos de la computadora.
If you are using a muffin pan to keep removed parts separate (a method I recommend highly), note that Steps 5, 6, and 7 involve removing the same size screw—and thus you can put them all in the same pile. This is unlike just about every other part you will remove during this procedure.
Using shot glasses!
If you are a mac newbie like me take care when you reassemble not to insert a screw in the DVI display port screw holes (shame). I cannot manage to get it out anymore.
I did the same thing once, and eventually got it out. Try tweezers, a screwdriver, magnets, holding the MBP on its side so gravity is working with you, etc. Eventually the little bugger will come out, you just have to keep working at it.
RE: Misplaced Screws in the DVI port, I was upgrading an early 2008 MacBook Pro with an SSD to get some more life out it, and sure enough, misplaced one of these small screws into the DVI port upon reassembly. Screwdrivers, shaking, gravity... nothing worked. UNTIL I went to my dad's house and his super-comprehensive workbench, where he found a small, high-pull magnet and the little bugger flew right out. Refrigerator magnets won't cut it, you will need a more powerful magnet, such as these: http://www.kjmagnetics.com/products.asp?...
Hope this helps someone... it was an easy solution to a frustrating problem
-
-
-
Levanta la parte trasera de la carcasa y mueve los dedos a lo largo de los lados, liberando la carcasa sobre la marcha. Una vez que hayas liberado los lados, es posible que debas mover la caja hacia arriba y hacia abajo para liberar el frontal de la carcasa superior.
-
Hay cuatro clips de plástico encima de la ranura del DVD, y otro arriba y a la izquierda del sensor IR. Estos clips pueden ser muy difíciles de desenganchar sin hacer palanca. También pueden ser difíciles de volver a conectar durante el reensamblaje.
The clips above the DVD slot (below the deck palm rest) are an absolute bear. They're hard to get released, and even harder to get back locked when you reassemble. (I've read to tilt the deck toward you when reassembling, inserting the front edge first, and press about an inch back from the edge to get all the front clips locked first before lowering the rest (back) of the deck.) No success for me yet, best of luck.
I thought these two videos did an excellent job of showing the technique of removing and replacing the drive.
MacBook Pro/PowerBook Keyboard Replacement (Part 1 of 3):
http://www.youtube.com/watch?v=jUonF9OSv...
MacBook Pro/PowerBook Keyboard Replacement (Part 3 of 3):
http://www.youtube.com/watch?v=JWeFXWXpp...
After watching that, I had the keyboard replaced in 2 minutes.
Chris -
the technique you describe of putting the front down first, is exactly what I did and it worked well
Those clips on the front edge are very challenging. I have a set of nylon pry tools that are for taking apart car dashboards without scratching the vinyl or plastic. I was able to get a long one in from the side and twist it which freed the clips without damaging the plastic on the upper case or the aluminum on the lower case.
Putting it back together presented another challenge. When I first re-assembled it I think I pushed too hard over the DVD slot and accidentally bent the metal down. I was able to bend it back up using a thicker part of those same nylon pry tools, and then i was able to get it snapped back down successfully. Had I known this would happen, I would have just put the nylon tool in the slot to reinforce the metal as I was snapping the case back down.
As everyone has said, the front clips by the DVD can be really tight. Use the spudger to pry the top and bottom halves apart. Slow work it in from one side to separate the top and bottom.
When reassembling the case, work the front clips by the DVD drive back in first. Once you slide them back in, the rest of the case fits easily.
I had a lot of trouble with getting those clips to lock in place again when reassembling. The way I eventually did it was to wedge something into the front of the CD/DVD slot so that I wouldn't warp the laptop casing. I used the end of a pen; when wedged in the tip of the pen was the right height to not support the casing above and below the CD/DVD slot and not allow it to warp.
I simply ensured the pen was aligned with one particular clip, lifted the laptop slightly, and squeezed the top and bottom edge of the laptop casing very firmly at that point. Each clip clicked in quite easily doing it this way. Just remember to move the pen (or whatever you are using) along to whichever clip you are clicking in.
You're on the right track David. But what works really good is something that gets more surface area contact than the pen--I carefully insert a stack of 3" square post-it notes about 3/8" into the slot. And because they're stacked, you can easily add/subtract post-its to get as tight a fit as possible. Then, assuming you have everything lined up, use quite a bit of downward pressure. You should hear a few snaps as the clips reseat.
Cita de David:
I had a lot of trouble with getting those clips to lock in place again when reassembling. The way I eventually did it was to wedge something into the front of the CD/DVD slot so that I wouldn't warp the laptop casing. I used the end of a pen; when wedged in the tip of the pen was the right height to not support the casing above and below the CD/DVD slot and not allow it to warp.
I simply ensured the pen was aligned with one particular clip, lifted the laptop slightly, and squeezed the top and bottom edge of the laptop casing very firmly at that point. Each clip clicked in quite easily doing it this way. Just remember to move the pen (or whatever you are using) along to whichever clip you are clicking in.
I would agree with everyone that the clips above the DVD drive are very temperamental. They came off easily for me but were a pain getting to clip back in place correctly.
Make sure you have the front clipped on securely before screwing the case back together otherwise the lid will not close properly.
I have taken apart quite a few laptops but this is my first Mac. This confirms my statements, to anyone that will listen, that these are the most "exquisite" machines ever produced. I just performed these HDD Replacement steps and with appropriate fear and trepidation popped the clips off. It would have been very helpful if someone had mentioned that they come straight up. I wasn't sure so I wiggled and (carefully) pried with the spudger until one of them went "POP". The credit card idea was helpful but my card was pretty soft so I didn't dare use it with too much force. When I got the top cover loose I just leaned it back against the screen so as not to take a chance on damaging the cable. Reassembly was according to the notes, but again the spudger was perfect if inserted into the drive slot (careful on the felt!) to support the base of the clips. Thanks to all for the notes. BTW; Prayer helps!
There is a fifth plastic clip between the IR sensor and the screw hole. (ie. 1 cm left of the IR sensor)
On the top of the case mark the center of each of the four clips that are over the CD slot and the one clip to the left of the latch with a pencil. When re-installing the top case apply pressure over the clip to the left of the latch until you hear a snap. For the four clips over the CD slot, upend the entire case. Then insert the flat end of the spudger into the CD slot under the center of each clip. Apply pressure from the top of the case while providing support with the spudger in the CD slot until the clip snaps in. This will minimize the chances of bending the CD slot which would prevent CDs from ejecting.
Take care reassembling new the DVD drive. It's easy to bend the top piece of metal down (the one that engages the clips) and your DVD can get stuck occasional ejecting. Very annoying. Maybe give it a little prophylactic bend upward. I placed a blunt letter opener in the slot and torqued it, while applying downward pressure from the top deck... This allowed the clips to engage nicely without bending this piece down.
i've used both of my inch nails, it works fine as well. no trouble to report.
i used a pry tool i had left over from replacing the screen on my iphone, any flat stiff item, like a credit card would work. watch the youtube video linked above, http://www.youtube.com/watch?v=jUonF9OSv..., skip ahead in the video to 4:57 where you see her use a pry tool. I had no problem separating and reassembling this section. Only issue i had was the two screws in the battery area. Only one of them would grab, so I left the other one out.
Here is an additional video showing how to remove the cables for both the left and right fans. At time 2:00 in the video he starts to work on the left fan. This video will help prevent you from attempting to detach the cables incorrectly.
I've opened these up many, many times, and by far the easiest method I have found to disengage the front clips is as follows:
Lift up the top case by the rear corners near the hinge, keep lifting so the top case is tilting towards you. You will feel some resistance, but keep lifting and you will hear the clips disengage with a 'snap'. Doing it this way should not bend the top case metal or loosen the spacing between the top case metal and plastic trim. The clips will not break, they will still engage when you put the top case back on.
It basically takes me 5 or 10 seconds to take off the top case now, and the case goes back on nice and tight as before.
YMMV and all that, but that's my experience.
Thank you for all the advance warnings, I had no issues with replacing the case. It just snapped into place with a little help from the spudger.
You're welcome! I was the one who added the spudger tips, as I had a devil of a time making the DVD drive clips snap back into place without one when I followed this guide.
Hello,
I didn't have much problems reassembling the MacBook. Thanks a lot!
For the hard reassembly part with the clips: I pushed quite hard with both thumbs directly over the place where the clips are. You need to figure out exactly where they are, but it worked well.
I repeat it to make it clear: I pushed from the top on the location under which the clip sat, with two thumbs after having checked that the lid was well in place.
My tools were one spudger and a basic tech toolkit from iFixit.
Thanks a lot!
I had not problem easing GENTLY the top case from the computer even around the DVD but I didn't understand how easy it was to disconnect the top case from the mother board. TAKE CARE HERE. It will make reassembly much easier it YOU get to disconnect the plug. See my note on step nine
-
-
-
Desconecta el el cable plano del trackpad y del teclado de la placa lógica, retirando la cinta según sea necesario.
-
Retira la carcasa superior.
If you does not have the spudger, use the Dremel to file a wooden piece
(Chinese stick maybe) to transform in a spatula. Works fine for me
Where can I get the cable from step 9 above?
just broke it!
That cable is attached to the upper case. It can be found here for the A1226 and here for the A1260.
To unplug the cable, pull the black connector straight up from the logic board.
I didn`t need to unplugged the cable to change the right fan. As Karen wrote above, it is for a fan to change not necessary.
I didn't look well before the plug connecting top case to motherboard (see my note in step 8). When it came time for assembly it took a while for me to figure out when the plug connected in the motherboard. Take care on step 8 so that YOU have to make the disconnection in step 9. Then reassembly on this step will be much easier.
Step 9, 2007 Mac Book Pro right fan replacement. It’s not necessary to disengage the keyboard ribbon, you can just tilt the upper shell back and support it against the screen. Be sure not to put tension on the ribbon and to check that the ribbon “plug” is seated securely on the base before reinstalling the top shell.
These instructions were really great. For $15 I got a used fan off eBay and a Torx T6 driver and Phillips 00 driver from the hardware store. Thanks also for the comment about marking where the plastic clips are by the DVD and IR slot with pencil. When reassembling I slotted a piece of wood (kebab skewer) into the DVD slot and pressed down on the pencil mark with the eraser end of the pencil.
My 10 year old MacBook Pro is going strong. Thanks for these very much. It was fun to do as well.
-
-
-
Desconecta el cable plano naranja de la unidad de disco duro de la placa lógica.
-
Retira la cinta según sea necesario y usa un spudger (o presiona con cuidado una tarjeta de crédito debajo de la cinta) para aflojar con cuidado el adhesivo que fija la luz del reposo y los conectores del sensor de IR a la parte superior del disco duro.
In my model the glue was really hard, if you think the tools you are using twist the cable too much try with a credit card.
etnier, i don't understand what you are suggesting
???
I got to this step, and to my dismay, I found that the Torx screws on the hard drive retaining bracket, and the new hard drive were NOT T6. The T6 screwdriver just goes around and around in them. Anyone else have this problem, and know the correct size? It was quite a bummer, since I had to reassemble the whole thing without having completed the project.
If you are replacing the HD with a Seagate Momentus 7200 RPM 500 GB Hard Drive be careful not to cover drive's breath hole since the ribbon cable will exactly pass over it (where the sleep light and IR sensor connectors are). You need to paste it a little bit diagonal. Also as roman7927 and welhitamy said, be VERY careful when removing the ribbon cable from the motherboard, I ripped it off too!
Good Luck.
I managed to change the hard drive, but with a different aproach on step 10. I did not disconect any of the cables from the motherboard, as I managed to slide the drive out, by lifting it a little, then disconecting only the hard drive cable with the help of the Spudger and slowly out. I think find it safer than removing the delicate conectors from the motherboard. Good luck!
Cita de Bernak:
I managed to change the hard drive, but with a different aproach on step 10. I did not disconect any of the cables from the motherboard, as I managed to slide the drive out
I followed this process and it worked seamlessly. As long as you have a soft touch you don't have to connect anything other than the hard drive cable and that proved very easy for me.
Slow and easy seems to be the key to separating the ribbon cable from the top of the drive. I used an alternating approach, emphasizing first one side and then the other of the cable, especially around the curve. The spudger and a plastic card were both useful here.
i didn't prefered touch connector on the motherboard. slowly lift harddrive with fingers. be carefull.
As others here, the second time I replaced the internal drive I didn't disconnect the ribbon cable from the logic board. I was installing an SSD, so maybe it was a little easier than with an HD. However, I don't remember disconnecting and reconnecting the ribbon cable to be an issue.
-
-
-
Retira los dos tornillos Torx T6 de 8,2 mm que sujetan el soporte de retención del disco duro a la carcasa inferior.
-
Levanta el soporte de retención del disco duro hacia arriba y hacia afuera del ordenador.
-
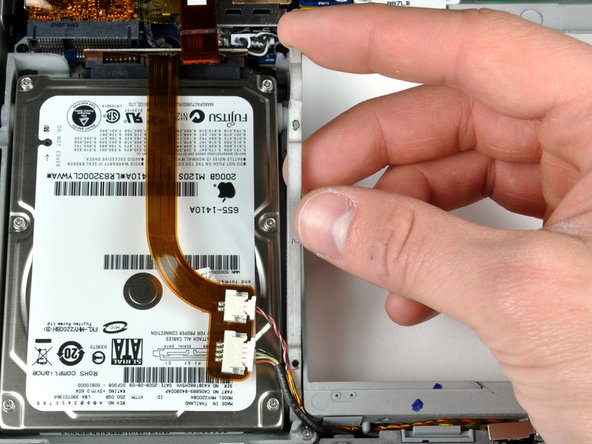
Levanta el disco duro con una mano y usa la otra mano para desconectar el cable del disco duro.
I used the round pointed part of the spudger (the opposite end of the one pictured in step 10) and started from the part of the cable that wasn't glued to the top of the hard drive. Insert the round pointed part under the bottom of the cable, perpendicular to it, and then roll it towards the glued part on the hard drive. The cable should separate quite easily from the drive . It was much easier doing it this way than using the chisel part of the spudger to separate the cable from the drive.
My ribbon cable was well and truly glued, I watched a few vids on youtube and they were hardly stuck at all.
But thanks to another comment on one of these guides for recommending DENTAL FLOSS!!
(a shame there are three separate guides for the pre unibody mbp as many of the processes are the same)
This worked like a dream, i took my time and used long strokes back and forth. Three frayed and snapped bits of floss later, eventually I was able to saw through the glue.
Though be sure to have your compressed air to get rid of any fluff (and remember to put your tray of screws somewhere else when you do so :)
I stupidly spent about 20 minutes trying to figure out how to pull the drive out when it was still screwed in on the left side, only to find that they're not screws but just rods that keep the drive in place. Hope this helps save people from making the same mistakes I did!
My cable was truly glued on to the hard drive also. Fortunately it was glued to the metallic sticker identifying the HD. That is to say, the sticker with HD product info, serial number etc. I was able to lift the sticker (and used an exacto knife to strip parts of the sticker away). So instead of ungluing the cable from the sticker, I unstuck the sticker. Hope this helps someone.
Apart from that slight trouble spot, the swap went well. I had previously cloned the drive and was able to start up with everything except MS Office working fine. MS Office asks for the product key as it detects that the computer is "different" because of the new drive.
Try these Ulta Thin metal spudgers for iPhone repair. Thinner than a credit card, good grasping and slices thru the glue!
@mac_medic Link doesn’t work
Be careful when you'll disconnect the SATA connector on the HDD itself: the area where the ribbon cable bends is quite prone to wear and tear.
After several disassemblies, I actually broke that ribbon cable by making a slight "cut" on the junction between the upper part of the ribbon cable (the one which goes from the HDD to the motherboard) and the lower part (the one which goes to the latch LED and IR sensor).
It took me quite some time to find that this ribbon cable was actually broken; as I had no HDD issues, I thought that it was fine. That's only when I found that I had no more latch LED and unrecognized IR sensor, that I carefully examined the ribbon cable, just to find that there was that little cut in the circuitry. Hopefully, I had a spare one, and you can still find it for a few bucks. -


Para volver a montar tu dispositivo, sigue estas instrucciones en orden inverso.
Para volver a montar tu dispositivo, sigue estas instrucciones en orden inverso.
Cancelar: No complete esta guía.
4 personas más completaron esta guía.
Un agradecimiento especial a estos traductores:
100%

¡ Oxer nos está ayudando a reparar el mundo! ¿Quieres contribuir?
Empezar a traducir ›

Before start, make a clone of your old HD into the new one, if you don't want to initiate a fresh copy. (Carbon Copy software is good).
ColmillodeChile - Contestar
Besides using WD 500GB models, are the WD 640GB and WD 750GB (the 9.5mm thickness model) good to go for? I am still considering as I have heard from other websites on the computer does not draw enough power to power up the 640 and 750 as it has the clicking sound and the rainbow keeps appearing. Anyone has install one before yet?
Please advice. Appreciated! Thanks a million to all the Mac gurus out there!
Danny Lim -
What is this about removing the PRAM battery causing a reinitialization of the HDD? For serious?
Adrian - Contestar
No, that's nonsense
max damage -
Wait, I misunderstood you. I thought the comment was directed at the PRAM battery removal page. Silly me.
Nevermind. Yes, it is always a good idea to backup one's data before doing stuff like this. I never do, and have never had any problems, but it's still a good idea.
Adrian - Contestar
The two screws removed in step 3 should not be mixed with screws in steps 5 through 7. Though similar, they are actually slightly shorter and have a bigger head. If you put the longer screws back in here when reassembling, the button to unlatch the top will not work properly.
Doug - Contestar
I think you may have commented on the wrong page. This page only has 3 steps, and the screws are removed in step 2, not 3.
(MacBook Pro 15" Core 2 Duo Modelos A1226 y A1260 Reemplazar RAM)
Don - Contestar
I'm not sure how the user notes get attached to the various procedures here, but my comment does seem to show up properly when viewing the steps for Hard Drive Replacement. However, the number of the step may be off if viewed as part of another procedure.
Doug - Contestar