Introducción
[vídeo|http://www.youtube.com/watch?v=B3oGp1IaQ...]
Reemplazar la carcasa superior requiere la eliminación de casi todos los componentes de tu MacBook Pro. También deberás transferir tu antiguo trackpad a tu nueva carcasa superior.
Qué necesitas
-
-
Extrae los siguientes diez tornillos:
-
Tres tornillos Phillips #00 de 14.4 mm
-
Tres tornillos Phillips #00 de 3.5 mm
-
Cuatro tornillos de resalto Phillips #00 de 3.5 mm
-
-
-
Usa el borde de un spudger para levantar el conector de la batería haciendo palanca para extraer su toma de corriente de la placa madre.
Prying the battery connector off does not take much force. I did exactly what the guide suggested (walked it off back and forth) with the spudger without any problems. Just be very gentle, much like with anything inside laptops, they are very fragile and need to be worked with carefully. A+ instructions, battery replacement was a success.
Be patient on disconnecting this one. It worked for me step by step, little by little.
I used the nails of thumb and pointer finger simultaneously - worked pretty fine
I whittled down ends of two wooden strips to use, along with my fingernails to start with. I used halves of a wooden clothespin, but popsicle sticks should work too.
-
-
-
Dobla el cabre de la batería ligeramente para alejarlo de su conexión en la placa madre para evitar que se conecte accidentalmente mientras trabajas.
I put some tape between the connector and socket while working on the drive.
That's a good tip
Anrothan -
Great tip, I did that too
One other note: The screw heads fit flush with the curvature of the case -- which means that they aren't exactly horizontal. In other words, they aren't perpendicular to the table that the computer is resting on. Don't try to force them straight in vertically, because you'll risk cross-threading them. (nearly ruined one screw hole myself!)
On my MacBook Pro, the connector seems to be an integral part of the battery.
I suspect it’s just like the special screwdriver required for seatbelts on cars – to discourage regular consumers from attempting repairs. Of course, this only encourages consumers to use the wrong tool to attempt to repairs
Dissambling my MacBookPro Premium Mid 2012 (i5-3210M 2.5Ghz) was easily, Careful with the screws, use screwdriver fitting exactly with the screws, you damage them very fast. Work very exactly, relaxed with time, consentration, good Tools and with feelings in your hands. Disconnect the Akku was easy if you take care, remove it to be safe, Two screws more, more space to work & haven`t to think about damaging someting. Apple use diffrent screws, you should have many difffrent scewdrivers. It is also good to clean everything inside, With time everything gets very dusty & dirty, don`t forget the sides and little fittings at the case. Use a pinsel, alcohol, soft peace stuff, it will look like new. If you have knowledge & experience, you can paint it in any colour or airbrushing for individualizing. You can also just polish it with a soft Politure (Sonax car Polish No1, NOT with wax or take an other light Politure you familiar & can do the job, A Laptop should serviced once a year, keeping it good working over years
First thing i do is open & cleanig everything inside,specially the cooling & fan, renew the thermal paste with an high quality product. Install the Nain System, clean up Bloatware and other unnecessary things, install standard software for daily use, additional change system components against better one (Edge to Firefox, Windows Media Player to VLC , an Office Suite and configuring everything for Data Protection, Privacy- & Indentety Protection, install Drivers from the component Manufactur (incedible effect, disable limitations, more functions, work better & faster, increasing performance, additional change the WiFi & Bluetooth Card to a better one a UMTS WWAN to an LTE Card, increase RAM with two Dual-Channel working SODIMMs, Use M2 or 2,5" SSD if no M2 Slot aviable) as System- and Software iDrive, a FAT32 formatted 32GB Partition to be safe of metaviruses comes with harmless downloads, and a big 2,5 HDD to store the user data. What does you guys think about this? Old Computer become a new life,
I livein Austria, near Vienna, if someone needs help or anything else, i would be glad to help. I always searching old or broken devices to bring them to new live. I also searching for spare parts, specilly a Bottom & Side Case and a 256GB or higher NGFF Storage Card for a Sony Vaio Tab 11 SVT1144HE (2014), some 14,1" Displays for a HP Probook 440G5 (2016), Elitebook MT 43 Mobile Thin Client, (2011), Dell Vostro 3460 (2012) Lenovo Thinkpad T440s (2014), and a Logic Board for an Lenovo Ideapad 330-15ARR (2017, damaged by Water i think) and a Logic Bord for an Alienware 17R4 with i7-6870HX & Nvidia 1080 (2018, CPU dead, maybe there is a repair Guide or workaround to bring it back to Life). I need always 8GB or 16GB DDR3 and DDR4 RAM Storage (perfectly two ident one for Dual-Channel use for Laptops, M2 SATA 6GB/s and NVMe PCIe SSDs 500GB or more and 2,5"SSD or HDD with 1TB or more and 3,5" HDD with 4GB or above. If you have some of this or other useful parts and doesn`t need them, please make me an offer, maybe
2
an change something you need. This is not a Business what i do, it`s more a Hobby with challenging new Excercices.. Thats the best Point. Plase forgive me as a Newbie this very long Post in the wrong Section, but if you are start writing you cannot stop.... But now i have to come to an end and would be happy if someone wants to get in contact. My E-Mail is: udontknowme@gmx.at (the adress name is just a notice against Big Data and for Privacy Protection!
-
-
-
Utilice el borde de un spudger para hacer palanca suavemente hacia arriba y hacia afuera del conector del ventilador en la placa lógica.
-
Tenga cuidado de no romper el enchufe de plástico del ventilador de la placa lógica mientras utiliza su spudger para levantar el conector del ventilador hacia arriba y fuera de su enchufe. El diseño de la placa lógica que se muestra en la segunda imagen puede ser ligeramente diferente al de su máquina, pero el enchufe del ventilador es el mismo.
I successfully soldered the fan connector back on for a friend. I used a small soldering iron (maybe 6-10 watts) and ground the tip down to a very fine point. Also used a magnifying light and very fine rosin core solder. I took my time and lined everything up and was careful not to heat any other junction unnecessarily.
Yup. Be careful on this one. I was trying to gently pry up and popped it off the socket. Computer working fine after replacing magsafe board, but no fan for cooling…
This one is really delicate, as pointed out. Be careful if using the pointed end of a spudger NOT to dig down and under ….there’s a layer of plastic-y insulation that can be torn. I accidentally gored it with the pointy end of a spudger and it was slightly ripped. Fortunately, I was able to press it down and there was no problem when the cable was reinserted.
For less than $16 I ordered a new fan from amazon. Fans eventually start making noise. If they fail, your system could expire from heat. Consider simply replacing your fan since this model is now about five years old. Here’s link:
I simply skipped this step and left fan wire connected to logic board. Just unscrew screws from Step 6, put fan on the logic board and remove whole stuff togheter.
Thanks, I did that too,,
a lot easier
sorry i dont understand what you did? could you please explain more detailed?
Olivier -
I would like to do the same thing too. I took the fan out of its socket but with the wire still attached to the logic board. How do you remove the wire from the fan and reattach the new fan to it?
Can you please explain with a little bit more detail?
Ifix2 -
I used a really thin, plastic spudger gently inserting from each side on mid-2012 and then very gently twisting the spudger. It worked fine without tearing or damaging anything. When reinstalling the connector, do not forget to twist it 180 degrees so that the open side of the connector is facing down to insert properly for seating.
-
-
-
Retira los siguientes tres tornillos que sujetan el ventilador a la placa lógica:
-
Un tornillo Torx T6 de 7,2 mm
-
Dos tornillos Torx T6 de 5,3 mm
I think so too, (maybe on a certain batch?) tried a T6 and its too big
I wasn’t able to open mine up. The heads looked like little triangles instead of hex torqx things. Is there a chart with the head shape of all the bits you can buy? I want to just get the one.
They might be tri point
they were T6 for me
T5 for me, my MBP was manufactured in 2015.
When seating the fan, be aware that the cutout on the fan for the wire harness may not match up with the cutout on the board itself. Line the wires up to the board and then seat the fan in an incremental manner - gently pushing at each connecting hole. Then put the screws in without tightening at first. Once all of the screws are seated, then sequentially snug them up. Finally, push down gently on the fan and snug up each screw without over tightening. I found that the fan seats a tad further and I wanted to avoid future rattles. DO NOT OVERTIGHTEN THOUGH.
-
-
-
Levante el ventilador de su lugar en la placa lógica, teniendo cuidado con el cable que podría quedar atrapado.
Note that, as per the photo, the fan goes in label side DOWN. Took me a few minutes to figure that out!
Before reinstalling the new fan and for novices like me, do not forget to have a can of compressed on hand to clear out years of dust, fine fibers, and maybe even a cat hair from the fins blowing outward. Do not shake the bottle and hold it upright, and use small squirts of air.
-
-
-
Utiliza la punta de un spudger para sacar el cable del altavoz/subwoofer derecho por debajo del dedo de retención moldeado en la caja superior.
-
Jala el cable del altavoz/subwoofer derecho hacia arriba para sacar el conector de su enchufe en la placa lógica.
Reminder: When replacing the cable the connector should be placed in from above. This fooled me and I damaged the seat a bit, but not enough to prevent proper connection.
Excellent guide, I feel this bit could be clearer tho. As it is a socket like a fan connector.
Mine had a foam pad on the top like the other lift-up connections and I’ve accidentally taken the socket off.
So just to be aware if your mac has the foam pad on top of this connection.
This one took me a moment to figure out. I also have the foam pad and couldn't see where the socket begins. Use the flat end of the spudger and go underneath the red/black cable part close to the socket, then slowly lift it up until it loosens a little, then do the same on the other side.
-
-
-
Desconecta el cable de la cámara de la placa lógica.
The camera cable head has bump at both sides. Just use two spudgers to pry it out.
thank you great suggestion
Here's where the mid-2009 13" MacBook Pro 5,5 makes its first major departure from this guide. No such connection exists. At least nowhere I could find on the motherboard.
IIRC the official service manual suggests putting the blunt or wide edge of a black-stick/spudger underneath the cable and then pressing down on said cable to provide better gripping force while pulling the cable out/away from the connector. It’s my tried-and-true method of choice.
Just broke this cable by pulling to hard. Definitely use a spudger to pry out the connector instead of pulling the cable.
Same, any suggestion about its replacement?
Really grip those little bumps on the head with a pair of pliers and gently wiggle!
In case you need replacement parts for the broken cable : http://www.powerbookmedic.com/MacBook-Pr...
To find out how to replace the cable, you can have a look at this tutorial : https://fr.ifixit.com/Tutoriel/Remplacem...
Die Metallverbindung besteht aus zwei Teilen. Der kabelferne Teil drückt den Stecker nach unten. Der kabelferne Teil ist ein festgelöteter Schuh. Mit Hilfe einer dünnen Präpariernadel konnte ich den kabelzugewandten, beweglichen Metall-Teil der Verbindung zum einen horizontal herausschieben, zum anderen habe ich gleichzeitig gezogen. Nicht zu viel Kraft beim Ziehen aufwenden.
Mir hat geholfen, ein Makrofoto vom Stecker zu machen, um ihn zu verstehen.
-
-
-
Desconectar los cuatro siguientes cables:
-
Cable del AirPort/Bluetooth
-
Cable de la Unidad Optica
-
Cable del Disco Duro
-
Cable del Trackpad
On the mid-2009 13" MacBook Pro 5,5 the Airport/Bluetooth cable is different from the other three cables in this step. It's fabric wrapped, and its connection works in a fashion more like the display data cable connection, although it does not have a lock that releases by pulling a tab back over the cable. So, to those of you who are repairing this model, be careful. Prying upward is not the way to remove this cable. I played with it until I could detect which parts were moving which way and why. Although I can't say with precision how the connection works, I removed it by gently coaxing slightly up at an angle and back along the plane of the optical drive. The idea is to pull the cable back out of its socket while lifting slightly.
Too bad we can't post photos in the comments.
-
-
-
Usa la uña para voltear la solapa de retención en el zócalo ZIF del cable plano del teclado.
-
Utiliza la punta de un spudger para sacar el cable plano del teclado su zócalo.
Hello i've a late 2011 and have manged to break the keyboard ribbon cable ZIF socket. Is this a part that can be replaced? Ribbon is still good just the plastic has broken on the edge. Thanks
No, You'll need to replace the logic board. I'd probably just use a wired or bluetooth keyboard and put the money towards a new machine.
I ran into trouble reattaching the keyboard ribbon cable into the ZIF socket. I couldn't grasp it in a way that let me push it all the all back. A local repair guy told me his trick: use a piece of tape. Attach a piece of tape to the ribbon cable and make a tab so you can pull the cable into the socket. Use of a piece of tape that you can easily remove. Works like a charm.
Buy that man a pint! I've been working on computers professionally for a decade and I've never thought of that trick. Brilliant!
Gryyphyn -
Amazing this saved me!
You've saved me countless hours of crying trying to simply push it in
Tunipguy -
Thanks! This saved me hours!
Thank you so much. Very clever idea that works like a charm!
Thank you so much! After 15 minutes of frustration, it inserted in less than 5 seconds.
I didin't read this before, but it was the idea i had in the moment... after 30 minutes of struggle. Thanks!
The tape tip is amazing! Worked first time, perfectly!
aliado -
I read all these comments and immediately thought if I can’t feed this through there how am I going to feed the tape through? This part isn’t sticky.
Oh. The tape is to pull it. Jeje. How silly.
When the time comes you will figure out how important the tape trick is. I promise.
Thank you soooo much!!!!
Billie -
After I put it all back together, the keyboard didn’t work; I traced it to this cable not being plugged in all the way. I used the tape trick to coax it all the way in to seat well and it works like a charm.
It’s worth pointing out that the lever to lift this is at the back of the connector and that you’re pulling it towards yourself - this then releases the plastic on top of the cable that’s holding it in place.
The tape tirck saved my bacon!! Thank YOU!
Thanks so much. This trick saved the day!!!!
One alternative method to the tape trick that worked for me goes as follows:
0. To prevent possible damage, please do everything listed very gently.
1. First, slide one of the corners of the cable into the socket. If the corner is properly fitted, the cable shouldn't go up when you stop holding it down with your hand.
2. Next, slide the corner to its corresponding side (eg: if you slid the right corner, then push it to right). This should leave you with one side of the cable more tucked in than the other; but the whole cable is now in the socket.
3. Gently, try to push the cable the whole way in. At this point it's trial and error, but it's faster than trying to slide the whole cable at once in my experience.
If the cable is correctly inserted, the white lines on it should all be "connected" or under the black top part of the socket. -
-
-
Si se encuentra presente, retira la tira pequeña de la cinta negra que cubre el zócalo del cable de retroiluminación del teclado.
This is the most difficult ribbon cable to reinsert. As noted in the comments for the keyboard ribbon cable above I’d recommend also using a a small piece of tape to help reinsert.
I used Blu-Tac on the end of my spudger to provide a gentle grip to get it to slide in.
-
-
-
Usa la punta de un spudger o de tu uña para voltear la solapa de retención en el zócalo del cable plano de contraluz del teclado ZIF.
-
Extrae el cable de la cinta de contraluz del teclado de su receptáculo.
The first time I reassembled the system I left this tiny ribbon connector under the logic board by accident. If your keyboard backlight no longer works after reassembly it’s because you forgot to reattach this small connector. Fortunately, I caught my mistake before securing the logic board screws. It’s an easy to miss item.
What the part name, i accidently broken this part
Hi! I accidently popped the conector from the logic board. I bought a replacement, but im not sure how to glue/sold it to the board again. Can you help?
-
-
-
Usa el extremo plano de un spudger para apalancar el conector del sensor de sueño/batería hacia arriba desde su zócalo en la placa lógica.
the sleep sensor/battery indicator were not included with my new case, i had to transfer them over from my old case. once the battery is out (step 22), you can see the three screws you need to remove in order to take it out. it’s also secured by adhesive. the button for the battery indicator will likely fall out (at least it did on mine) when you remove the board, so be careful not to lose it…my new case did come with the button for the battery indicator (even though it didn’t come with the board or cable), but i just re-used the old one.
I forgot to place this tiny flex cable on top of the mainboard, and tried to recover it from under (lazy!) so I broke it.
In general I would tape all those connectors out of the way of the mainboard. Use paper tape or paper labels as you want to avoid the electrical discharge associated with peeling off of plastic tape.
Update: the computer works even without this feature. Of course the led battery indicator does not work, but it is not a big loss.
Does it still sleep properly?
The flat battery indicator cable sits directly underneath the headphone jack/port and then goes to the top on the right side of the battery screw. If you forgot to put it underneath the port when reinserting the logic board (which leads to the battery not fitting), carefully slide it underneath the port into the small available space with a spudger.
-
-
-
Sujeta la lengüeta de plástico que esta sujeta al bloqueo del cable de datos de la pantalla y gírala hacia el lado de entrada de DC del equipo.
-
Tira del cable de dato de la pantalla para sacarlo de su zócalo en la placa lógica.
On my mid-2009 13" MacBook Pro 5,5 the display data cable was square with the motherboard, rather than at an angle. I'm not experienced with working on computer connections, but if I were going to describe this procedure, it would be more like:
"Grasp the plastic tab on the end of the display data cable connection, and pull it gently back over the cable, toward the DC-in board. The tab is connected to a flat rectangular 'ring' that locks the cable to its connection, and when you pull the tab, the rectangular lock will flip back over the cable, allowing the cable to be removed by pulling the same direction, parallel to the surface of the motherboard."
Exactly the same as on the Mid2010 Model - never pull up, always parallel to the board, using the spudger to keep the cable down might helpfull while pulling with fingers the cable towards DC-In at the right side.
Hans -
My display is not working after reassemble the mac.
Any reason?
I had the same problem, and it was solved by slightly unscrewing the 14.4 mm screw that sits nearest the ESC button (upper left hand side, if the computer is open as if you’re using it). All the way screwed in, and the display conks out (something must be getting pinched). Slightly loosened, and the display immediately came back!
I choose not to remove this, just laid the board over. Worked just fine.
I second this. It’s quite easy to leave this connection in place. The board flips over nicely, and everything is still accessible.
when reattaching the display cable, i used the spudger to tuck the spongy top flap underneath the cable lock, so that i could then get the cable lock down the entire way. i couldn’t get it under there (and get the lock closed) without it, the top part of the display cable blocked it.
When replaced the logic board when reassembled lap top screens not working. Saw others similar issues plugged in my monitor it’s working great must have messed up any ideas how to fix?
Hi Wayne, and Michael! I had the same problem, and it was solved by slightly unscrewing the 14.4 mm screw that sits nearest the ESC button (upper left hand side, if the computer is open as if you’re using it). All the way screwed in, and the display conks out (something must be getting pinched). Slightly loosened, and the display immediately came back! —Shannon
My display is not working after I put everything back together, can hear the macbook chime. Tried shining light onto the display, see nothing. Tried loosening the screw slightly like someone suggested here, that does not help either. Tried cleaning the contacts of the LVDS cable, nothing. Any help appreciated.
Found a solution: https://www.youtube.com/watch?v=KjIQXwit...
This resolved it for me. My clasp wasn’t didn’t seem worn in any way but it seemed when it was clamped it caused the short circuit causing my screen to be black upon turning on. Lifting the clasp immediately resolved it. Odd issue! Thanks very much for the video. Incredibly helpful.
Same problem as other users here at this point. I screwed the casing a little, and it worked, but I like to do things properly.
If you want to fix it 1) open your computer.
2) the flex of the screen has a kind of little lock made on wire.
3) put the lock around the connection you should ear a little sound when it reach the good position. Make sure the tongue of the flex is above of the lock. And then it is fixed.
Wish it helps and sorry by my English.
Idk how to include photos
When reinstalling the cable, it is quite easier to do WITHOUT the display data cable retainer (step 17), in case you are reassembling everything in reverse order, as said in the guide's conclusion.
While this can make the resitting of the cable easier, one of the retainer's screws is directly below the cable, so you'll probably have to do some funny screwing to reinstall the retainer. -
-
-
Retira los siguientes tornillos:
-
Cinco tornillos T6 Torx de 3.6 mm.
-
Dos tornillos T6 Torx 4.3 mm.
-
Dos tornillos T6 Torx de 7.2 mm.
-
Cinco tornillos T6 de 3.0 mm
-
Dos tornillos T6 de 3.6 mm
-
Dos tornillos T6 de 6.7 mm
2 of the 7 listed 4mm screws attaching the logic board are actually 4.5 or 5 mm.... unfortunately. I didn't notice that until I was reassembling. so I don't know which positions they came from.
I'm just noticing this too... I've put the longer screws as the two on the far left of the picture because they seemed to be the two holes I couldn't see the bottom to.
Just took one apart and paid attention this time. On this Mac, the screws colored orange should be red, and the 2 screws on the left side of the board should be orange (they’re a bit longer).
For keeping the screws straight I drew a simple diagram and placed them on it head down/threads up in their respective positions. Then all screws went back into their original positions without any guess work. Another suggestion I have during assembly is to start the screws without torquing them all the way down - leave them a little loose to allow some adjustment of the logic board for getting them all to line up with their holes, then torque them down. This technique also works for the screws on the bottom cover/lower case.
Great guide! Saved me some dough, and now my MagSafe connector stays nice and cool.
for me the two on the farthest left were the 4.3mm screws. otherwise all went as described
on something like this (like in iphones) i print the picture and place the screws on the picture. saves some problems and guessing.
Well on my mid 2012 MacBook Pro the screw heads are definitely not T6 but rather J000. Will place the removed screws on a paper drawing of logic board. Good tip ….
-
-
-
Retira los dos siguientes tornillos:
-
Un tornillo Phillips de 8.6 mm
-
Un tornillo Phillips de 5.5 mm
-
Retira el retenedor del cable de datos de la pantalla de la caja superior.
-
-
-
-
Usa la punta de un spudger para quitar suavemente el micrófono del adhesivo que lo sujeta a la carcasa superior.
I finally got that mic out by gripping it between two spudgers like a pair of chopsticks and gently pulling it out at an angle. The rubber shroud on it makes the thing hard to grip, and when I finally pulled it free, part of the adhesive ring tore off and stayed stuck to the chassis. When reassembling the machine, I had to kind of squish it back into place. It doesn’t hold quite as well as it did before, but it seems fine.
when reseating the logic board, first install the DC board in position and loosely seat the screws. then try to align the logic board to the 3.6mm screw housing closest to the firewire/ thunderbolt port and align the board to the ports and gently drop it into position. watch out for the cables that can get snagged under the board while seating it.
-
-
-
Acopla los muchos conectores cerca de sus bordes, levanta la placa lógica del extremo más cercano a la unidad óptica.
-
Sin doblar la placa, maniobra para sacarla de la caja superior, teniendo en cuenta la conexión flexible a la placa de entrada de DC que puede quedar atrapada en la caja superior.
-
Retire la placa lógica.
I did all this, and worked! .but Im wondering, has anybody unscrewed what seems to be a mini heatsink (black 1 inch square housing) on the integrated GPU? Could I re apply paste on that?
I did make the change yesterday. inside it has a thermal pad, that appears to be 3mm or less. i try to clean on my best. I make a making a very tick pea size and added again. but i have no idea if it works or not. still having temps on 56c on idle. there is no much info on that. i use MX-4 from arctic. but i still, in my option, a little to for my use. if someone have more info on that part on the late 2011 i7 macbook pro 13inch please send the info.
I did and applied Arctic Silver 5 underneath instead of the crap tape they put under there. This alone stopped the random freezing and rebooting problem I was having with this macbook pro. I recommend if you're already that deep into it, you might as well do it. I'm glad I did.
ej257lgt -
Need help. After I put everything back together, everything works fine but my macbook just wont charge. Any diagnosis on this? Anyone who can explain to me how the battery and the charging work in a Mac?
If this happened to me, I would first suspect I hadn't completely connected the DC-in board cable. If I hadn't just replaced the battery, I would wonder if the battery was good. MagSafe power cable connect connections fail too, especially if they've been attached for a long time to a red hot DC-in board.
If those failed, I'd head to the genius bar!
I had this problem. I accidentally cut the a cable from the DC-in board and I had to buy this component and replace it. You have to be very careful when mounting back the logic board in its position to not get a cable from the DC-in board cut by the screws.
The fan exhaust grille was catching onto the speaker unit so I had to skip to step 28 to take it out. After taking out the airport card the speaker was able to move away from the fan grille and let me lift out the logic board.
Also be sure to lift up the logic board to a slight angle so it clears the optical drive then pull it out gently at that angle. Do not pull it ulwards.
The mainboard got stuck with the speaker and I can't lift it up. So I removed the first speaker screw (Wich is nearest to the mainboard) then I was able to remove the mainboard
I removed the battery …. helps getting the logic board out.
-
-
-
Retire los dos tornillos siguientes:
-
Un tornillo de tres puntas de 5,6 mm
-
Un tornillo de tres puntas de 13 mm
-
-
-
Utiliza la lengüeta de plástico adjunta para extraer la batería de la carcasa superior.
once the battery is out, you may also need to remove the sleep sensor/battery indicator and move it to your new case if it didn’t come with them. mine didn’t, so i had to do so…it’s secured by three screws (i believe phillips) and some adhesive. the battery indicator button was loose on mine and just fell out when i removed the board, so be careful not to lose it.
-
-
-
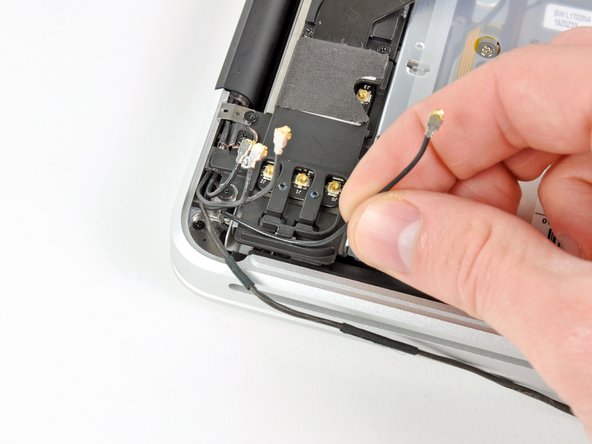
Desconecta los cuatro conectores de antena encuadrados en rojo en la primera imagen.
-
Para hacerlo, usa la punta de un spudger para levantar los conectores de los zócalos en la placa AirPort/Bluetooth.
-
Desconecta cada uno de los cables de sus canales en el soporte AirPort/Bluetooth.
they are ”antenna connectors” going to the “AirPort/Bluetooth” assembly so I am guessing they are needed for the bluetooth. I removed them with a pair of small flat screwdrivers to gently walk them out of the sockets - which are quite deep.
One cable snapped on reassembly. It snapped from inside the copper band where the wires are bare of coating. This is figured made all three of these wires interface and share whatever they are transmitting. So, I crimped the broken wire’s ends and shoved it back into the sleeve. I have tested my wireless features for two days and everything works like a charm.
-
-
-
Retira los cinco tornillos siguientes:
-
Dos tornillos Phillips de 10,3 mm
-
Dos tornillos Phillips de 3,1 mm
-
Un tornillo Phillips de 5 mm
-
-
-
Tira del conjunto AirPort/Bluetooth y el altavoz de subgraves hacia arriba cerca del centro del lado de la unidad óptica hasta que se separen entre sí.
-
Retira el ensamblaje de la placa AirPort/Bluetooth.
-
-
-
Despega el cable del altavoz derecho de la carcasa superior.
Need to put the vertical piece just above the demonstrator's hand into the new case, or else the CD/DVD drive, logic board, and fan are missing screw holds.
This is where I stopped following the guide because I was only replacing the keyboard. (There are sooo many screws holding the keyboard down. It took a long time.)
-
-
-
Usa una herramienta de apertura de plástico u otro objeto delgado para hacer palanca para levantar con cuidado el altavoz derecho del adhesivo que lo sujeta a la carcasa superior.
-
Haz palanca a lo largo del borde del altavoz derecho hasta que se separe de la carcasa superior.
This was perhaps the hardest step. I could not get under the recommended side and had to start at the other end. The speaker was adhered so tight to the keyboard it was impossible to pry up on the right side. But no damage was done.
-
-
-
Saca el altavoz derecho de debajo de la abertura de la unidad óptica.
Fourth- antenna wasn’t on the replacement case. I peeled the antenna off the old case (starting opposite the cable) and removed the disc screen, put both in the new case. The new case doesn’t have a hole for the screw securing the top of the antenna but the adhesive should hold it fine. I’m not sure if that screw acts as a grounding point, because there’s a bracket further up that antenna that also provides a ground from the shielding.
i also had to remove the plate with the antenna underneath to transfer it to the new case. there is an additional screw you need to remove in order to do this (you can see it just to the left of the index finger on the hand in the picture), and it was also attached by adhesive. i removed the screw and then used the spudger to get under the plate and loosen it from the adhesive.
unlike the previous commenter, there was a screw hole on my new case to re-attach the antenna plate (in addition to the adhesive).
Does anyone actually know what it is for though? Is it necessary?
It’s either for the Bluetooth or AirPort or possibly WiFi. I don’t know which one. Given the possible applications it’s probably best to move it to the replacement case. Just be careful not to bend it when removing since I don’t know how delicate the internal construction is. Also, when installing it in the new case, make sure it’s stuck down well, maybe even add some new double side tape. Where it’s positioned, if it pops up it could block access to the optical drive.
As indicated, carefully remove the metal plate where the antenna is soldered. The plate is glued to the unibody topcase. It came loose when forcing a long strong tool like a flathead screwdriver underneath (spudger too weak) and following the metal plate from the hinge down along the superdrive opening. Careful not to damage the solders. The metal plate is so thin it could tear, but it comes loose quite evenly. Careful here!
-
-
-
Abre tu MacBook Pro para que la pantalla quede perpendicular a la caja superior.
-
Coloca tu MacBook Pro abierto sobre una mesa como se muestra en la imagen.
-
Mientras sujetas la pantalla y la carcasa superior con la mano izquierda, retira el tornillo Torx T8 restante del soporte inferior de la pantalla.
-
-
-
Retira el último tornillo Torx T8 restante que sujeta la pantalla a la carcasa superior.
-
-
-
Toma la carcasa superior con la mano derecha y gírala ligeramente hacia la parte superior de la pantalla para que el soporte de la pantalla superior quede libre del borde de la carcasa superior.
-
Gira la pantalla ligeramente alejándola de la caja superior.
-
Levanta la pantalla y sepárala de la carcasa superior, prestando atención a los soportes o cables que puedan quedar atrapados.
-
Queda la carcasa superior.
-
-
-
Retira los cuatro tornillos Phillips de 1,2 mm resaltados en rojo.
-
-
-
Retira con cuidado el borde del panel táctil más cercano al teclado de su hueco en la carcasa superior empujándolo hacia afuera de los soportes conectados a la carcasa superior.
-
Desvía el cable del panel táctil a través de su ranura cortada en la carcasa superior.
I concur with Anonymous 596. There is a support wall that runs front to back, under keyboard, held down by 2 Phillips screws that will need to be removed & transferred to new upper case. You can see it being touched by index finger in this pic.
-
-
-
Saca el trackpad del borde exterior de la carcasa superior.
-
Retira el trackpad y déjalo a un lado.
There's a missing step here. In addition to the trackpad, there's an aluminum structural piece that sits under the center of the keyboard, that has to be migrated from old to new case. It's clearly shown to the left of the repair-person's right hand in step 44.
-
-
-
Usa un destornillador Torx T6 para instalar sin apretar el tornillo de fijación de 1,1 mm incluido con su nueva carcasa superior en su orificio roscado cerca del centro de la abertura del panel táctil en su nueva carcasa superior.
I bought a used replacement case and had to move a few parts from the old case to the replacement. This included the battery indicator cable, the clips for the trackpad and the bracket in the center of the top case. So worth it at this point to compare your old and replacement case to be sure everything you need is there.
my new case came with the set screw already installed, and i couldn’t loosen it. i didn’t want to strip it and cause a bigger problem, so i left it alone. the trackpad seems to work fine so far regardless, although i may take the bottom case off and play with it a little if i get a chance.
i also (just like Ron) had to move the trackpad clips, battery indicator and center bracket to the new case. they were not included.
-
-
-
Inserta con cuidado el cable de tu antiguo panel táctil a través de la ranura cortada en tu nueva carcasa superior.
-
Usa una mano para sostener el cable del panel táctil en su lugar mientras inserta las dos lengüetas de retención en el borde exterior del panel táctil debajo del borde de la carcasa superior.
-
Tira del cable del panel táctil mientras colocas el panel táctil en su espacio vacío en tu nueva carcasa superior.
-
-
-
Aprieta los dos tornillos exteriores a lo largo del borde interior del trackpad y verifica su alineación en el lado exterior de la carcasa superior.
-
Si su alineación se ve bien, instala el resto de los tornillos Phillips a lo largo del borde interior del panel táctil.
-
Antes de volver a armar stu máquina, verifica que el tornillo de fijación aún esté instalado en una posición en la que el mouse haga clic correctamente.
You can actually replace the keyboard alone fairly easily! I don't know why everyone says you have to replace the whole top case, because if you've got the guts to go this far, you might as well just peel back the illuminator cover and get to work pulling all those tiny screws in the keyboard... Just be careful when peeling up the black adhesive keyboard cover, because you will need to replace it. I used the edge of the ifixit Sesame tool (very thin flat metal opening tool) to carefully slip under any bits of adhesive, and had the keyboard exposed in no time. Also be careful because the clear plastic sheet is actually the keyboard illuminator. Once under all that, it's a mere 50 or so tiny screws, 2 screws in the power button backing, and you've got the keyboard out. Use a magnetized #000 phillips, it will make life much easier than anything else.
Absolutely right. I just replaced a keyboard the same way without much problem but i just want to add that those tiny screws need extra care as the heads can get damaged very easily. If damaged, they become very difficult to remove.
Masood -
I did just that on my mid-2010 MacBook Pro about a month ago and sadly will have to do it to my wife's Early-2011 one next week. I was cleaning all the crap off her keyboard and apparently nuked the K and 0 keys on her keyboard. Probably my ply challenge was aligning the keyboard illuminator. It's still not aligned properly on mine so some keys are better lit than others, but otherwise it was a relatively easy fix and far cheaper than replacing the entire upper case.
I replaced my keyboard less than an hour ago. The biggest pain/most time consuming was reattaching the ZIF connector for the keyboard and backlight. No matter what I did I could not get the %#*@ thing to reattach. What sadist designs these things? I had to walk away from the project for an hour and finally success.
All those screws will make you go crosseyed!
It helps to put some tape along the cable going lengthwise to the cable, and then fold the end of the tape onto itself to give yourself something to hold onto. This will give you some leverage to get that puppy into the socket.
I’m glad you managed !!!
I’m suffering :( take a part about 5 times…… ordered new (used) keyboard, the same results. I tested logic board in my daughter MAC, board works 100% no trouble ……. what could be wrong? there a secret how to reassemble keyboard parts together? I ripped a little bit black plastic thing, not top one with tiny connectors……
In the end I have two keyboards, cleaned and taken a part, both of them acting identical when installed. Some keys respond by giving absolutely not relevant symbols, beeping noise come with almost every key i pressed…..
Recovering after massive cappuccino spell after surprising hug :(((((
I swear to post photo step by step, if I will achieve this one……….. assemble back to 100% working condition after total reassembling, ultrasonic cleaning and drying………. just keyboard panel.
Give me nightmares :) will be first time I have so much trouble to fix………
I'm wondering about putting it back together. Different wires and small parts etc were glued or adhered in some way to the case or sides or whatever, as it is put together in the beginning. Is that just to make it easier to put it back together? Should I try to stick them back the way they were with something? Can you use tape or glue if it's just a wire? I wouldn't want to use something that would melt...or is this not something to worry apout?
I just used 1/4 polymide tape, and iFixit double sided tape. Works like a champ.
-


Para volver a ensamblar tu dispositivo, sigue estas instrucciones en orden inverso.
Para volver a ensamblar tu dispositivo, sigue estas instrucciones en orden inverso.
Cancelar: No complete esta guía.
78 personas más completaron esta guía.
Un agradecimiento especial a estos traductores:
100%

¡ Francisco Javier Saiz Esteban nos está ayudando a reparar el mundo! ¿Quieres contribuir?
Empezar a traducir ›

3 comentarios
Great stuff. I could replace a keyboard in my son's MBP (2011) without any problem. However, later I found the laptop not going to sleep when the lid is closed. Moving a small magnet around the screen bezel does the trick. I found the sleep sensor/battery indicator connector broken. I also replaced that but the problem persists. I must also add that I could replace a wifi card in a friends Macbook Air. Thank you very much for these documents and the pictorial guide.
I am currently typing on my repaired macbook pro, it took awhile and the a-stock replacement case had a few problems like missing foam bits, metal spacers, the electrical part under the disk drive opening and a broken off screw in one of the two power button locations but with some careful removal of the items from the old case and placement with a bit of superglue in the purchased case, it all went back together. And works which is what counts. It was a mid 2011 that suffered a coffee spill when only 2 months old put away until now. (in other words the new used case had been stripped clean which should be mentioned in the sales description) Otherwise a great instructional guide.
Great walk-thru. Be sure to check out the step’s comments. Many tips are there, especially for the reassembly. Some tricks there help. Be sure to check the comments on the keyboard ribbon. The tape trick is the only way I think you will get it back in that slot.
How much weight can I save by removing the optical drive?
gunes314 - Contestar
You can save a lot of weight if lets say your installing a solid state drive or putting in a second hard drive but if you know that you use the CD/DVD disc drive a lot then you might just want to leave the drive alone.
Marshall WahlstromHelgren -
Tip: Use one of those weekday pill holders to have a cheep way to store screws you remove and each day of the week can be for different sizes or parts. It has been handy to have (much less expensive than the magnetic mat.
Robert Wacker - Contestar
Hello, where can I buy the screws I need in case I lose one of them?
taylornya - Contestar
iFixit sells a kit: MacBook Pro Unibody Lower Case Screw Set
Darrell Johnson -
I have one stripped screw... How opening without drill it?! Any suggestions please?
rodrigosady - Contestar
I also stripped a couple screws. I wasn’t able to open it up without drilling. After drilling the heads and removing the cover it was easy to hacksaw the tip and unscrew with a standard driver.
Michael Wilkens -
We have a guide for that!
Cómo quitar un tornillo barrido
Sam Omiotek -
My top tip - make sure you buy good quality Phillips screwdrivers and a magnetic holder. Cheap screwdrivers won’t get the screws undone safely. Without a magnetic holder you have no chance of getting the tiny crews in and out safely.
jeremyyoung - Contestar
A good Phillips 00 is your friend here. Also, when reinserting the screws, gently start anticlockwise and you wil feel a click at the start of the thread. This tells you you’re in the right place and less likely to cross-thread through force in the wrong place.
Iain Boyd - Contestar
I feel like these are 000 screws. Amazon sales describe them as such and my 000 screwdriver fits better
cam2000deluxe -
Before ordering a new Trackpad remove the existing battery and try clicking the Trackpad. If it clicks OK with the battery out the source of problem is likely a swollen battery, which should to be replaced even if it still works to some degree. From the side of the battery you will likely see the soft part of the battery bulging beyond the hard case.
Patrick Langvardt - Contestar
That’s absolutely correct as I can testify. With the battery removed I also adjusted the T6 set screw that adjusts the sensitivity of the trackpad click, evidently someone had cranked mine down tighter than the factory setting.
Gary Register -
Le quatrième paragraphe dans les instructions en français n’est pas correct : ce ne sont pas les 2 petites vis, mais les 7 petites vis qui sont inclinées. Et les 3 grandes sont bien verticales.
Degeorges - Contestar
Bonjour ! Merci de votre observation. J’ai corrigé la traduction. iFixit étant un wiki, n’hésitez pas à modifiez si vous remarquez une erreur :) Encore merci de votre attention et à bientôt !
Claire Miesch -
Tip: if you have a magnetic screw mat or similar, lay the macbook over the mat to make sure it catches any screws that may decide to fall of and hide under your table
Moritz - Contestar
Funny, it's not her hands that are doing the close ups. :)
Cinemated Man - Contestar
What's the difference between the shouldered and non shouldered screws? They look exactly the same to me.
MLNLRD - Contestar