Saltar al contenido principal

MacBook Pro 13" Touch Bar Late 2016 Logic Board Assembly Replacement

Sólo Prerrequisito
Esta guía solo debería usarse como prerrequisito para otras guías. Por tanto, estará incompleta.

Qué necesitas

  1. MacBook Pro 13" Touch Bar Late 2016 Logic Board Assembly Replacement, Remove the keyboard connector screws: paso 1, imagen 1 de 2 MacBook Pro 13" Touch Bar Late 2016 Logic Board Assembly Replacement, Remove the keyboard connector screws: paso 1, imagen 2 de 2
    • Use a T3 Torx driver to remove the two 1.9 mm screws from the keyboard connector bracket.

  2. MacBook Pro 13" Touch Bar Late 2016 Logic Board Assembly Replacement: paso 2, imagen 1 de 1
    • Remove the keyboard connector bracket.

  3. MacBook Pro 13" Touch Bar Late 2016 Logic Board Assembly Replacement, Disconnect the keyboard: paso 3, imagen 1 de 2 MacBook Pro 13" Touch Bar Late 2016 Logic Board Assembly Replacement, Disconnect the keyboard: paso 3, imagen 2 de 2
    • Use a spudger to disconnect the keyboard connector by prying it straight up from the logic board.

  4. MacBook Pro 13" Touch Bar Late 2016 Logic Board Assembly Replacement, Disconnect the display board: paso 4, imagen 1 de 2 MacBook Pro 13" Touch Bar Late 2016 Logic Board Assembly Replacement, Disconnect the display board: paso 4, imagen 2 de 2
    • Remove the two 2.9 mm T3 Torx screws securing the aluminum cover on top of the main display cable.

    • Remove the cover.

  5. MacBook Pro 13" Touch Bar Late 2016 Logic Board Assembly Replacement: paso 5, imagen 1 de 2 MacBook Pro 13" Touch Bar Late 2016 Logic Board Assembly Replacement: paso 5, imagen 2 de 2
    • Remove the two 1.7 mm T3 Torx screws securing the aluminum cover on top of the display cable flex connector.

    • Remove the cover.

  6. MacBook Pro 13" Touch Bar Late 2016 Logic Board Assembly Replacement: paso 6, imagen 1 de 2 MacBook Pro 13" Touch Bar Late 2016 Logic Board Assembly Replacement: paso 6, imagen 2 de 2
    • Pry the display board flex cable straight up from its socket to disconnect it from the display board.

  7. MacBook Pro 13" Touch Bar Late 2016 Logic Board Assembly Replacement, Remove the Thunderbolt port screws: paso 7, imagen 1 de 2 MacBook Pro 13" Touch Bar Late 2016 Logic Board Assembly Replacement, Remove the Thunderbolt port screws: paso 7, imagen 2 de 2
    • Using a T3 Torx driver:

    • Remove two 1.4 mm screws from the Thunderbolt port connector bracket on the left.

    • Remove two more 1.4 mm screws from the Thunderbolt port connector bracket on the right.

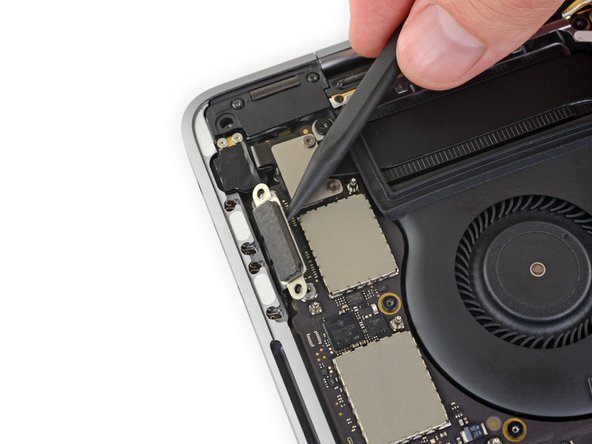
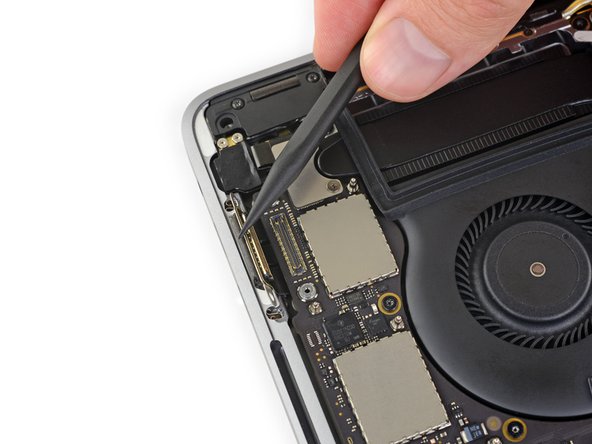
  8. MacBook Pro 13" Touch Bar Late 2016 Logic Board Assembly Replacement, Disconnect the left Thunderbolt ports: paso 8, imagen 1 de 3 MacBook Pro 13" Touch Bar Late 2016 Logic Board Assembly Replacement, Disconnect the left Thunderbolt ports: paso 8, imagen 2 de 3 MacBook Pro 13" Touch Bar Late 2016 Logic Board Assembly Replacement, Disconnect the left Thunderbolt ports: paso 8, imagen 3 de 3
    • Use a spudger to disconnect the left-side Thunderbolt port connector by prying it straight up from the logic board.

    • Pry from the inside edge, nearest the fan.

    • Gently push the connector aside so it won't interfere with logic board removal.

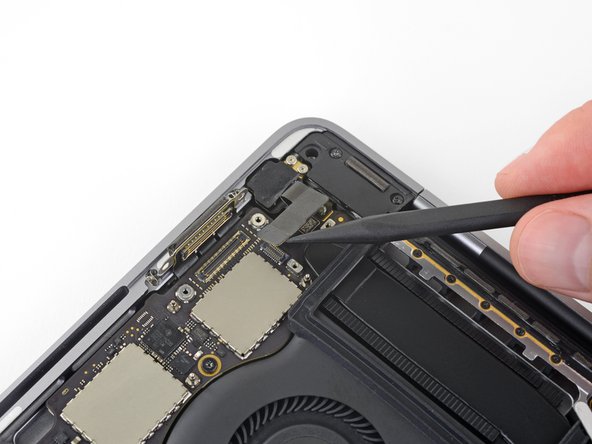
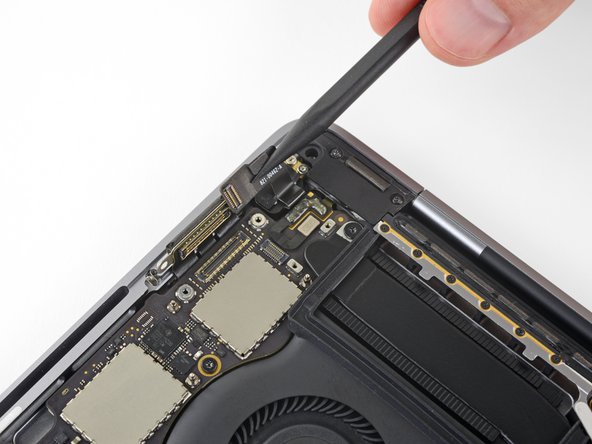
  9. MacBook Pro 13" Touch Bar Late 2016 Logic Board Assembly Replacement, Disconnect the right Thunderbolt ports: paso 9, imagen 1 de 3 MacBook Pro 13" Touch Bar Late 2016 Logic Board Assembly Replacement, Disconnect the right Thunderbolt ports: paso 9, imagen 2 de 3 MacBook Pro 13" Touch Bar Late 2016 Logic Board Assembly Replacement, Disconnect the right Thunderbolt ports: paso 9, imagen 3 de 3
    • Repeat for the right-side Thunderbolt port connector, prying it up from the inside edge and pushing it carefully aside.

  10. MacBook Pro 13" Touch Bar Late 2016 Logic Board Assembly Replacement, Remove the Touch ID connector screws: paso 10, imagen 1 de 2 MacBook Pro 13" Touch Bar Late 2016 Logic Board Assembly Replacement, Remove the Touch ID connector screws: paso 10, imagen 2 de 2
    • Use a T3 Torx driver to remove the two 1.9 mm screws from the cover bracket securing the Touch ID and 3.5 mm audio jack connectors.

  11. MacBook Pro 13" Touch Bar Late 2016 Logic Board Assembly Replacement: paso 11, imagen 1 de 1
    • Remove the bracket.

  12. MacBook Pro 13" Touch Bar Late 2016 Logic Board Assembly Replacement, Disconnect the headphone jack: paso 12, imagen 1 de 3 MacBook Pro 13" Touch Bar Late 2016 Logic Board Assembly Replacement, Disconnect the headphone jack: paso 12, imagen 2 de 3 MacBook Pro 13" Touch Bar Late 2016 Logic Board Assembly Replacement, Disconnect the headphone jack: paso 12, imagen 3 de 3
    • Use a spudger to disconnect the 3.5 mm audio jack flex cable by prying it straight up from the logic board.

    • Gently push the flex cable aside.

  13. MacBook Pro 13" Touch Bar Late 2016 Logic Board Assembly Replacement, Disconnect Touch ID: paso 13, imagen 1 de 2 MacBook Pro 13" Touch Bar Late 2016 Logic Board Assembly Replacement, Disconnect Touch ID: paso 13, imagen 2 de 2
    • Disconnect the Touch ID and power button flex cable by prying it straight up from the logic board.

  14. MacBook Pro 13" Touch Bar Late 2016 Logic Board Assembly Replacement, Heat the Touch ID cable: paso 14, imagen 1 de 2 MacBook Pro 13" Touch Bar Late 2016 Logic Board Assembly Replacement, Heat the Touch ID cable: paso 14, imagen 2 de 2
    • Apply mild heat using an iOpener, heat gun, or hair dryer to soften the adhesive under the power button/Touch ID flex cable.

  15. MacBook Pro 13" Touch Bar Late 2016 Logic Board Assembly Replacement, Pry up the Touch ID cable: paso 15, imagen 1 de 3 MacBook Pro 13" Touch Bar Late 2016 Logic Board Assembly Replacement, Pry up the Touch ID cable: paso 15, imagen 2 de 3 MacBook Pro 13" Touch Bar Late 2016 Logic Board Assembly Replacement, Pry up the Touch ID cable: paso 15, imagen 3 de 3
    • Carefully slide an opening pick under the flex cable to separate it from the logic board, and push it carefully aside.

    • Be very careful not to damage this delicate flex cable. The attached Touch ID sensor is uniquely paired to your MacBook's logic board—if damaged, only Apple can successfully replace it.

    • If you have trouble, don't force it—apply a little more heat and try again.

  16. MacBook Pro 13" Touch Bar Late 2016 Logic Board Assembly Replacement, Remove the Touch Bar digitizer screw: paso 16, imagen 1 de 2 MacBook Pro 13" Touch Bar Late 2016 Logic Board Assembly Replacement, Remove the Touch Bar digitizer screw: paso 16, imagen 2 de 2
    • Use a T3 Torx driver to remove the 1.9 mm screw from the Touch Bar digitizer connector bracket.

  17. MacBook Pro 13" Touch Bar Late 2016 Logic Board Assembly Replacement: paso 17, imagen 1 de 1
    • Remove the bracket.

  18. MacBook Pro 13" Touch Bar Late 2016 Logic Board Assembly Replacement, Disconnect the Touch Bar digitizer: paso 18, imagen 1 de 2 MacBook Pro 13" Touch Bar Late 2016 Logic Board Assembly Replacement, Disconnect the Touch Bar digitizer: paso 18, imagen 2 de 2
    • Use a spudger to disconnect the Touch Bar digitizer by prying its connector straight up from the logic board.

  19. MacBook Pro 13" Touch Bar Late 2016 Logic Board Assembly Replacement, Remove the Touch Bar display screws: paso 19, imagen 1 de 2 MacBook Pro 13" Touch Bar Late 2016 Logic Board Assembly Replacement, Remove the Touch Bar display screws: paso 19, imagen 2 de 2
    • Use a T3 Torx driver to remove two 1.9 mm screws from the Touch Bar display connector bracket.

  20. MacBook Pro 13" Touch Bar Late 2016 Logic Board Assembly Replacement: paso 20, imagen 1 de 1
    • Remove the bracket.

  21. MacBook Pro 13" Touch Bar Late 2016 Logic Board Assembly Replacement, Disconnect the Touch Bar display: paso 21, imagen 1 de 2 MacBook Pro 13" Touch Bar Late 2016 Logic Board Assembly Replacement, Disconnect the Touch Bar display: paso 21, imagen 2 de 2
    • Use a spudger to disconnect the Touch Bar display connector by prying it straight up from the logic board.

  22. MacBook Pro 13" Touch Bar Late 2016 Logic Board Assembly Replacement, Uncover the microphone connector: paso 22, imagen 1 de 2 MacBook Pro 13" Touch Bar Late 2016 Logic Board Assembly Replacement, Uncover the microphone connector: paso 22, imagen 2 de 2
    • Peel back any tape covering the microphone connector socket.

  23. MacBook Pro 13" Touch Bar Late 2016 Logic Board Assembly Replacement, Disconnect the microphone: paso 23, imagen 1 de 2 MacBook Pro 13" Touch Bar Late 2016 Logic Board Assembly Replacement, Disconnect the microphone: paso 23, imagen 2 de 2
    • Open the locking flap on the microphone cable's ZIF connector by prying it straight up from the logic board.

  24. MacBook Pro 13" Touch Bar Late 2016 Logic Board Assembly Replacement: paso 24, imagen 1 de 2 MacBook Pro 13" Touch Bar Late 2016 Logic Board Assembly Replacement: paso 24, imagen 2 de 2
    • Disconnect the microphone cable by pulling it back—away from the fan—until it slides out of its socket.

    • If possible, pull on the attached tape, rather than on the cable itself.

  25. MacBook Pro 13" Touch Bar Late 2016 Logic Board Assembly Replacement: paso 25, imagen 1 de 2 MacBook Pro 13" Touch Bar Late 2016 Logic Board Assembly Replacement: paso 25, imagen 2 de 2
    • Peel back any tape covering the connector for the left-side tweeter.

  26. MacBook Pro 13" Touch Bar Late 2016 Logic Board Assembly Replacement, Disconnect the left tweeter: paso 26, imagen 1 de 2 MacBook Pro 13" Touch Bar Late 2016 Logic Board Assembly Replacement, Disconnect the left tweeter: paso 26, imagen 2 de 2
    • Flip open the locking flap for the left-side tweeter ZIF connector by prying it straight up from the logic board.

  27. MacBook Pro 13" Touch Bar Late 2016 Logic Board Assembly Replacement: paso 27, imagen 1 de 2 MacBook Pro 13" Touch Bar Late 2016 Logic Board Assembly Replacement: paso 27, imagen 2 de 2
    • Disconnect the cable by pulling it towards the tweeter until it slides out of its socket.

    • If possible, pull on the attached tape rather than the cable itself.

  28. MacBook Pro 13" Touch Bar Late 2016 Logic Board Assembly Replacement: paso 28, imagen 1 de 2 MacBook Pro 13" Touch Bar Late 2016 Logic Board Assembly Replacement: paso 28, imagen 2 de 2
    • Underneath the tweeter's flex cable lies a second ZIF connector, for the left main speaker.

    • Peel back any tape covering the socket for the left main speaker.

  29. MacBook Pro 13" Touch Bar Late 2016 Logic Board Assembly Replacement, Disconnect the left main speaker: paso 29, imagen 1 de 2 MacBook Pro 13" Touch Bar Late 2016 Logic Board Assembly Replacement, Disconnect the left main speaker: paso 29, imagen 2 de 2
    • Flip open the locking flap for the left main speaker ZIF connector by prying it straight up from the logic board.

  30. MacBook Pro 13" Touch Bar Late 2016 Logic Board Assembly Replacement: paso 30, imagen 1 de 2 MacBook Pro 13" Touch Bar Late 2016 Logic Board Assembly Replacement: paso 30, imagen 2 de 2
    • Disconnect the left main speaker cable by pulling it toward the tweeter until it slides free from its socket.

    • Remember to pull on the attached tape, not the cable.

  31. MacBook Pro 13" Touch Bar Late 2016 Logic Board Assembly Replacement: paso 31, imagen 1 de 2 MacBook Pro 13" Touch Bar Late 2016 Logic Board Assembly Replacement: paso 31, imagen 2 de 2
    • Repeat the previous six steps to disconnect the opposite tweeter and main speaker, on the right.

    • Begin by peeling back any tape covering the tweeter connector.

  32. MacBook Pro 13" Touch Bar Late 2016 Logic Board Assembly Replacement, Disconnect the right tweeter: paso 32, imagen 1 de 2 MacBook Pro 13" Touch Bar Late 2016 Logic Board Assembly Replacement, Disconnect the right tweeter: paso 32, imagen 2 de 2
    • Flip open the locking flap for the right-side tweeter ZIF connector by prying it straight up from the logic board.

  33. MacBook Pro 13" Touch Bar Late 2016 Logic Board Assembly Replacement: paso 33, imagen 1 de 2 MacBook Pro 13" Touch Bar Late 2016 Logic Board Assembly Replacement: paso 33, imagen 2 de 2
    • Disconnect the cable by pulling it towards the tweeter until it slides out of its socket.

    • Remember to pull on the tape if possible—not the actual cable.

  34. MacBook Pro 13" Touch Bar Late 2016 Logic Board Assembly Replacement: paso 34, imagen 1 de 2 MacBook Pro 13" Touch Bar Late 2016 Logic Board Assembly Replacement: paso 34, imagen 2 de 2
    • Peel back any tape covering the connector for the right-side main speaker.

  35. MacBook Pro 13" Touch Bar Late 2016 Logic Board Assembly Replacement, Disconnect the right main speaker: paso 35, imagen 1 de 2 MacBook Pro 13" Touch Bar Late 2016 Logic Board Assembly Replacement, Disconnect the right main speaker: paso 35, imagen 2 de 2
    • Flip open the locking flap for the right-side main speaker ZIF connector by prying it straight up from the logic board.

  36. MacBook Pro 13" Touch Bar Late 2016 Logic Board Assembly Replacement: paso 36, imagen 1 de 1
    • Pull the right-side main speaker cable toward the tweeter until it slides free from its socket.

  37. MacBook Pro 13" Touch Bar Late 2016 Logic Board Assembly Replacement, Disconnect the antennas: paso 37, imagen 1 de 3 MacBook Pro 13" Touch Bar Late 2016 Logic Board Assembly Replacement, Disconnect the antennas: paso 37, imagen 2 de 3 MacBook Pro 13" Touch Bar Late 2016 Logic Board Assembly Replacement, Disconnect the antennas: paso 37, imagen 3 de 3
    • Disconnect the first antenna cable by prying it straight up from its socket.

    • Carefully slide your tweezers or the flat end of your spudger underneath the cable until it's near the socket, and then gently twist or pry up to disconnect it.

  38. MacBook Pro 13" Touch Bar Late 2016 Logic Board Assembly Replacement: paso 38, imagen 1 de 1
    • Repeat the previous step to disconnect the two remaining antenna cables.

    • To reconnect each cable, align the connector directly over its socket, and then press down to snap it into place.

  39. MacBook Pro 13" Touch Bar Late 2016 Logic Board Assembly Replacement, Remove the antenna bundle screw: paso 39, imagen 1 de 2 MacBook Pro 13" Touch Bar Late 2016 Logic Board Assembly Replacement, Remove the antenna bundle screw: paso 39, imagen 2 de 2
    • Use a T5 Torx driver to remove the 2.9 mm screw securing the antenna cable bundle.

  40. MacBook Pro 13" Touch Bar Late 2016 Logic Board Assembly Replacement, Unscrew the logic board: paso 40, imagen 1 de 2 MacBook Pro 13" Touch Bar Late 2016 Logic Board Assembly Replacement, Unscrew the logic board: paso 40, imagen 2 de 2
    • Remove all ten screws securing the logic board assembly:

    • Three 2.5 mm Torx T3 screws

    • Five 2.9 mm Torx T5 screws

    • Two 3.0 mm Torx T5 screws

    • During reassembly, install these screws loosely and adjust the logic board's position if necessary before tightening the screws.

  41. MacBook Pro 13" Touch Bar Late 2016 Logic Board Assembly Replacement, Peel up the fan dampers: paso 41, imagen 1 de 3 MacBook Pro 13" Touch Bar Late 2016 Logic Board Assembly Replacement, Peel up the fan dampers: paso 41, imagen 2 de 3 MacBook Pro 13" Touch Bar Late 2016 Logic Board Assembly Replacement, Peel up the fan dampers: paso 41, imagen 3 de 3
    • Peel up (but don't remove) the two rubber vibration damping strips from the adhesive holding them to the fans.

    • If needed, apply mild heat with an iOpener, hair dryer, or heat gun to soften the adhesive and make the dampers easier to separate.

  42. MacBook Pro 13" Touch Bar Late 2016 Logic Board Assembly Replacement, Remove the logic board assembly: paso 42, imagen 1 de 2 MacBook Pro 13" Touch Bar Late 2016 Logic Board Assembly Replacement, Remove the logic board assembly: paso 42, imagen 2 de 2
    • The logic board assembly is a tight fit, but you can make it easier to remove by inserting a spudger under the left edge and levering it up slightly.

    • There should be no resistance as you remove the logic board. Check all cables carefully and hold them out of the way if needed so they don't snag on the board.

    • Lift from the left side to remove the logic board assembly.

  43. MacBook Pro 13" Touch Bar Late 2016 Logic Board Assembly Replacement, Logic board installation: paso 43, imagen 1 de 3 MacBook Pro 13" Touch Bar Late 2016 Logic Board Assembly Replacement, Logic board installation: paso 43, imagen 2 de 3 MacBook Pro 13" Touch Bar Late 2016 Logic Board Assembly Replacement, Logic board installation: paso 43, imagen 3 de 3
    • When reinstalling the logic board assembly:

    • Check the alignment of the rubber vibration dampers, and adjust them as needed.

    • Feed the antenna cable bundle through the gap between the logic board and heat sink, and make sure it lines up correctly as you lower the board into place.

    • Verify that no cables get trapped under the board as you install it. Check each marked location carefully.

Conclusión

To reassemble your device, follow these instructions in reverse order.

Jeff Suovanen

Miembro Desde 08/06/13

427,835 Reputación

259 Guías creadas

Equipo

iFixit Miembro de iFixit

Staff

135 Miembros

16,731 Guías creadas

Un comentario

Microphoneのパーツの説明欄には、Teardownの動画がリンクされていますが、その動画にはMic部分の説明が無いため、このページをリンクしておくと良いと思いました。

This page should be linked In the page of microphone assembly. Threre is not any microphone assembly part in the video embedded in the page.

polo - Contestar

Agregar Comentario

Ver Estadísticas:

Ultimas 24 horas: 0

Ultimos 7 días: 0

Ultimos 30 días: 0

Todo El Tiempo: 285