Saltar al contenido principal

MacBook Pro 13" Retina Display Early 2013 SSD Tray Replacement

Qué necesitas

  1. MacBook Pro 13" Retina Display Early 2013 SSD Tray Replacement, Lower Case: paso 1, imagen 1 de 1
    Herramienta utilizada en este paso:
    Magnetic Project Mat
    $19.95
    Comprar
    • Remove the following ten screws securing the lower case to the upper case:

    • Two 2.3 mm P5 Pentalobe screws

    • Eight 3.0 mm P5 Pentalobe screws
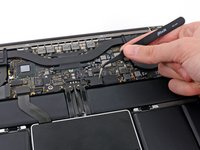
    • Throughout this repair, keep track of each screw and make sure it goes back exactly where it came from to avoid damaging your device.

  2. MacBook Pro 13" Retina Display Early 2013 SSD Tray Replacement: paso 2, imagen 1 de 1
    • Wedge your fingers between the upper case and the lower case.

    • Gently pull the lower case away from the upper case.

    • Remove the lower case and set it aside.

  3. MacBook Pro 13" Retina Display Early 2013 SSD Tray Replacement: paso 3, imagen 1 de 3 MacBook Pro 13" Retina Display Early 2013 SSD Tray Replacement: paso 3, imagen 2 de 3 MacBook Pro 13" Retina Display Early 2013 SSD Tray Replacement: paso 3, imagen 3 de 3
    • During reassembly, gently push down the center of the lower case to reattach the two plastic clips.

    • The lower case is connected to the upper case at the center, with two plastic clips.

  4. MacBook Pro 13" Retina Display Early 2013 SSD Tray Replacement, Battery Connector: paso 4, imagen 1 de 1
    • Remove the plastic cover adhered to the battery contact board.

  5. MacBook Pro 13" Retina Display Early 2013 SSD Tray Replacement: paso 5, imagen 1 de 1
    • Remove the following screws securing the battery connector board to the logic board:

    • Two 2.8 mm T6 Torx screws

    • One 7.0 mm T6 Torx shouldered screw

  6. MacBook Pro 13" Retina Display Early 2013 SSD Tray Replacement: paso 6, imagen 1 de 2 MacBook Pro 13" Retina Display Early 2013 SSD Tray Replacement: paso 6, imagen 2 de 2
    • Use tweezers to remove the small plastic cover located near the bottom right of the battery connector board.

  7. MacBook Pro 13" Retina Display Early 2013 SSD Tray Replacement: paso 7, imagen 1 de 1
    • Remove the wide head 6.4 mm T6 Torx screw securing the battery connector to the logic board assembly.

  8. MacBook Pro 13" Retina Display Early 2013 SSD Tray Replacement: paso 8, imagen 1 de 2 MacBook Pro 13" Retina Display Early 2013 SSD Tray Replacement: paso 8, imagen 2 de 2
    • Carefully lift the battery connector board up off the logic board.

    • It is recommended to bend the battery cables just slightly, to keep the board suspended up above the logic board and out of the way.

    • Do not fold the board completely over, or crease the cables, as this may damage the battery.

  9. MacBook Pro 13" Retina Display Early 2013 SSD Tray Replacement, Battery Contact Board: paso 9, imagen 1 de 2 MacBook Pro 13" Retina Display Early 2013 SSD Tray Replacement, Battery Contact Board: paso 9, imagen 2 de 2
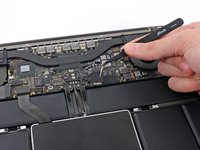
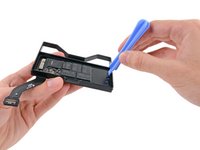
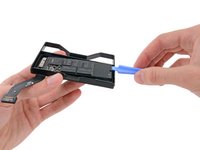
    • Grasp the Interposer with tweezers.

    • An interposer is the name for an interface that links one electrical connection to another. In this repair, it is the board connecting the battery to logic board.

    • Lift the Interposer off the logic board and remove it.

    • Removing this board will ensure that the battery remains disconnected throughout your repair, preventing your computer from accidentally powering on. It's also a good idea to take it out so it doesn't fall out unexpectedly.

  10. MacBook Pro 13" Retina Display Early 2013 SSD Tray Replacement, SSD Assembly: paso 10, imagen 1 de 2 MacBook Pro 13" Retina Display Early 2013 SSD Tray Replacement, SSD Assembly: paso 10, imagen 2 de 2
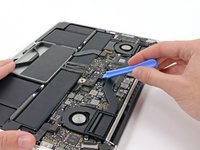
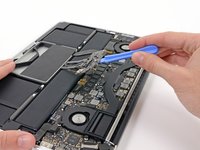
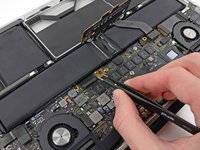
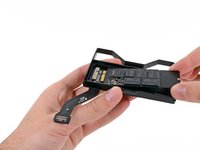
    • Use the flat end of a spudger to pry the SSD cable connector up from its socket on the logic board.

  11. MacBook Pro 13" Retina Display Early 2013 SSD Tray Replacement: paso 11, imagen 1 de 3 MacBook Pro 13" Retina Display Early 2013 SSD Tray Replacement: paso 11, imagen 2 de 3 MacBook Pro 13" Retina Display Early 2013 SSD Tray Replacement: paso 11, imagen 3 de 3
    • Use your thumb or finger to bend the plastic spring bar on the SSD tray, freeing the two clips at the front side of the device.

    • While holding the spring bar depressed, tilt the SSD assembly up out of its cavity.

  12. MacBook Pro 13" Retina Display Early 2013 SSD Tray Replacement: paso 12, imagen 1 de 1
    • Remove the SSD assembly from the upper case.

  13. MacBook Pro 13" Retina Display Early 2013 SSD Tray Replacement: paso 13, imagen 1 de 1
    • Remove the single 2.9 mm T5 Torx screw securing the SSD to the SSD tray.

  14. MacBook Pro 13" Retina Display Early 2013 SSD Tray Replacement: paso 14, imagen 1 de 2 MacBook Pro 13" Retina Display Early 2013 SSD Tray Replacement: paso 14, imagen 2 de 2
    • Insert the edge of plastic opening tool between the SSD and the SSD tray, opposite to the socket side of SSD tray.

    • Pry the side of the SSD opposite the SSD tray socket out of the SSD tray.

    • Only lift the SSD up far enough to grab the sides of it with your fingers. Lifting it any more may damage the card or socket.

  15. MacBook Pro 13" Retina Display Early 2013 SSD Tray Replacement: paso 15, imagen 1 de 2 MacBook Pro 13" Retina Display Early 2013 SSD Tray Replacement: paso 15, imagen 2 de 2
    • Carefully pull the SSD straight out of its socket on the SSD tray.

  16. MacBook Pro 13" Retina Display Early 2013 SSD Tray Replacement, SSD Tray: paso 16, imagen 1 de 1
    • SSD tray remains.

Conclusión

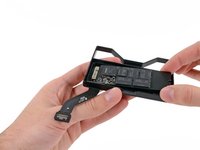
To reassemble your device, follow these instructions in reverse order.

4 personas más completaron esta guía.

Sam Goldheart

Miembro Desde 10/18/12

465,238 Reputación

538 Guías creadas

Equipo

iFixit Miembro de iFixit

Staff

136 Miembros

16,560 Guías creadas

0 comentarios

Agregar Comentario

Ver Estadísticas:

Ultimas 24 horas: 0

Ultimos 7 días: 3

Ultimos 30 días: 17

Todo El Tiempo: 7,116