Esta versión puede contener ediciones incorrectas. Cambiar a la última instantánea verificada.
Qué necesitas
-
-
Utiliza una moneda o un spudger para girar el tornillo de bloqueo de la batería 90 grados en el sentido de las agujas del reloj.
-
-
-
Desatornilla los tres tornillos Phillips espaciados uniformemente a lo largo de la pared posterior del compartimento de la batería.
-
-
-
Retira los 3 tornillos siguientes:
-
Un Phillips#00 de 11 mm en el centro de la caja inferior. (Cabeza: 5 mm de diámetro x 0,75 mm de grosor)
-
Dos Phillips #00 de 14,5 mm (cabeza: 5 mm de diámetro x 0,75 mm de grosor)
-
-
-
-
Retira los siguientes 4 tornillos de la parte posterior del ordenador:
-
Dos Phillips #00 de 11 mm, con mango (2,2 mm de diámetro x 2 mm de longitud) (Cabeza: 3,2 mm de diámetro x 0,5 mm de grosor)
-
Dos Phillips #00 de 7,25 mm, con mango (2 mm de diámetro x 3,75 mm de longitud) (cabeza: 3,2 mm de diámetro x 0,5 mm de grosor)
-
-
-
Utiliza una herramienta de apertura de plástico, un crédito de plástico caducado o una tarjeta de grosor similar para hacer palanca en la carcasa superior, comenzando en la esquina superior izquierda y trabajando alrededor de la parte frontal del ordenador.
-
Durante el montaje, asegúrate de que los clips del lado derecho, encima de la unidad óptica, encajan firmemente en su sitio. Son diferentes de los clips del lado izquierdo, por lo que normalmente requieren una presión un poco más firme para encajar en su sitio.
-
-
Este paso está sin traducir. Ayuda a traducirlo
-
Use a spudger to disconnect the orange optical drive cable from the logic board.
-
-
Este paso está sin traducir. Ayuda a traducirlo
-
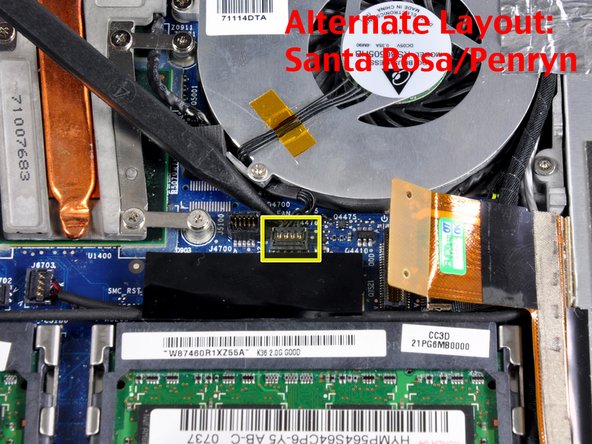
Use a spudger to disconnect the black fan connector from the logic board.
-
-
Este paso está sin traducir. Ayuda a traducirlo
-
Deroute the fan cable from behind the tab on the left side of the fan.
-
-
Este paso está sin traducir. Ayuda a traducirlo
-
Peel up the silver foil tape between the fan and the optical drive.
-
-
Este paso está sin traducir. Ayuda a traducirlo
-
Use a spudger to move the gray display data and black speaker cables to the right. This will reveal a silver screw securing the fan housing to the lower case.
-
-
Este paso está sin traducir. Ayuda a traducirlo
-
Remove the following 2 screws:
-
One 3 mm Phillips on the right side of the fan.
-
One 6 mm Phillips on the left side of the fan.
-
-
Este paso está sin traducir. Ayuda a traducirlo
-
Lift the fan and its attached mounting bracket up and out of the computer, being careful not to rip the black felt tape.
-


Cancelar: No complete esta guía.
307 personas más completaron esta guía.

23 comentarios
My wife's MacBook has been overheating for some time, and then shutting itself down. Your instructions were great, but I did note that I needed to unscrew the cable tie near the speaker in Step 17.
The system had some dust in it, used the air can to spray it all out. Dust was on the heatsink vents, too. Closed it all up, and peak temps during a software install that crashed it three times yesterday was 145F - yesterday it was passing 170F and crashing.
Thanks for the instructions, ifixit!
Download and print out the PDF version of the repair guide. Tape the screws to their corresponding image in the guide so that you can't go wrong!
what a great idea! i've been thinking about a solution for organizing screws. that's genius!
Victoria -
Good Idea. I generally sketch up rough diagrams and putsmall pieces of double sided tapes and stick the screws on my drawing.