Esta versión puede contener ediciones incorrectas. Cambie a la última instantánea verificada.
Qué necesitas
-
-
Usa un destornillador P5 Pentalobe para quitar los diez tornillos que sujetan la carcasa. Los tornillos tienen las siguientes medidas:
-
Dos tornillos Pentalobe P5 de 9 mm
-
Ocho tornillos Pentalobe P5 de 2,6 mm
-
-
-
Toma la lengüeta de tiro de plástico transparente conectada al conector de la batería y jálala hacia el borde frontal de la Air para desconectar la batería de la placa lógica.
-
-
-
Levanta la batería de su borde más cercano a la placa lógica y retírela de la caja superior.
-
Cárgala hasta 100% y luego déjala cargándola durante al menos 2 horas más. Luego, desenchufa y úsala normalmente para drenar la batería. Cuando veas la advertencia de batería baja, guarda tu trabajo y mantén tu computadora encendida hasta que se duerma por tener la batería baja. Espera al menos 5 horas, luego cárgala ininterrumpidamente hasta 100%.
-
Si notas algún problema o conducta inusual luego de instalar tu batería nueva, puedes necesitar reiniciar el SMC de tu MacBook.
-
-
-
Use la punta de un spudger o la uña para levantar la aleta de retención en el zócalo ZIF del cable de cinta del trackpad.
-
Tire del cable plano del panel táctil hacia afuera de su zócalo hacia el borde posterior del Air.
-
-
-
-
Mientras levanta con cuidado el cable plano del teclado con una mano, use la punta de un spudger o la uña para levantar la solapa de retención del zifón ZIF del cable plano del teclado.
-
Tire del cable de cinta del teclado directamente fuera de su zócalo hacia el borde frontal del Air.
-
-
-
Retire los siguientes doce tornillos:
-
Seis tornillos Phillips de 1,6 mm que sujetan los soportes del trackpad al trackpad.
-
Seis tornillos Phillips de 1,6 mm que sujetan el panel táctil a la carcasa superior.
-
Un Phillips # 000 debería ser suficiente, pero un JIS # 000 también podría funcionar.
-
-
Este paso está sin traducir. Ayuda a traducirlo
-
This is the seat of the buffer.
-
You will find the rest of the rotten buffer here, which made your trackpad rattle
-
Peel it off and clean with some alcohol or similar untill you see the raw aluminium surface
-
-
Este paso está sin traducir. Ayuda a traducirlo
-
Cut two tiny (approx. 1,5 x 4 mm) pieces of double sided adhesive tape and place them on the seat
-
the red colour comes form the protective film of Tesa 4965, which works perfectly for this job. But principally any double sided tape, which is not too thick should do
-
On the second photo you see the empty seat on the left and the prepared one on the right
-
-
Este paso está sin traducir. Ayuda a traducirlo
-
Now cut a piece of foam material of the same size. My foam material is black, and therefore a bit hard to see
-
In this case an EPDM foam was used, which can be compressed with little force but has a high longevity
-
The material must be below one milimeter thick! depending on your source material you will have to cut all tree dimensions
-
This took me many tries…
-
-
Este paso está sin traducir. Ayuda a traducirlo
-
Peel off the protective film of the double sided tape and position the foam parts on both sides.
-
It should look more or less like on the photos
-
-
Este paso está sin traducir. Ayuda a traducirlo
-
Reinstall trackpad by following step 8 in reverse order but only tighten the 6 screws at the trackpad (orange) firmly and leave the 6 screws of the case (red) slightly loose
-
Open the MacBook to nearly 90° so that it stands stable on its display case.
-
Check the feel of the click. Does it go back gently into rest position? Has it enough stroke?
-
If not, you might have chosen to rigid or to thick material (or both)
-
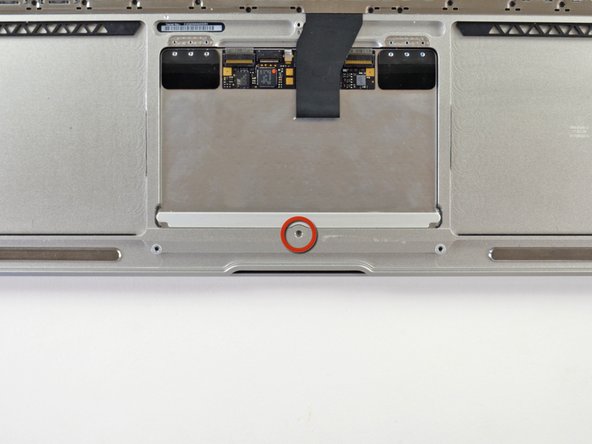
You may also try to readjust the central screw which is marked in step 10 and which you hopefully did not unscrew!
-
-
Este paso está sin traducir. Ayuda a traducirlo
-
Finally center the trackpad in the case. This can easily be done by positioning a lamp behind the vertically standing lower case.
-
Move the trackpad in order to have an equal gap all around it. Then tighten the remaining 6 screws firmly to fix your adjustment.
-
Reassemble the rest going back from Step 8 and you're done!
-


Cancelar: No complete esta guía.
4 personas más completaron esta guía.
5 comentarios
Hello, good tutorial. Today on my Macbook Air disarm the trackpad, since it was loose and it sounded when using it. The only solution and that was good for me, was to tighten the central screw, to the point that it remained firm and allowed the clicks.
Another thing, the brackets I found on ebay, the pair at $ 5.
Very good guide. I did this yesterday on my Macbook Air Early 2014 and it solved the problem but as @ifixitkit mentioned in Step 8, “Removing the bracket is completely unnecessary”.
Thank you for the guide. I do advise against removing the 6 Philips screws attaching the trackpad to its hinges as described in Step 8. They simply don’t have to be removed, unless you’re replacing the trackpad.
My 2013 11” Air’s trackpad had started rattling after a battery swap and the noise drove me positively nuts. The trackpad does feel as good as new now. I used a ~1mm thick double sided foam tape instead of EPDM, hoping that it’s robust enough to last.
Nice guide, my 5 year old machine had a loose trackpad that was making it difficult to register clicks and drags. All I had to do was step 10, not even remove the battery and the trackpad is as flush as new now 😊
Thank you so much! The trackpad of my MacBook Air 11'' early 2015 was ratteling because I changed the battery. I really couldn´t find out the problem. Than I found this guide and as mentioned I just had to adjust the screw in step 10 a little bit and now it is working perfectly again.