Esta versión puede contener ediciones incorrectas. Cambie a la última instantánea verificada.
Qué necesitas
-
-
Usa un destornillador P5 Pentalobe para quitar los diez tornillos que sujetan la carcasa. Los tornillos tienen las siguientes medidas:
-
Dos tornillos Pentalobe P5 de 9 mm
-
Ocho tornillos Pentalobe P5 de 2,6 mm
-
-
-
Agarre la lengüeta de plástico transparente unida al conector de la batería y tire de ella hacia el borde frontal del Air para desconectar la batería de la placa lógica.
-
-
-
Utilice el extremo plano de una paleta para sacar el cable del conector I/O de la tarjeta tire hacia arriba fuera del zócalo I/O sobre la tarjeta.
-
-
-
Mientras hale suavemente el cable de la tarjeta I/O hacia arriba está cerca la conexión de la tarjeta lógica, use la punta de una paleta para hacer palanca hacia arriba sobre los lados alternos del conector para ayudar a "desplazarlo" fuera del conector.
-
Remueva el cable de la tarjeta I/O
-
-
-
Utiliza la punta de la espátula para levantar con cuidado la lengüeta que retiene el cable ZIF del ventilador del conector.
-
-
-
-
Desconecta la placa de E/S tirando del cable de alimentación para separarlo de su zócalo en la placa lógica.
-
-
Este paso está sin traducir. Ayuda a traducirlo
-
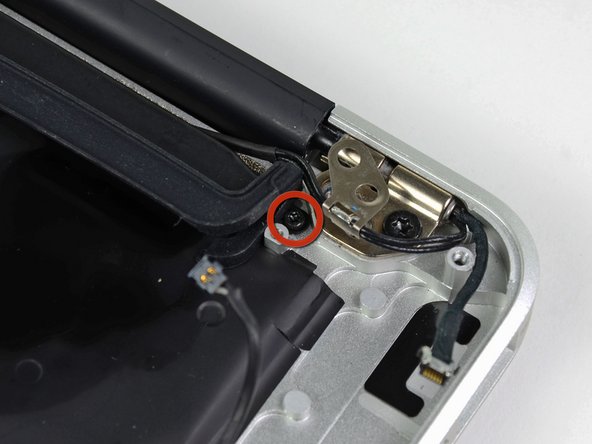
Remove the two 4.9 mm T8 Torx screws securing the antenna cable retainer on the left display hinge to the upper case.
-
-
Este paso está sin traducir. Ayuda a traducirlo
-
Push the antenna cable retainer out of the way and remove the 3 mm T5 Torx screw securing the end of the heat sink to the upper case.
-
-
Este paso está sin traducir. Ayuda a traducirlo
-
Remove the four 2.5 mm T5 Torx screws securing the heat sink to the logic board.
-


Cancelar: No complete esta guía.
30 personas más completaron esta guía.

4 comentarios
Excellent instructions / guide. Replaced both heat sink and fan without a hitch. Thank you!
I wanted to bring my old 2011 MBA back to life since its still running strong, so I followed this with a new thermal paste, good cleaning and a new battery, its like a brand new computer now. Glad I got the ifixit kit as well when I ordered the battery. Hope to keep this MBS going another year or two before I upgrade. Now I need to do the same with my MBP 2010 for fun.
I have a mid-2011 MacBook Air identical to the model in the instructions, and it frequently gets up to 80C when running under a heavier load. I am planning to disassemble it entirely and repaste the machine, and fully blow out the inside. I will post on here when I get it done and see how it runs! Thanks for the guide!
thanks alot.. I followed the procedure to replace the thermal paste and it was great.but i didn’t realise a difference in heat and sound of fan.