Saltar al contenido principal

MacBook Air 11" Mid 2013 Logic Board Assembly Replacement

Sólo Prerrequisito
Esta guía solo debería usarse como prerrequisito para otras guías. Por tanto, estará incompleta.

Qué necesitas

  1. MacBook Air 11" Mid 2013 Logic Board Assembly Replacement, Logic Board Assembly: paso 1, imagen 1 de 3 MacBook Air 11" Mid 2013 Logic Board Assembly Replacement, Logic Board Assembly: paso 1, imagen 2 de 3 MacBook Air 11" Mid 2013 Logic Board Assembly Replacement, Logic Board Assembly: paso 1, imagen 3 de 3
    • Use the flat end of a spudger to pry both antenna connectors up from their sockets on the AirPort/Bluetooth card, and move them out of the way.

    Be very careful. When I did this - just as in the photo - I prised the top of the antenna connector off from the bottom of it, leaving me with only one functioning antenna.

    Andrew Wainwright - Contestar

    You can usually pull the airport card out of the socket and let it dangle by the attached wires. They can be frustrating to re-attach.

    maccentric - Contestar

    This seems like great advice! Any more details would be greatly appreciated

    Colleen V -

    Just walk it out slowly. The cables don’t have a lot of slack, so if you pull too hard on the card it may yank the cables out of their sockets, or worse, when it comes free.

    maccentric -

    When I did this, one antenna connection broke off and the other will not reattach for love nor money. I have not idea how to fix it. I’d try a blob of solder if my fingers were the size of matchsticks! Haha

    Andrew Aldis - Contestar

  2. MacBook Air 11" Mid 2013 Logic Board Assembly Replacement: paso 2, imagen 1 de 1
    • Remove the following five screws securing the battery to the upper case:

    • Two 5.2 mm T5 Torx screws

    • One 6 mm T5 Torx screw

    • Two 2.6 mm T5 Torx screws

  3. MacBook Air 11" Mid 2013 Logic Board Assembly Replacement: paso 3, imagen 1 de 1
    • When handling the battery, avoid squeezing or touching the six exposed lithium polymer cells.

    • Lift the battery from its edge nearest the logic board and remove it from the upper case.

  4. MacBook Air 11" Mid 2013 Logic Board Assembly Replacement: paso 4, imagen 1 de 2 MacBook Air 11" Mid 2013 Logic Board Assembly Replacement: paso 4, imagen 2 de 2
    • Disconnect the I/O board by pulling the power cable away from its socket on the logic board.

    • Pull the cable parallel to the face of the logic board toward the front edge of the Air.

    Did it wrong to begin with by taking the complete socket away and not just the insert. Now I can’t get the socket back on the logic board contacts. Any ideas?

    John Lillywhite - Contestar

    I have the same issue! Did you find a solution?

    Alexis Townsend -

    It's safer and easier to use the tip of a spudger to depress the catch located on the top of the socket. Push down and towards the connector and it will ease itself out without damage.

    jgreenb2 - Contestar

  5. MacBook Air 11" Mid 2013 Logic Board Assembly Replacement: paso 5, imagen 1 de 3 MacBook Air 11" Mid 2013 Logic Board Assembly Replacement: paso 5, imagen 2 de 3 MacBook Air 11" Mid 2013 Logic Board Assembly Replacement: paso 5, imagen 3 de 3
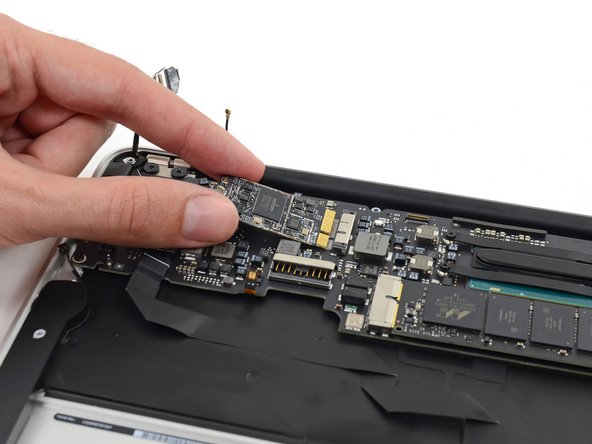
    • Use the tip of a spudger to de-route the antenna cables from their notches in the logic board.

    I ordered a used display and the antennae wires are way too short to make it in to their respective ports (either of them). Am I missing something? Anything I should know to do a splice?

    -Aidan

    Aidan - Contestar

    I did not disconnect the tiny gold terminals, they are too fragile. I just slide out the card but leave it connected to the antenna, if replacing the logic board is the aim.

    Jurgen - Contestar

    They're not clicking back in when I reassemble it

    Carson Banker - Contestar

  6. MacBook Air 11" Mid 2013 Logic Board Assembly Replacement: paso 6, imagen 1 de 3 MacBook Air 11" Mid 2013 Logic Board Assembly Replacement: paso 6, imagen 2 de 3 MacBook Air 11" Mid 2013 Logic Board Assembly Replacement: paso 6, imagen 3 de 3
    • Gently push the tip of a spudger under the black plastic flap stuck to the display data cable lock to make the lock pop upward and away from the socket.

    • While holding the lock away from the socket, gently pull the display data cable out of its socket.

    • Do not pull upward on the display data cable as you disconnect it, as its socket may break off the logic board.

  7. MacBook Air 11" Mid 2013 Logic Board Assembly Replacement: paso 7, imagen 1 de 3 MacBook Air 11" Mid 2013 Logic Board Assembly Replacement: paso 7, imagen 2 de 3 MacBook Air 11" Mid 2013 Logic Board Assembly Replacement: paso 7, imagen 3 de 3
    • Use the tip of a spudger to pry under the speaker cable connector, lifting it straight up from its socket.

    • De-route the cable from its notch in the logic board.

  8. MacBook Air 11" Mid 2013 Logic Board Assembly Replacement: paso 8, imagen 1 de 3 MacBook Air 11" Mid 2013 Logic Board Assembly Replacement: paso 8, imagen 2 de 3 MacBook Air 11" Mid 2013 Logic Board Assembly Replacement: paso 8, imagen 3 de 3
    • Use the tip of a spudger or your fingernail to flip up the retaining flap on the trackpad ribbon cable ZIF socket.

    • Be sure you are prying up on the hinged retaining flap, not the socket itself.

    • Pull the trackpad ribbon cable straight out of its socket toward the front edge of the Air.

  9. MacBook Air 11" Mid 2013 Logic Board Assembly Replacement: paso 9, imagen 1 de 3 MacBook Air 11" Mid 2013 Logic Board Assembly Replacement: paso 9, imagen 2 de 3 MacBook Air 11" Mid 2013 Logic Board Assembly Replacement: paso 9, imagen 3 de 3
    • Use the tip of a spudger to flip up the retaining flap on the keyboard backlight ribbon cable ZIF socket.

    • Be sure you are prying up on the hinged retaining flap, not the socket itself.

    • Pull the keyboard backlight ribbon cable out of its socket.

  10. MacBook Air 11" Mid 2013 Logic Board Assembly Replacement: paso 10, imagen 1 de 1
    • Remove the single 2.9 mm T5 Torx screw securing the AirPort/Bluetooth card to the logic board.

  11. MacBook Air 11" Mid 2013 Logic Board Assembly Replacement: paso 11, imagen 1 de 3 MacBook Air 11" Mid 2013 Logic Board Assembly Replacement: paso 11, imagen 2 de 3 MacBook Air 11" Mid 2013 Logic Board Assembly Replacement: paso 11, imagen 3 de 3
    • Slightly lift the free end of the AirPort/Bluetooth board and pull it out of its socket on the logic board.

    • To avoid damaging its socket on the logic board, do not excessively lift the free end of the AirPort/Bluetooth card.

  12. MacBook Air 11" Mid 2013 Logic Board Assembly Replacement: paso 12, imagen 1 de 1
    • Remove the three 3.6 mm T5 Torx screws securing the logic board to the upper case.

    • In some models these are 3.1 mm T5 Torx screws.

  13. MacBook Air 11" Mid 2013 Logic Board Assembly Replacement: paso 13, imagen 1 de 3 MacBook Air 11" Mid 2013 Logic Board Assembly Replacement: paso 13, imagen 2 de 3 MacBook Air 11" Mid 2013 Logic Board Assembly Replacement: paso 13, imagen 3 de 3
    • Gently lift the logic board assembly from the heat sink end and pull it away from the port side of the case to remove it from the Air.

    • When replacing the logic board, insert the board's rubber edge under the port-side rubber gasket, then lower the board into place.

    There's a screw that's connecting the logic board to the casing that has to be removed before sliding the logic board out. I found that out the hard way.

    Andrea Carter - Contestar

    Only 3 were in mine, where did you find another screw?

    maccentric -

    When replacing the logic board, make sure you haven’t trapped an antenna cable underneath. Easy to sort it out now, much more annoying if you only discover it after screwing everything down first!

    Andrew Wainwright - Contestar

Conclusión

To reassemble your device, follow these instructions in reverse order.

Una persona más ha completado esta guía.

Sam Goldheart

Miembro Desde 10/18/12

465,659 Reputación

538 Guías creadas

Equipo

iFixit Miembro de iFixit

Staff

135 Miembros

16,757 Guías creadas

0 comentarios

Agregar Comentario

Ver Estadísticas:

Ultimas 24 horas: 0

Ultimos 7 días: 0

Ultimos 30 días: 0

Todo El Tiempo: 122