Esta traducción podría no reflejar los cambios más recientes añadidos a la guía de referencia. Ayúdanos a actualizar la traducción o revisa la guía original.
Introducción
Use esta guía para reemplazar la placa de E / S para remediar una toma de auriculares rota, el puerto USB izquierdo o el conector MagSafe DC-In.
Qué necesitas
-
ComprarHerramienta utilizada en este paso:P5 Pentalobe Screwdriver Retina MacBook Pro and Air$5.99
-
Retire los siguientes diez tornillos:
-
Dos tornillos de Pentalobe de 8 puntos y 5 puntos
-
Ocho tornillos Pentalobe de 2.5 mm y 5 puntos
-
-
Este paso está sin traducir. Ayuda a traducirlo
-
Use the flat end of a spudger to pry both short sides of the battery connector upward to disconnect it from its socket on the logic board.
-
Bend the battery cable slightly away from the logic board so the connector will not accidentally contact its socket.
-
-
Este paso está sin traducir. Ayuda a traducirlo
-
Remove the single 2.9 mm T5 Torx screw securing the SSD to the logic board.
-
-
Este paso está sin traducir. Ayuda a traducirlo
-
Use a spudger to help lift the free end of the SSD just enough to grab it with your other hand.
-
Pull the drive straight out of its socket and remove it from the logic board.
-
-
Este paso está sin traducir. Ayuda a traducirlo
-
Use the flat end of a spudger to pry the I/O board cable connector upward out of its socket on the I/O board.
-
-
Este paso está sin traducir. Ayuda a traducirlo
-
While gently pulling the I/O board cable upward near its connection to the logic board, use the tip of a spudger to pry upward on alternating sides of the connector to help "walk" it out of its socket.
-
Remove the I/O board cable.
-
-
-
Este paso está sin traducir. Ayuda a traducirlo
-
Use the tip of a spudger to carefully flip up the retaining flap on the fan cable ZIF socket.
-
-
Este paso está sin traducir. Ayuda a traducirlo
-
Remove the following three screws securing the fan to the upper case:
-
Two 5.2 mm T5 Torx screws
-
One 3.6 mm T5 Torx screw
-
-
Este paso está sin traducir. Ayuda a traducirlo
-
Lift the fan out of the upper case and carefully pull the fan ribbon cable out of its socket as you remove it from the Air.
-
-
-
Retire los siguientes cinco tornillos que sujetan la batería a la carcasa superior:
-
Dos tornillos Torx T5 de 5,2 mm
-
Un tornillo Torx T5 de 6 mm
-
Dos tornillos Torx T5 de 2,6 mm
-
-
Este paso está sin traducir. Ayuda a traducirlo
-
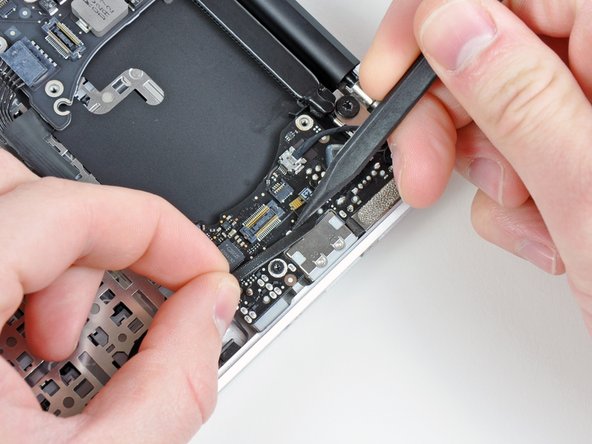
Pull the camera cable parallel to the face of the I/O board toward the rear edge of the Air to disconnect it from its socket.
-
-
Este paso está sin traducir. Ayuda a traducirlo
-
Remove the small rubber gasket from the corner of the upper case nearest the I/O board.
-
-
Este paso está sin traducir. Ayuda a traducirlo
-
Remove the single 3.6 mm T5 Torx screw securing the I/O board to the upper case.
-
-
Este paso está sin traducir. Ayuda a traducirlo
-
Carefully lift the I/O board from its edge nearest the logic board and remove it from the upper case.
-


Para volver a armar su dispositivo, siga estas instrucciones en orden inverso.
Para volver a armar su dispositivo, siga estas instrucciones en orden inverso.
Cancelar: No complete esta guía.
15 personas más completaron esta guía.
Un agradecimiento especial a estos traductores:
69%

¡ irlanda nos está ayudando a reparar el mundo! ¿Quieres contribuir?
Empezar a traducir ›

Un comentario
Question. Im looking a replacing the I/O board on my MacBook air and am wondering if it matters whether I get the board for the 13” or the 11”? Are the two boards different? It seems that the 11” I/O board is cheaper so I just trying to figure out if it matters which one I get?