Introducción
Apple describe su nueva Retina MacBook como " el futuro del portátil . " Su diseño completamente nuevo , sin duda nos ha intrigado . "El soplo de aluminio en el aire y el susurro de los tornillos desenrollados que revelan misterios" sólo puede significar una cosa : El desmontaje se ha iniciado . Únase a nosotros los expertos, para desmantelar la MacBook retina de 2015.
Qué necesitas
-
-
Desde que se anunció el 9 de marzo, hemos estado ansiosos por tener en nuestras manos el nuevo y elegante MacBook. Antes de entrar en esta belleza, echamos un vistazo a sus especificaciones:
-
Pantalla IPS "Retina" de 12 pulgadas, 2304 x 1440 píxeles (~ 226 ppi)
-
Procesador Intel Core M de doble núcleo a 1,1 GHz o 1,2 GHz (procesador opcional de 1,3 GHz disponible)
-
8 GB de memoria LPDDR3 de 1600 MHz
-
Almacenamiento flash de 256 GB o 512 GB
-
Gráficos Intel HD 5300
-
Puerto USB-C único
-
-
-
Si bien queremos felicitar a Apple por adoptar el nuevo estándar USB Type-C, lo han hecho de una manera que hace imposible el uso de adaptadores antiguos en dispositivos nuevos. Los puertos MagSafe y Thunderbolt de antaño se han ido. La nueva MacBook tiene un USB-C para dominarlos a todos.
-
Por el bien de la comparación:
-
Adaptador USB para iPad de 10 vatios (izquierda)
-
Adaptador de corriente USB-C de 29 vatios incluido con la MacBook (en el medio)
-
MacBook Air Magsafe 2 de 60 vatios (derecha)
-
Insertar traducción aquí
Can we heap some scorn on Apple for not also including/designing in a 1A USB Type A connector on this charger block? An additional 5W wouldn't have made the guts substantially bigger, if at all. Coupled with the ridiculously short Type-C cable that they ship it with, if a road warrior wants to charge their MacBook and iPhone "on the go", they're SOL. And since the Type-C cable is so short, the charger block is likely to be ON your desk, not under it; the exact same place you'd expect an iPhone charging block. Not seeing fit to put both functions in one block speaks multitudes to me about Apple's design philosophy towards its users: greedy contempt. They are, in effect, saying "We know you're going to have to buy another, 3rd party block. Haha."
@ScooterComputer,
The one thing most folks are missing about this laptop - it is designed to be used on your lap! No cables, no cords, no restrictions on movement, the battery lasts all day. You use it like an iPhone or an iPad, carry it around, move it, take it here, take it there. You plug it in to charge at the end of the day.
You do not leave it on a desk. Get an iMac or MacBook Pro if you want to leave it on your desk plugged in. "Think different."
Did "think different" magically become "defend whatever apple shoves down our throats" ?
Cmon, sometimes they make stupid choices, and the reality here is that in their ecosystem those choices are forced onto their consumers because there is no "other makers" it's either use the device apple makes or move on.
That being the case then this is a bad decision. Because it creates a situation that doesn't benefit their userbase in any way. It creates a situation of dissatisfaction with their products. They are basically forcing you to buy dongles for ports that cost ridiculous amounts of money when designing in even just a usb 3 port would have cost them pennies.
I want to be able to charge the stupid thing along with my iPhone without having to carry around two power bricks. Is that so much to ask? With older MacBook models I could plug in my MacBook and plug my phone into that and they'd both charge. What is the point of having an ultra portable if you're forced to carry around a 5lb gear bag to hump all the rest of the necess-ories??
Scott -
What an apple fan-boi comment. Just because you can sit it on your lap doesn’t mean that you won’t *ALSO* put it on your desk for part of the day. It never fails to amaze me how some people identify themselves so strongly with the brans they buy that they have to be unofficial spokesman and apologist. Sad.
ndolam -
-
-
-
La nueva MacBook tiene menos de la mitad del grosor de su antecesora de 2009, midiendo 0,52 pulgadas en su punto más grueso.
-
Con 1.08 pulgadas de grosor, los 2,2kg de MacBook 2009 envueltas en policarbonato eclipsan a nuestra MacBook Retina de 0,92kg.
-
Apple probablemente redujo mucho de ese peso al eliminar puertos. En 2009 teníamos MagSafe, ethernet, Mini DisplayPort, 2x USB, audio y una ranura de seguridad.
-
También se despide de su unidad óptica, aunque ese barco ya ha zarpado.
-
-
-
Las teclas son bastante bajas. Saliendo de su base está el teclado de nuevo diseño de Apple, equipado con un mecanismo de mariposa. Veremos si este teclado supera el mecanismo tradicional de interruptor de tijera.
-
Hacemos zoom en la pantalla Retina, descrita por Apple como la pantalla Retina más delgada y con mayor eficiencia energética jamás vista en una Mac. Los píxeles en sí tienen una apertura más grande, lo que permite que entre más luz, lo que resulta en una mayor eficiencia energética sin comprometer el brillo.
I was searching for the reference in this, what do they even mean by twice as high?
The keyboard has a "butterfly mechanism". The "twice as high" line is a reference to the Reading Rainbow theme song, which has the lyrics "Butterfly in the sky/I can go twice as high". The link is to Jimmy Fallon as Jim Morrison in The Doors, doing a parody cover of the referenced theme song.
-
-
-
Tomamos una nota rápida del número de modelo recién acuñado, A1534, antes de seguir adelante.
-
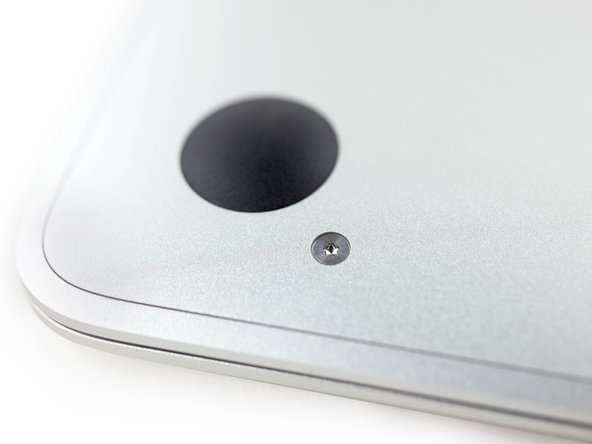
Este puede ser el futuro de las computadoras portátiles, pero Apple se ha mantenido fiel a su tradición de usar tornillos pentalobe de 5 puntos a prueba de manipulaciones para la nueva MacBook.
-
-
-
Es hora de arrancar esa aburrida y simple tapa de aluminio y llegar a lo bueno ...
-
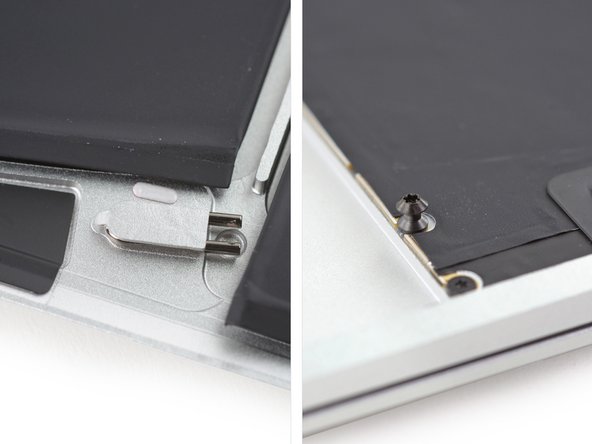
¿Qué es esta nueva diablura? Cables !? ¿Una batería y una placa lógica en la base?
-
Las bisagras mantienen el mismo estilo, pero luego los cables se tensan. Hay que girar la tapa y tirar la base hacia atrás y hacia adelante para acceder a los conectores y abrir la caja.
-
¿Qué es esto, un iPhone de generación media?
-
Los clips de plástico estándar de antaño se reemplazan con clavijas futuristas y clips de resorte extraños.
-
-
-
Con reminiscencias de la Macbook Pro 13 "Retina lanzada en marzo, esta MacBook viene equipada con el elegante trackpad Force Touch. Desconectamos el cable del trackpad / teclado para tener un poco más de espacio de maniobra.
-
Con el cable elástico del trackpad / teclado desconectado, podemos doblar toda la enchilada sobre la mesa. Es hora de inspeccionar el campo y ver a qué nos enfrentamos esta vez.
-
-
-
Espera, esto es un portátil, ¿verdad? ¿Dónde está el conector de la batería?
-
Perdidos, jugamos un rato con este pequeño botón amarillo. Boop.
-
Hemos visto algo como esto antes: en el iPad, a Apple le encanta esconder el conector de la batería debajo de la placa lógica. Esta es la primera vez que lo vemos en un portátil, por lo que parece que es hora de ...
-
Nuestro nuevo aislador de batería recién acuñado resulta ser el truco que necesitamos para mantener el jugo alejado de los contactos de resorte de la placa lógica.
Did you guys ever find out what the button is for on the battery connection tab for the PCB?
Yeah, it’s explained in the repair guide—just a way to power everything down for servicing without physically disconnecting the battery.
IMPORTANT: If you don’t press the yellow button before removing the trackpad cable on new models, it will KILL your Mac. This I’m reading from fellow contributors. Please tell me, I have not destroyed two MacBooks this way.
-
-
-
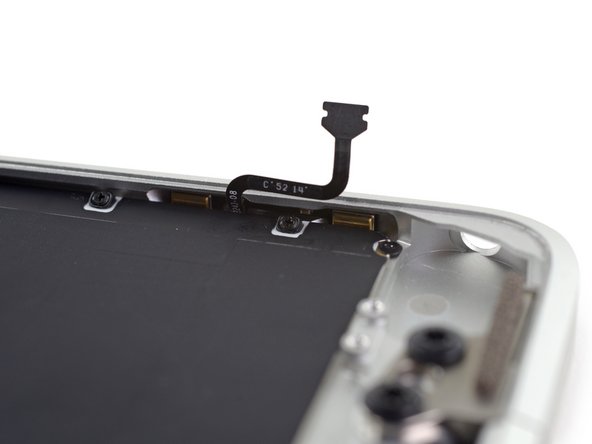
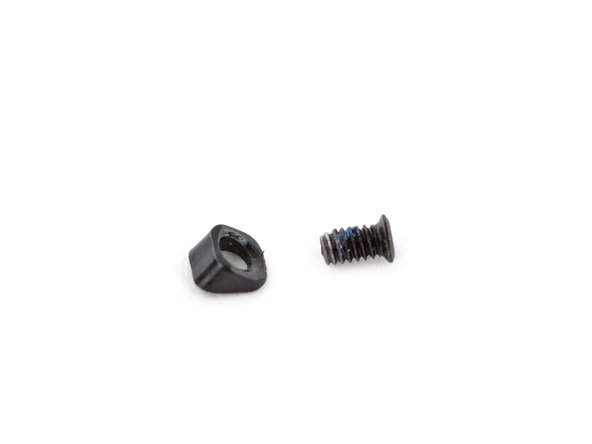
En nuestra búsqueda para comenzar la Gran Desconexión de cables de 2015, ¡encontramos un tornillo de tres alas!
-
Finalmente desconectamos el cable del puerto de E / S / alimentación / pantalla 3 en 1 que va al único puerto USB-C de la MacBook.
-
Es gracioso porque si bien hay tres funciones, solo hay un puerto y no hay placa de E / S.
-
-
-
Supusimos que la pantalla Retina más delgada de la historia vendría con algunos otros cambios, ¡pero este es un conector de pantalla extraño!
-
Desconectamos con pinzas el conector de la "placa de audio" que conecta el conector para auriculares y los micrófonos duales.
-
Finalmente, las dos mitades están libres para volar. ¡Ahora es el momento de llegar a esa placa lógica!
-
-
-
-
Levantamos con cuidado la hermosa placa lógica de su nido de aluminio.
-
El uso de Apple de los nuevos procesadores Intel Core M permite factores de forma más pequeños y divertidas cubiertas de disipadores de calor.
-
El disipador de calor está muy bien mecanizado para proporcionar múltiples puntos de contacto en la placa lógica, quizás incluso para enfriar un poco el reverso de la placa lógica.
Would you please measure the logic board? I'd like to know how small it actually is.
It's about 4.5" x 1.5", not including the battery contact protrusion.
I have a base model 1.1/256GB. Seems exporting 1080p video in iMovie generates the most heat. Mine hovered between 84-87C thru the 12 minute process with a high them reading of 88.20 Cooling was immediate after export was complete. Down to 54C within 10 seconds. Intel lists the high gem for the 5Y31 at 95C
Seems to be significant thickness of paste between the heat sink and the CPU.
Apple is going down, I better buy a few second hand 2012 model for the future, when mine will give up, no way I'm buying an no upgradable computer! I might have to think seriously to try to make a hackintosh also!
-
-
-
¡Es hora de poner las fichas sobre la mesa! Veamos qué nos ofrece esta placa lógica:
-
Elpida / Micron FB164A1MA-GD-F RAM móvil LPDDR3 de 8 GB
-
Toshiba TH58TFT0DFKLAVF NB2953 Memoria flash MLC NAND de 128 GB (+ 128 GB en el reverso para un total de 256 GB)
-
Microcontrolador NXP 11U37; Flash de 128 kB, SRAM de 10 kB
-
Sensor de temperatura SMSC 1704-2
-
Texas Instruments SN650811 (probablemente convertidor de potencia relacionado con SN6501)
That can't be SLC but MLC or TLC, right? Also, where is the %#*@ SSD controller?
SSD is scolded into logicboard. It's immovable. SSD controller is on the rear part.
I wonder how one would extract/recover data from a retina MacBook 2015 with a dead logic board (you know s..t happen)? On MacBook Pros/previous gen MacBooks you could simply remove the SSD and place it to another Mac or external enclosure (not to mention the older models with the usual SATA interface).
It's OK if you backup your data regularly (most users don't hence the data recovery business is flourishing) what will you do if there is no backup? Sure sometimes logic boards can be repaired, but sometimes even L. Rossmann can't fix them...
I need to restore my mail back from SSD drives. My logic board is dead. Is there a way I can do it. I am willing to remove SSD from the dead logic board. Any ideas on how I may do this.
I need to replace Texas Instruments SN650811. I tried buying it online on their web, but they don’t sell the part. Any replacement or ideas on how to get it fixed?
-
-
-
Tarareando una melodía lógica, examinamos la parte posterior de la tabla más lógica:
-
CPU Intel SR23G Core M-5Y31 (doble núcleo, 1,1 GHz, Turbo Boost de hasta 2,4 GHz) con Intel HD Graphics 5300
-
SK Hynix H9TKNNN4GDMRRR-NGM 4 Gb (512 MB) LPDDR2-SDRAM
-
Toshiba TH58TFT0DFKLAVF 128 GB MLC NAND Flash
-
Elpida / Micron J4216EFBG-GNL-F DDR3 SDRAM
-
Broadcom BCM15700A2, parece ser un chipset de red inalámbrica
-
Murata 339S0250 (probablemente una iteración del módulo Wi-Fi 339S02541 que se encuentra en el iPad Air 2)
-
Texas Instruments / Stellaris LM4FS1EH SMC Controller (Reemplazo de nombre en clave para TM4EA231)
The Toshiba 128GB NAND Flash is not SLC. It is 128GB MLC NAND Flash. As the information Apple announced on the web site, MacBook uses PCIe-based SSD. There should be an PCIe-based NAND Flash controller. And, as the teardown result you did, there is an additional memory chip, SK Hynix H9TKNNN4GDMRRR-NGM. Can you recheck the chip? Is there a chip under SK Hynix H9TKNNN4GDMRRR-NGM? I guessed the PCIe-based NAND Flash controller is under SK Hynix H9TKNNN4GDMRRR-NGM which is PoP package.
Should SK Hynix H9TKNNN4GDMRRR-NGM be LPDDR2?
It would be interesting, if the components on the whole board are something new, or can be found in similar configuration in other models on the market.
There are voices saying, that the hardware is highly overpriced. It would like to have objective comparisons or analyses, not emotion and religion-driven affects of the Apple haters and on the other hand of the fan boys.
Is anybody here with real expertise?
Yes. It is something new. Mostly, PoP package is used on SmartPhone and Tablet. Apple should be the first one to use PoP package on the SSD controller.
JJ Wu -
where is the Graphic ic ?
-
-
-
En 2011, Apple adquirió Anobit, un diseñador de controladores de memoria flash israelí.
-
Cuatro años después, parece que ahora podrían tener algo que mostrar; gracias al informe de Anandtech de que el SSD de la MacBook se veía un poco inusual en el generador de perfiles del sistema, llevamos nuestra pistola de calor al SK Hynix SDRAM para ver qué se escondía debajo .
-
Donde esperábamos ver algo de Samsung o Toshiba, encontramos un chip sin marca con un número de pieza muy parecido al de Apple: 338S00055.
Is it possible to remove the whole logic board and try to use As an external hard drive?
-
-
-
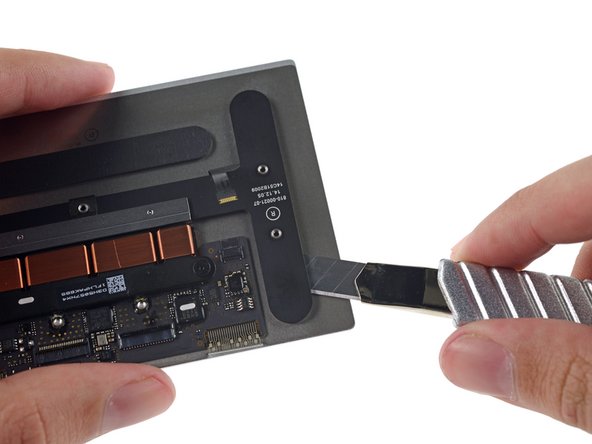
Era demasiado esperar que la batería estuviera asegurada con unos tornillos, al estilo MacBook Air. Es hora de romper el calor y las cartas.
-
Esperábamos que esto hubiera proporcionado espacio para algunos tornillos, o algunos de esos pequeños clips elegantes que vimos en la carcasa. Aparentemente no.
-
iApertura en la base? Esto se siente raro ...
-
Raspar, pelar, raspar, pelar. Mira todo ese desagradable adhesivo.
-
-
-
¡Puaj! Incluso la celda central de la batería está pegada, y esperábamos que las celdas pegajosas que encontramos en la nueva MacBook Pro de 13 "no fueran una tendencia ...
-
Para complicar el procedimiento, la batería se asienta en un pozo; el único lugar seguro para hacer palanca es sobre esta pared de aluminio.
-
Bueno, finalmente salió, en todo su esplendor multisegmentado.
-
-
-
Para alimentar este dispositivo delgado, Apple produjo esta batería de 7.55 V, 39.71 Wh y 5263 mAh que se ajusta a la forma.
-
Según las especificaciones, esto es solo un pelo más de lo que obtiene de la MacBook Air 11 "de 5100 mAh, casi regordeta en comparación, de este año, aunque Apple promociona el mismo rendimiento de la batería de hasta nueve horas navegando por la red, o diez horas de reproducción de video de iTunes.
-
-
-
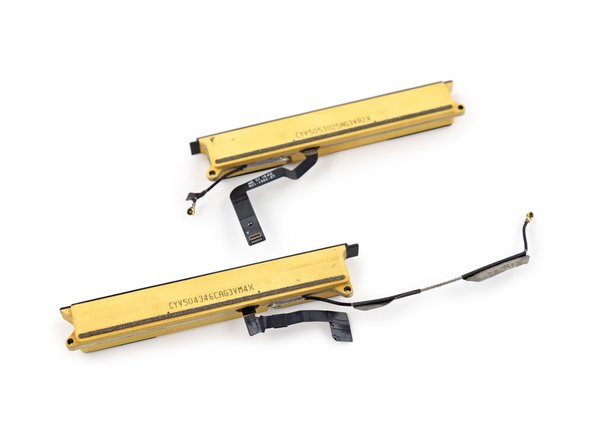
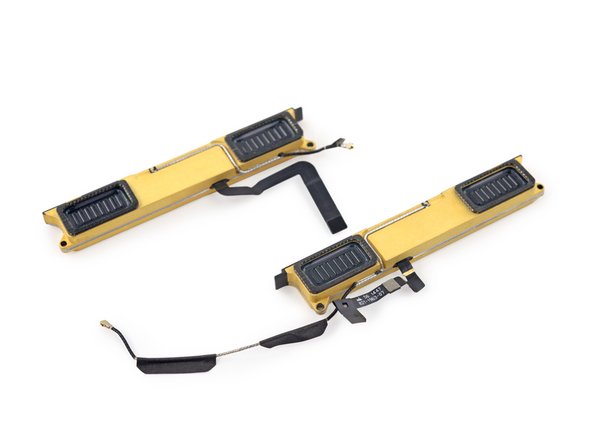
¡Hemos encontrado oro! ... O tal vez solo un recubrimiento dieléctrico sobre aluminio.
-
Las antenas del tesoro se colocan en canales encaminados a cada conjunto de altavoces.
-
-
-
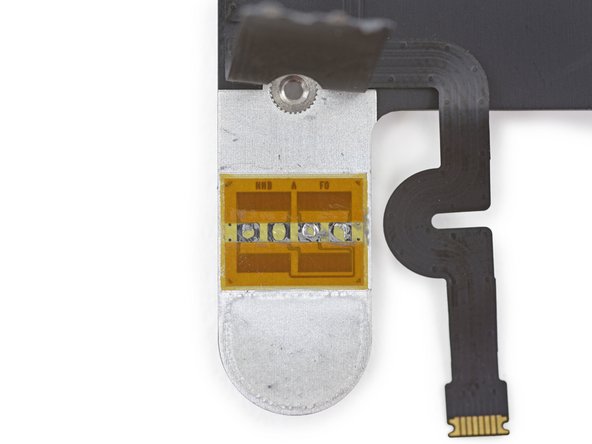
Finalmente, llegamos a uno de los trackpads más comentados de la ciudad. Como era de esperar, el trackpad Force Touch de la MacBook MacBook parece una versión más delgada y delicada de la que encontramos en la MacBook Pro de 13 ".
-
Una vez que cortamos el soporte, obtenemos una vista clara del Motor Táptico.
-
-
-
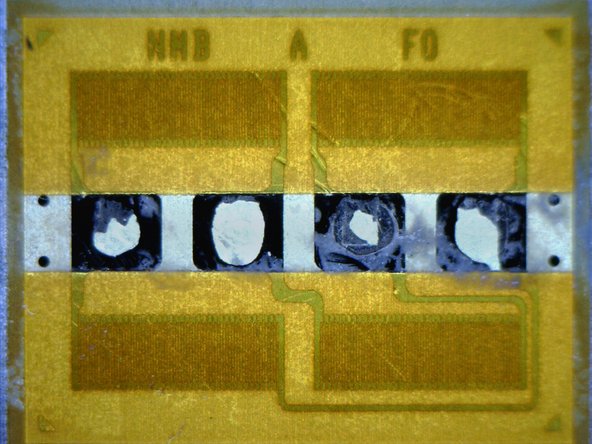
¿Sólo cuatro galgas extensométricas? Parece poco probable ... Es hora de buscar.
-
¡Ah ah! Un extraño pegamento gomoso sujetaba un cable sobre la segunda mitad de cada par de galgas extensométricas.
-
Como descubrimos anteriormente en Force Touch de Apple, los medidores de tensión en este trackpad detectan la presión de los dedos sin moverse realmente.
I'm sure the new strain gauge trackpads are more durable than the old diving board trackpads (which had a tiny dome switch + fragile plastic/rubber nub making up the physical button, mine failed there), but the strain gauges DO wear out, don't they?
Is it likely to be something that people who press hard will see failing at some point during the Macbooks lifetime?
-
-
-
Con el soporte del medidor de tensión retirado, echamos un vistazo más de cerca a los chips que alimentan este nuevo trackpad:
-
Controlador de pantalla táctil Broadcom BCM5976
-
Microcontrolador basado en STMicroelectronics 32F103 ARM Cortex-M
-
Convertidor LED Linear Technology LT3954 con generador PWM interno
-
-
-
Otro ala triple muerde el polvo, y el cable del puerto USB-C resulta ser un cable de interconexión.
-
¡Y el puerto está atrapado por la bisagra de la pantalla! Qué grosero.
-
Volveremos por ti más tarde, USB-C.
-
-
-
Bueno, al menos el conjunto de audio es modular, lo que permite una fácil extracción de la placa del conector de audio. Pero eso significa que los micrófonos duales se quedan atrás.
-
Detrás del teclado, eso es, ¡maldiciones!
-
Espera, ¿son esos tornillos? ¿Sin remaches? ¿Podemos realmente entrar? ¡Bonito!
-
Para ser justos, ese tornillo que ves en la esquina es un pentalobe, un P2. Es un tornillo del tamaño de un iPhone. Apple realmente no quiere dejarnos entrar.
-
-
-
Tres pentalobes despues ...
-
... y 10 tornillos Phillips con extraños espaciadores inclinados, lo que les permite asegurar el teclado en ángulo ...
-
... y finalmente dos tornillos que encajan en los clips de la caja (volviendo al paso 6).
-
No podemos quejarnos demasiado, quiero decir que los tornillos son mejores que el adhesivo, oh Dios mío.
-
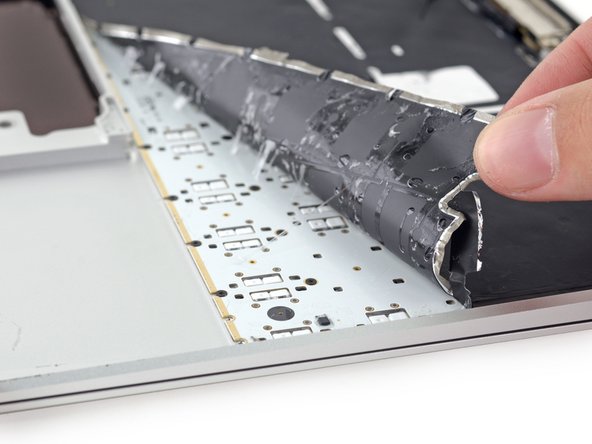
El respaldo adhesivo (una especie de cinta en capas) está pegado al teclado y apenas se mantiene unido al despegarse.
-
Bajo el manto de cinta hay un campo de estrellas desalentadoras. Dos pentalobios por tecla, más una fila en la parte superior e inferior, para un total de 83, más los tres anteriores.
On either side of the keyboard are phillips screws which I assumed were 000 size because that is the only screwdriver of that size that was listed in your tools needed section - I even ordered the driver from ifixit but it does not work. Can someone please tell me the correct size driver for these screws - I ordered the JIS version of the 000 today - I think that might be it. Thanks!
-
-
-
Atemorizados por el panel trasero lleno de pentalobos, optamos por el acceso frontal. Las teclas se abren con bastante facilidad y parecen encajar en su lugar.
-
Con muy pocas piezas móviles en el interior, ¿es posible que este mecanismo de mariposa de plástico realmente sea una ganancia para la reparación?
-
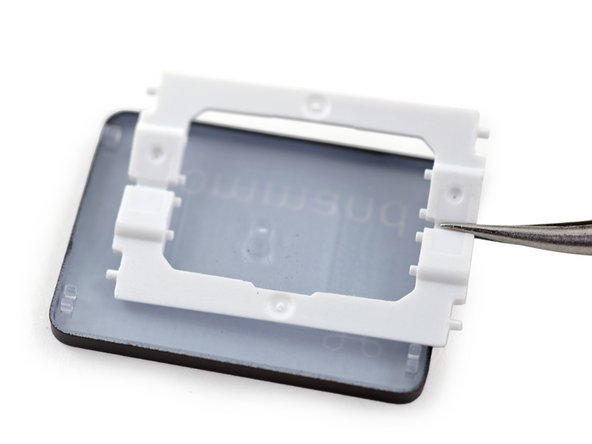
El soporte se sujeta con pequeños clips; tan lindo.
How much pressure did you apply to pop the keys off?
Not a lot. A pretty light flick with a thing plastic tool like our opening pick works well enough, once you get it jammed in the gap between the key and the aluminum frame.
Do the keys go back on after doing this? Being able to remove keys could be useful for cleaning.
How bout the plastic cup where the plastic butterfly mechanism can you able to detach it also?
What mechanism controls the "spring" in the key (driving the key back up)? The hinge controls the up and down motion, but where is the spring that drives the key up? And is it easy to replace this spring portion for keys that appear slightly less responsive?
I can't put the shift key back in properly, it won't snap back to it's place. Do you have any ideas?
Me too OTL. Did you solve the problem?
"Although we're a tiny bit worried about the plastic hinge fatiguing and breaking at its flex-point, we'll give Apple the benefit of the doubt and assume they've thought of that and designed for it."
I went back and watched the introduction keynote. It's not plastic, it's glass-filled nylon.
How do replace the Spacebar? Do I put in the hinge first than the key. Or do I put the hinge and key already attached together back into the Spacebar area and apply firm pressure?
If you remove the butterfly mechanism, be very careful to not flex it the 'other' way. The plastic will become fatigued and you will lose the pop-up action of the key.
I feel I should point out that the removal of that key cracked one of the itty bitty plastic clips on its underside, no good.
so the spacebar on my mb12 became inoperable; the 1st attempt to remove it and clean the inside yield no results (lots of gunk went out and the plastic bits holding the key to the butterfly mechanism were intact though) so i tried again and this time, applying minimal force, some of the plastic bits gave and now the key is loose and won’t stay in place much; that being said, at least i can use it when typing!
any thoughts on how to fix that? did anyone try using any form of adhesive perhaps? i don’t suppose one can simply buy the spacebar / butterfly mechanism as a replacement part? i want to avoid spending 200usd to replace an otherwise perfect and scratch free top chassis part… thanks!
@mikebppla The Bookyard has individual keys as well as full key replacement sets. The keys are pretty tricky to replace without damage in my experience, but definitely worth a shot before you resort to replacing the entire upper case.
-
-
-
¡Ahora para quitar la pantalla y llegar a ese molesto puerto multipropósito!
-
¡Ahh, USB-C! Este chico combina carga, transferencia de datos y salida de video en un solo puerto.
-
USB-C admite una velocidad máxima de 10 Gbps (este puerto tiene un máximo de 5 Gbps), potencia bidireccional de 20 V / 5 A y un diseño reversible destinado a resolver todos sus problemas de USB.
I'd like to see a bit more contempt for Apple's decision to wedge that USB Type-C connector behind the display hinge. Looking at the design, by using the aluminum case as the connector body they clearly are -trying- to make that port robust; but in doing that they're pushing the failure point onto the plastic tongue. The amount of aluminum on the part shows they KNOW that. The design is clever, modular. But to then wedge the thing IN, that's just asinine. They're over-engineering one point in an attempt to compensate for poor design at another. Then again, can't knock 'em much more than the 1 out of 10.
Not sure what you're getting at - what would a solution be? Make the aluminum weaker? I think that the extra metal there is to keep the corner from denting during a drop. As for the "wedging the connector in" part, that's a non issue since it is probably installed before the display is attached.
@Jeffrey Daniels: By removing MagSafe, Apple is necessarily making the user accept a greater risk of breaking the Type-C connector. That the connector is modular, and designed the way it is, pretty much reflects Apple understands that. However, instead of merely making the connector modular AND easy to replace (a fast repair job), they make it a substantially longer job requiring the removal of the display (and a bunch else to get that far). The one part that carries the most risk of causing repair...they then go and make replacing it puzzlingly more difficult than the part's modularity would convey. (If you have to do that much work to get it out, why bother even making the thing compactly modular at all?)
Scott -
USB 3.1 Gen 2 supports 10Gbps, however Apple's implementation is USB 3.1 Gen 1…which only supports 5Gbps (just 1 lane of HiSpeed USB). AKA USB 3.0. See http://www.apple.com/macbook/specs/
What Scooter said. Type-C is a form-factor.
How much stress / abuse / ware etc. do you think the hinges can take? Say repeatedly picking the computer up by the hinge while open.... I mean at the extreme corner only?
-
-
-
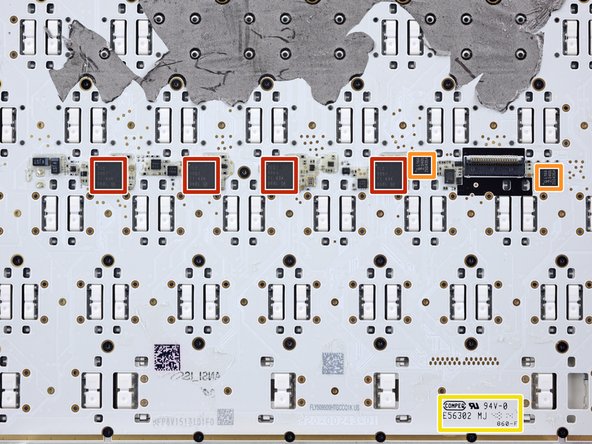
Apple ha optado por pasar de usar una fila de LED con un panel de guía de luz a instalar LED individuales debajo de cada tecla.
-
Y detrás de esas llaves encontramos:
-
Una matriz de cuatro controladores LED PWM TLC5951 de Texas Instruments
-
Un par de expansores de E / S NXP PCAL6416A
-
Compeq, fabricante de PCB, informa un aumento de los ingresos en marzo.
Array of 4 Drivers for the keyboard LEDS, each supported 24 output channels. Someone's going to have to make a bit of software to led flash sequences of keys for alerting. Email from mom? M-O-M lights up, goes dark, lights up. etc. That would be awesome.
That would be awesome. Im guessing theyre all wired in parallel to the same control signal and doubt they would be individually addressable.
It'd be cool, but I don't think each key has its own led. At least, in the past models there were 4 leds for the whole keyboard.
Each key has its own led. Apple has touted this itself.
Any idea if Apple's design allow for the individual LEDs to be controlled by user programs?
.
Since they use those TLC5951 LED drivers with 24 channels and that chip allows each channel to be adjustable individually, for 24 channels x 4 chips that's 96 channels total... is it possible to use them like disco lights? :D
or maybe as a strobe / morse code blinker / other light games?
One of the most common repairs we do in our shop is to replace the keyboard after failures. (Usually spills). It looks like this previously arduous but fairly inexpensive task will remain arduous but no longer inexpensive.
When repairing the keyboard after liquid damage, do you swap out the keyboard, or must you swap out the whole topcase?
Audricus -
-
-
-
La MacBook 2015 tiene un puntaje de: 1 de 10 (10 es fácil de reparar)
-
Los tornillos "pentalobe" hacen que abrir el dispositivo sea innecesariamente difícil, y la nueva colocación de los cables hace que el procedimiento aún más complicado.
-
El puerto USB - C se fija mediante tornillos de tres alas , y está debajo de los soportes de la pantalla , lo que complica el reemplazo . Además, al ser el único puerto, experimentará un mayor uso y el desgaste típico de un puerto que se usa para todo propósito.
-
El conjunto de la batería "ocupa todo" y esta muy adherida a la base inferior.
-
La pantalla Retina es todavía una unidad fusionada sin poder separar el vidrio protector . Si la pantalla necesita ser reemplazada, Costará un ojo de la cara .
-
El procesador, RAM, y la memoria flash de almacenamiento están soldadas a la placa base
Just replace the bottom case with the battery together. I don't see why you guys are so determined to pull the battery off the case when replacing it, it's just a cheap stupid metal bottom.
Also pentalobe screws are no longer "proprietary" when you can get 10 for like 1 dollar.
Apart from those. I agree this thing gets no more than 1 score on repairability though
There's slightly MORE than the battery on the bottom case. Things you *might* need - like the logic board, speakers, antennae...
It may not be as trivial as you seem to think.
Just don't pull the battery off the case, replace those two as an assembly.
Speakers and antennas are not so expensive either, but they are easily removable so not a problem.
Tom Chai -
-


Un agradecimiento especial a estos traductores:
100%

Estos traductores nos están ayudando a reparar el mundo! ¿Quieres contribuir?
Empezar a traducir ›

20 comentarios
Hello,
Have you checked the content of the power adapters?
Le commentaire. As you say, pentalobe is tamperproof, and surely most of us now have a screw driver set? About time we forgave Apple, and it's good for your merchandising business ;-)
Yeah I'm thinking the same… I vaguely got the point behind the complaints when iPhone 4 came out, but that is now five years ago, and I am sure that anyone trying to fix the MacBook has ordered some part for one of the *last five iPhone models* and gotten the pentalobe screwdriver with it, so… And then the tri-wing screws just get a quick mention, although tri-wing screwdrivers are far less common by now, which just isn't fair :D
I could not find - what sound chip is used inside?
Definitely not an upgradable computer. Even the little bigger MacBook Air offers easy battery, SSD and cpu fan replacement.
Considering there is no fan in the new Macbook Retina. You can't really hold that against it.
Robert B -
I believe the BCM15700A2 chip is related to the camera:
02:00.0 Multimedia controller [0480]: Broadcom Corporation 720p FaceTime HD Camera [14e4:1570]
Thanks for the teardown, iFixit. Are the camera and microphone(s) unpluggable? I've been able to unplug my camera/microphones based on your teardowns of past Apple devices, but I can't tell from any of these pictures. Thanks!
Savvy comments - I learned a lot from the info - Does someone know where I could grab a template WI DoT MV2118 version to edit ?
It helps lot when you shown the repairing posts. I know that people can understand the problems they faced with apple products like phone, laptop etc. you given the guarantee to the people these apple products once problem gets can be replaced and repaired. Thanks for your efforts in showing interest for us.
Is there a tutorial to remove the space button? thank you
Thanks You. very useful.
Any idea what this screw is for. It was rattling around my MacBook Air, https://imgur.com/gallery/hkYIK
Physically the differences are very minor. We break them down for you in the Retina MacBook 2016 Teardown.
It is very useful information. Thanks for sharing.
Is the 2017 topcase similar to the 2015 or 2016 version?
Sehr schöner Bericht von euch, ich bin immer wieder erstaunt wie Ihr mit den teilen umgeht und es immer wieder auf die Reihe bekommt die Teile wieder zusammen zu bekommen irre Danke macht weiter so.
Gruss aus Hamburg Germany
I replaced the battery on my MacBook 12 2015 A1534, after the battery replacement, the power button key doesn't work, all other keys on the keyboard works except the power button. Please help