Introducción
Utilice esta guía para reemplazar la batería CMOS.
Antes de comenzar cualquier trabajo en tu Mac Pro: Desenchufa la computadora y mantén presionado el botón de encendido durante diez segundos para descargar los capacitores de la fuente de alimentación.
Ten mucho cuidado para no tocar los capacitores o cualquier junta de soldadura expuesta en la parte posterior de la fuente de alimentación. Solo maneja el tablero por los bordes.
Qué necesitas
-
-
Desliza el interruptor de bloqueo hacia la derecha, hasta la posición de desbloqueo.
-
-
-
Quita los cinco tornillos Torx T10 de 5.1 mm de todo el perímetro exterior del ensamblaje del ventilador.
Fat Mango is correct. That said. If you do pull the fan assembly note that the screws are all held in with blue Permatex and breaking them free takes a fair amount of effort. Getting a good set of Torx screwdrivers is a must.
Hey guys, what would happen if you only replace one card.. I have a D300 but the plan is to upgrade to D500 or D600. So If I can afford and install one instead of the pair would it increase something? or will it cause any conflict? I guess I don’t understand if I the Mac Pro has 2 D300 graphic cards that means each has 1GB? Same as If I would Install 1 D600 that would increase 3GB only? Thanks.
D300 = 2GB each card. Very few apps uses two cards at the same time.
Gio Cas -
The (5) Screws are Apple part number 923-0713
-
-
-
Mientras sostienes el ensamblaje del ventilador con una mano, afloja los dos tornillos cautivos T8 en el soporte del cable del ventilador.
On my machine, a TR7 worked to remove them due to the weird angle.
-
-
-
Retira los cinco tornillos Torx T10 de 5.1 mm del perímetro exterior de la caja inferior.
-
-
-
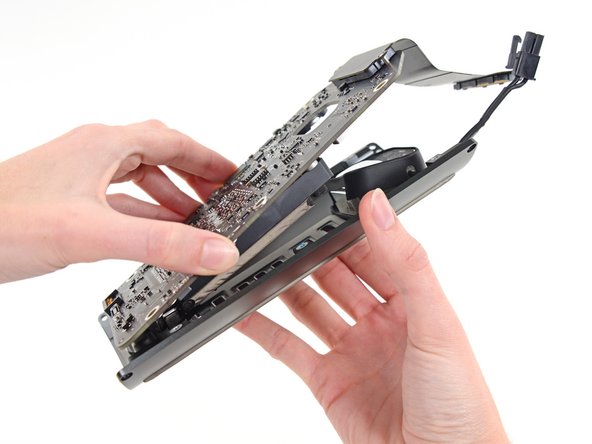
Utiliza el extremo plano de un spudger y un movimiento de giro para separar suavemente un lado de la conexión de datos de la tarjeta gráfica.
-
-
-
-
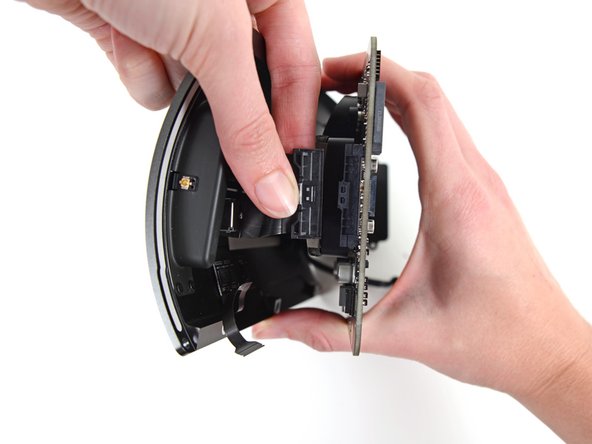
Retira los dos tornillos Torx T7 de 6,0 mm que sujetan la placa de interconexión al disipador de calor.
Ended up being T9 screws for me.
T8 screws for me, i did and edit to this step
Ended up being T15 screws on my machine
-
-
-
Da la vuelta al Mac Pro y colócalo suavemente sobre una superficie plana.
-
-
-
Utiliza el extremo plano de un spudger para desconectar el conector de salida de CC de la fuente de alimentación de su zócalo en la placa de E/S.
-
Use la punta de un spudger para desconectar el cable de datos de la fuente de alimentación de su zócalo en la placa de E/S.
Need to add T9 Torx Screwdriver to list of tools at the beginning of this article.
-
-
-
Retira los cuatro tornillos Torx T10 plateados de 9.0 mm de los lados de la fuente de alimentación.
awesome. thank you for the tip!!
-
-
-
Retira los 2 tornillos T10 Torx de 9 mm que aseguran la placa del E/S al blindaje E/S.
On reassembly, before tightening these 2 9.0mm T10s, make sure the other 4 holes line up. Otherwise you might be setting yourself up for cross threading the 4 remaining 9.0 mm T10 that are already in a bad spot for torquing.
Might not be a bad idea to put the other 4 halfway in to be sure no resistance, then tighten the 2 in this step, then remove the other 4.
-
-
-
Utiliza la punta de un spudger para voltear la solapa de retención del conector ZIF del cable de la cinta del escudo E/S.
-
Desconecta el cable plano del escudo E/S.
-
-
-
Aprieta y tira del conector del cable plano del conector de audio de la placa E/S.
-
-
-
Utiliza la punta de un spudger para sacar la batería CMOS de la toma de corriente.
-


Para poder ensamblar tu dispositivo, sigue estas instrucciones en orden inverso.
Para poder ensamblar tu dispositivo, sigue estas instrucciones en orden inverso.
Cancelar: No complete esta guía.
26 personas más completaron esta guía.
Un agradecimiento especial a estos traductores:
100%


Estos traductores nos están ayudando a reparar el mundo! ¿Quieres contribuir?
Empezar a traducir ›

11 comentarios
A very good guide. I have a few notes from my experience replacing my battery.
In step 13 the torx screws securing the interconnect board to the heat sink were T-8 on my Mac but T-7 worked.
In step 23 a short arm Torx key would be helpful. Getting them out tore up the heads of the screws and getting back in was difficult without cross threading some of them. Bondhus (model no. 31832) sells a set that might help.
In step 29 if you don't reconnect the power supply data cable completely your Mac fan will run full speed and the processors will max out.
Yeah, could somebody please post the specifications for the replacement battery and maybe a source for it?
From the tear down, it's a Long-life BR-2032... I got mine at: https://www.amazon.com/PANASONIC-BATTERI.... Good luck! Great machine!
Yes, the BR2032.
The difference between it and the CR2032 medical battery is the wider heat tolerance range, both extreme heat and cold of the BR. As these are known to get quite hot, get the BR2032.
The batteries in most Macs are easy to replace so substituting the common CR2032 works fine. Electrically, they are identical. The Mac Pro and the late 2009-2010 iMac are a bit time consuming (2009–10 iMacs have the battery on the back of the motherboard) so use the same one that Apple uses.
The best price on the BR2032 is this 3-pack.
<url>https://www.amazon.com/Panasonic-Battery...</url>
Could anyone explain what issues they are seeing with a dead CMOS battery?
I’ve had a problem booting for a while, having to reset pram and smc every time and try multiple reboots, uugh, I changed CMOS battery thinking it was that and tested the old one which was lo and behold dead. I thought this would fix the issue but it hasn’t. Just FYI I have the same problem with or without a battery in there.
Hi there. The same for me here, how did you solve this problem ?
Changed for new battery although it is not turning on yet.
Ebd -
Thank You for very good detailed guide but I have problem after reassembly, fan running on maximum speed. I have try SMC reset (1)Shut down Mac, 2) Unplug power cord, 3) Wait 15 sec., 4) Plug in power cord, 5) Wait 5 sec., 6)Turn On Mac) and not worked for me, all is without changes. Mac very lagging and is very slow. I disassembled the mac again, checked all the flex cables and dont’t find any problem with this. Please, is any way how can I fix this? I have searching and testing guides 2 days and now I'm absolutely frustrated, nothing worked. :-( Thank You very much.
Thank you for an excellent guide to a tricky enough operation. Phew! Good job that coin cell lasts a few years! As someone else has said, I highly recommend chasing down the BR2032 version that Apple install as OEM, rather than using the more common CR2032. There are good reasons for this - the BR2032 has increased temperature stability and holds voltage better over lifetime. UK folk can get a supply at RS Components here: https://uk.rs-online.com/web/p/button-ba...
One other comment - in the reverse of Stage 23 when re-assembling, please take care aligning those 4 x 9mm T10 screws bolting down the PSU to the IO board. They came out fairly easily, but picking up the thread again properly when putting them back I found very tricky, mainly due to the overhang, and there is a risk of stripping if they don’t go in vertically.