Introducción
Cuando aparece "Absorbedor de tinta lleno" o "Absorbedor de tinta casi lleno" en la pantalla de la impresora, es el momento de reemplazar la Caja de absorción de tinta (y/o la Caja de lavado).
Qué necesitas
-
-
Abre la puerta de acceso frontal y retira las tarjetas o cables presentes. Cierra la puerta de acceso.
-
Retira la bandeja de papel.
-
Retira los cartuchos de tinta.
-
Abre la cubierta de la impresora usando los soportes para los dedos en los costados.
-
Desenchufa y retira los cables presentes debajo de la cubierta.
-
Retira las tapas del puerto LAN y del puerto EXT (si están presentes).
-
-
-
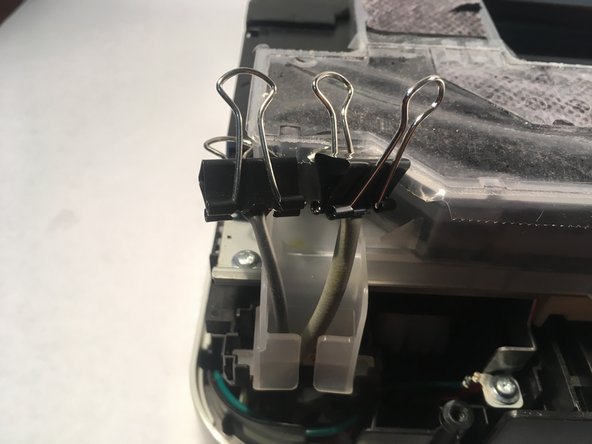
Mientras sostienes la cubierta con una mano, tira del gancho en la parte posterior del amortiguador de soporte y luego retira el amortiguador de la cubierta.
-
Retira el amortiguador del soporte.
-
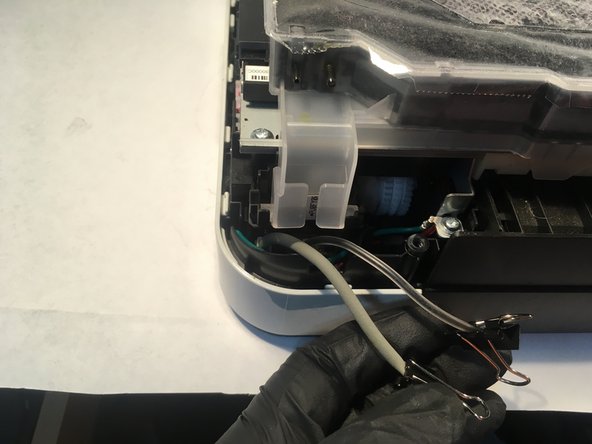
Coloca el soporte en posición vertical y tira de él hacia afuera de la impresora.
-
-
-
Usa tu dedo o un spudger para desenganchar las dos pestañas en el lado derecho de la cubierta del arnés haciendo palanca hacia arriba.
-
Retira la cubierta del arnés. Hay dos pestañas en el lado izquierdo que debes mover libremente y una en el frente.
-
-
-
Retira el tornillo Phillips n.º 2 de 6 mm del cable de conexión a tierra del arnés del motor del ADF.
-
-
-
-
Saca el arnés del motor ADF de su zócalo.
-
-
-
Inserta un spudger entre el soporte del arnés del escáner y el marco para liberar la pestaña. Hay una segunda pestaña en el lado opuesto.
-
Levanta el soporte del arnés del escáner para sacarlo de su marco.
-
-
-
Empuja la pestaña para fijar el soporte del arnés del escáner a la cubierta del escáner.
-
Desconecta el arnés del sensor de posición de escaneado de documentos/detección de documentos y el arnés del motor ADF del soporte del arnés del escáner.
-
Esto asegurará la tensión adecuada del arnés para permitir el escaneo de libros gruesos.
-
-
-
Con ambas manos, tira de la cubierta del escáner hacia atrás mientras la sostienes verticalmente y luego levántala de la impresora.
-
-
-
Retira los seis tornillos Phillips n.º 2 de 12 mm que sujetan la cubierta superior a la impresora.
-
Retira la cubierta superior.
-
-
-
Retira el sensor de absorción de tinta llena de su zócalo.
-
Desconecta el cableado de su arnés.
-
-
-
Desengancha el absorbedor de tinta del arnés tirando de él hacia arriba y hacia la derecha.
-
-
-
Retira el tubo de drenaje y el tubo de ventilación de aire de la caja del absorbedor de tinta. Un spudger puede ser útil.
-
Corta los extremos de los tubos para que no se filtren.
-
Desenruta los tubos del soporte.
-
-
-
Gira la caja del absorbedor de tinta 90º verticalmente y sácala de su alojamiento.
The reset procedure is slightly different on the one that I have.
1. Press the up or down chevrons to display the Home button, the house.
2. Hold the Home button down for about 5s until 4 boxes appear. From now on ignore everything except the screen that has the boxes
3. Press the bottom box, the blank one, for about 2s, until replaced with a keypad.
4. Press * 2 8 6 4 to enter maintenance mode. “Machine Error46” will be displayed because purge count not yet reset.
5. Press 8 0 to display the machine log.
6. Press << to get more keys and then press “Mono” many, many times to reach “purge”.
7. Press 2783 to reset. It will continue to show the error but this appears to be a bug.
8. Press 9 9 to exit maintenance mode and reboot.
Yes this is perfect, thank you
Hallo, was wird denn nach dem 17 Schritt gemacht?
Read “Conclusion,” below.
Calion -
Resseten nach Anleitung, aber das funktioniert erst wenn der Drucke sperrt.
Siehe Abschluss. Das Menu heißt Maintenance, und die zwei Zähler heißen purge.
Das Ersatzteil findest DU hier:
super Anleitung....hat perfekt funktioniert
Hallo, hat mit dem Zusammenbau gut funktioniert, nur leider komme ich nicht in das Menü die Zahlen zum Reset einzugeben?
Hat jemand eine Idee? Habe auf meinem Drucker keine Leertaste. Modell MFC-J4420DW
LG Franz
-


Para volver a armar tu dispositivo, sigue estas instrucciones en orden inverso. También es posible que desees reemplazar la caja de lavado en este momento.
Se han incluido los pares de tornillos del manual de servicio si tienes un destornillador dinamométrico, pero no te preocupes por ellos si no los tienes.
Después de volver a armar, sigue los siguientes pasos para restablecer el conteo de purga para borrar el error "Absorbedor de tinta lleno":
- Enchufa la impresora y enciéndela.
- Pulsa el botón Inicio (el icono de la casa) en la parte frontal de la impresora hasta que aparezca la pantalla Modo de mantenimiento (aproximadamente cinco segundos).
- Mantén presionado el botón en blanco en la parte inferior de la pantalla hasta que aparezca un teclado numérico en la pantalla (aproximadamente dos segundos).
- Presiona *, 2, 8, 6'' y 4 (puedes usar el teclado en pantalla o el teclado incorporado de la impresora para esto). La impresora emitirá un pitido y aparecerá MANTENIMIENTO''' en la pantalla.
- Pulsa 8 y 0.
- Presiona la flecha hacia abajo repetidamente hasta que aparezca PURGAR: (o FLUSHING:) en la pantalla.
- Pulsa 2, 7, 8'' y 3. La impresora emitirá un pitido y MANTENIMIENTO''' volverá a aparecer en la pantalla.
- Pulsa 9 dos veces para salir del modo de mantenimiento y reiniciar la impresora. También puedes usar esto para comenzar de nuevo si cometes un error.
Cancelar: No complete esta guía.
50 personas más completaron esta guía.
Un agradecimiento especial a estos traductores:
100%

¡ Francisco Javier Saiz Esteban nos está ayudando a reparar el mundo! ¿Quieres contribuir?
Empezar a traducir ›
Equipo

51 comentarios
Useful for dismantling the printer although my problem wasn’t with the waste ink component
Well, feel free to make a guide based on this one for whatever your problem was!
Calion -
Calion, you are my hero! The one place I’ve found where I can buy the replacement waste box for my Brother MFC-J4510DW does not provide directions on how to install it. And Brother itself offers neither the part nor the instructions. I thought I was going to have to buy a new printer until I came across your excellent report! Thanks so much for doing this!
You’re welcome! Very glad I could help out!
Calion -
Very informative and helpful :-)
Question could you fit a external waste ink tank ? what size are the waste ink tubes?
the disassembly instructions were concise and very helpful. I had everything taken apart and removed the flushing box in less than 10 minutes. Thanks for the very helpful instructions.
You’re welcome and thanks!
Calion -
After I reassembled according to instructions, the left side of the scanner cover wasn’t seating correctly. I adjusted the arm, and now it seats perfectly. However, there is an error message saying “close scanner cover”, and I can’t get rid of this. Is there an error code in the maintenance mode that will get rid of this so I can use the printer/scanner again?
The official manuals are available on the iFixIt product page at MFC-J4410DW; they may have the info you’re looking for.
Also, you may wish to check that arm again; perhaps it seated wrong or there’s a blocked sensor or something.
Calion -
Thanks! This worked great on my 4510. The reprogramming section was a little confusing, but I was able to figure it out after some tinkering around.
Specifics on what was confusing or suggestions on how to improve it would be helpful. These reprogramming instructions are copied almost verbatim from the manual.
Calion -
These instructions also worked for my Brother MFC-J4610DW printer. The only supplier for the part was in the US and they were able to ship to the UK.
I think you can create a page for that product, then just include these instructions on that page.
Calion -
Thank you. Just completed. I asked my usual maintenance person, but he siad it was too fiddly and didn’t want to do it. It is a bit messy, But ink on the fingers is a small price to pay.
Thank you for the tutorial. Wow! Not a fix it kinda girl…nothing is simple anymore…wish me luck! Lol
You’re welcome! Let us know how it turns out!
Calion -
For the very first time I feel compelled to comment on tips ‘brought to you by google search’.
The most fantastic article and the very clear description at the end is perfect. This worked for my MFC-J6920DW after replacing the ink absorber (which is far easier to accomplish with this model).
Question for Calion (if you are still seeing replies to this): How to you get the printer to force a re-check of the ink levels? I have a constant issue that new inks are only seen as 1/5th full.
My thanks for the time and effort put in to this (regardless of whether you reply to my further ask above).
Thanks so much!
I’m not sure about the ink levels. Perhaps try taking the cartridges out, one at a time, and putting them back in? Other than that, I’ll have to refer you to the service manual, linked on the product page.
Thank you for this guide, worked a treat. Also found this video on Youtube - https://www.youtube.com/watch?v=6IsmfZbJ...
After cleaning the ink absorbers on my Brother MFC-J4510DW, as per the instructions, I reassembled the printer without any problems. I spent some time getting the scanner support arm fitted correctly, but it’s now fitted as it should be, after reading several clips on how to do this / how to check the arm is correctly positioned.
However I now get the message ‘Scanner cover open’ when I start the printer and this stops everything in its tracks
- I’ve tried all the usual Brother support answers without success (e.g. open and close the cover, check the support arm).
- I’ve also tried maintenance mode (See https://www.youtube.com/watch?v=ANCokAwT...) but I don’t get very far in this mode, as the error message about the scanner cover overrides this.
- I think it’s a sensor that is not working correctly, resulting in the error message, but where is this sensor and how do I fix it!
All suggestions welcome!
Colm
Hello, I am a user of DCP-4220J.
I have destroyed the chip capacitor on the sensor board when cleaning the waste ink tank.
I have installed a ceramic capacitor of 0.01uF instead, but I can't get rid of the "near full" error.
Does anyone know the capacity of the chip capacitor on this sensor board?
No idea, but you can check the service manual linked on the information page for this product: MFC-J4410DW
There is no obvious reason why the ink cartridges need to be removed.
Perhaps not, but that was in the instructions in the service manual. Feel free to leave a comment on that step so that others can use their own judgment.
Calion -
Thank you so much for this excellent instructions. It helped me getting my printer back to operation again.
Thanks! Glad to hear it helped!
Calion -
Thank you very much for this very good guide!
My 9 year old printer will live on now!!!
Very simple and well explained.
Thank you for the effort and work.
I signed up specifically to say thank you!
Thank you so much Calion!
Wirklich vielen vielen Dank für diese sehr gute Anleitung!
Mein 9 Jahre alter Drucker wird nun weiterleben!!!
Sehr einfach und gut erklärt.
Vielen Dank für die Mühe und Arbeit. Ich habe mich extra angemeldet um mich dafür zu bedanken!
Vielen Dank Calion!
I followed these instructions and successfully cleaned the ink absorber. Thank you for this useful guide!
Unfortunately, now the error message "cover open" appears and I can not enter any menu and not even turn off the printer. What can be the reason for this? The cover is definitely closed. However, I have unfortunately completely disconnected the red cable at step 5. I was able to put it back on the wires that were still plugged in, but is now a little loose. Could this be the trigger? Is it possible to get replacement parts for it?
My first suggestion would be to look at the service manual, accessible from the device page.
Calion -
Super gemachte Anleitung. Hat perfekt geklappt. Vielen Dank
Super, vielen Dank für diese tolle Anleitung! Dadurch habe ich meinen 7 Jahre alten Drucker wieder reparieren können. Erst wollte ich ihn fast entsorgen, aber da ich bisher mit dem Brother zufrieden war, habe ich dann diese Anleitung gefunden und befolgt. Leider ist es etwas schwierig an das entsprechende Ersatzteil zu kommen.
Ein großes Lob an den Verfasser, vielen Dank.
Believe I replaced ink absorber successfully, put back together, plugged it in. Now says scanner cover is open, but it's not. Won't work yet.
I am getting a Error 46 after cleaning and reinstalling my ink absorber box. This error occurs at step #4. Can you help me try and clear this? I would hate to have to by a new printer based on this code...
There’s a service manual linked at the main page for this device; it may have some help for you.
Calion -
War etwas hakelig, aber Drucker hat die Meldung zurückgesetzt. Jetzt muss ich das Teil noch ausbauen und entleeren/reinigen.
Moinsen, im Menu des Druckers steht nicht "Wartung" sondern "Maintenans" und man mus zwei Zähler Namens "PURGE" zurücksetzen. Nach Reinigen sucht man vergebens. Sonst alle Super:
These look like great detailed instructions! I'm getting the "Ink absorber nearly full" message so have been looking to replace it - I've seen online you can get the whole assembly or just the pads that go inside - do you think it would be possible to take the absorber box apart and replace just the pads? Thanks
Yes, it’s probably possible, but it will be very messy. Make sure it seals properly afterwards, or you’ll get ink all over the inside of your printer.
Calion -
Bonjour je viens d'utiliser le tuto super et merci encore bravo à l'auteur
Thank you very, very much for these instructions!
You’re welcome! Glad they were helpful!
Calion -
Bravo Calion pour ce tuto 20/20, je suis arrivée à 74 ans à la fin ; pour changer les éponges pas de surprise? on sort et on remet ? il y a un film plastique sur le réservoir, faut-il protéger les éponges neuves et comment ?
Un grand merci.
Forgive me, the translation I got isn’t that great; I’m not sure what you’re asking, but I didn’t take the sponge out and clean it or anything; I just bought a whole new part and installed it: http://www.baystateoffice.com/ink-absorb...
Calion -
Very helpful - many thanks!
I want do add for German users: Beim Abschluss unter 3. gibt es keine Leertaste, statt dessen nochmal die Home-Teste drücken, bis ein digitales Zahlenfeld angezeigt wird. Und statt REINIGEN oder SPÜLEN sucht man nach "PURGE". Ich habe die Tintenpatronen einfach drin gelassen, damit nichts austrocknet - geht auch.
Hi Calion! Is there any choice to repair 4410 LT2252-001 power supply board? (original fuse blown, replaced - same, tested out of the printer). Thanks, Shlomo.
I can only recommend you consult the service manual.
Calion -
how do you clear the message That says the Ink absorber Full and get the printer printing again????
Thank you
Ersatzteil findest Du hier:
https://www.druckerpatronen-und-toner.de...
Thomas Baumann - Contestar
Thanks! Added to Ink absorber box.
Calion -