Saltar al contenido principal

Lorex LW2742 Back Panel Replacement

Sólo Prerrequisito
Esta guía solo debería usarse como prerrequisito para otras guías. Por tanto, estará incompleta.

Qué necesitas

  1. Lorex LW2742 Back Panel Replacement, Back Panel: paso 1, imagen 1 de 3 Lorex LW2742 Back Panel Replacement, Back Panel: paso 1, imagen 2 de 3 Lorex LW2742 Back Panel Replacement, Back Panel: paso 1, imagen 3 de 3
    • Remove the battery cover on the back of the LCD monitor by unscrewing one 5mm Phillips #1 screw.

    • Slide the battery out of the housing. Lightly tap the opposite end of the monitor if the battery does not come right out.

  2. Lorex LW2742 Back Panel Replacement: paso 2, imagen 1 de 1
    • Remove the four 6mm Phillips #1 screws on the back of the LCD monitor.

  3. Lorex LW2742 Back Panel Replacement: paso 3, imagen 1 de 2 Lorex LW2742 Back Panel Replacement: paso 3, imagen 2 de 2
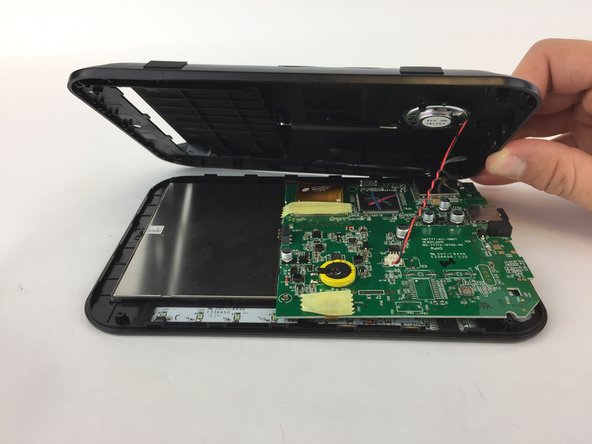
    • Using a plastic opening tool, gently separate the back panel from the front panel, working the tool around the panel to disconnect it.

    • Carefully remove the back panel

    • The speaker wire is connected to the motherboard so DO NOT rip back panel away from the monitor.

Conclusión

To reassemble your device, follow these instructions in reverse order.

Alex Kusmierz

Miembro Desde 09/26/16

601 Reputación

5 Guías creadas

Equipo

USF Tampa, Team 16-1, Eyestone Fall 2016 Miembro de USF Tampa, Team 16-1, Eyestone Fall 2016

USFT-EYESTONE-F16S16G1

4 Miembros

12 Guías creadas

0 comentarios

Agregar Comentario

Ver Estadísticas:

Ultimas 24 horas: 0

Ultimos 7 días: 0

Ultimos 30 días: 0

Todo El Tiempo: 50