Saltar al contenido principal

Lite-On iHAS324 Eject Button and Power LED Light Replacement

Qué necesitas

  1. Lite-On iHAS324 Eject Button and Power LED Light Replacement, Chassis: paso 1, imagen 1 de 2 Lite-On iHAS324 Eject Button and Power LED Light Replacement, Chassis: paso 1, imagen 2 de 2
    • Insert a paper clip into a small hole on the right side of the faceplate bellow the disc tray.

    • There may be resistance, do not be afraid to use force.

    • The tray should then pop open.

    • Pull out the tray so that it is fully extended.

  2. Lite-On iHAS324 Eject Button and Power LED Light Replacement: paso 2, imagen 1 de 3 Lite-On iHAS324 Eject Button and Power LED Light Replacement: paso 2, imagen 2 de 3 Lite-On iHAS324 Eject Button and Power LED Light Replacement: paso 2, imagen 3 de 3
    • Use a plastic opening tool to push the three tabs located on the right, left, and bottom side of the outer chassis to loosen the faceplate off.

  3. Lite-On iHAS324 Eject Button and Power LED Light Replacement: paso 3, imagen 1 de 1
    • Pull the faceplate off the chassis.

    • Do NOT pull the faceplate all the way off the disc tray, because doing so can cause damage to the faceplate.

    • There may be resistance, do not be afraid to use force.

  4. Lite-On iHAS324 Eject Button and Power LED Light Replacement: paso 4, imagen 1 de 1
    • Using the Phillips Head #2 screwdriver, unscrew the two 8.5 mm screws located on the bottom back of the chassis.

  5. Lite-On iHAS324 Eject Button and Power LED Light Replacement: paso 5, imagen 1 de 1
    • Remove the bottom plate by lifting it off the device.

  6. Lite-On iHAS324 Eject Button and Power LED Light Replacement: paso 6, imagen 1 de 1
    • Turn the device over.

    • Remove the top plate by pulling the sides and lifting the plate off.

  7. Lite-On iHAS324 Eject Button and Power LED Light Replacement, Disc Tray: paso 7, imagen 1 de 2 Lite-On iHAS324 Eject Button and Power LED Light Replacement, Disc Tray: paso 7, imagen 2 de 2
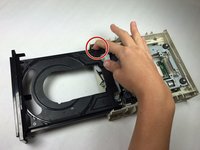
    • Push the left tab in and slide the tray out on the left side.

    • Pull the gray plastic casing on the right side away from the tray.

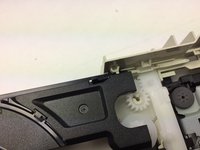
    • Slide the right side of the tray out.

  8. Lite-On iHAS324 Eject Button and Power LED Light Replacement, Disc Tray Belt: paso 8, imagen 1 de 1
    • Take tweezers and remove the black tray belt from the gears carefully.

  9. Lite-On iHAS324 Eject Button and Power LED Light Replacement, Eject Button and Power LED Light: paso 9, imagen 1 de 1
    • Flip the device over.

  10. Lite-On iHAS324 Eject Button and Power LED Light Replacement: paso 10, imagen 1 de 1
    • Use a plastic opening tool to pull all three tabs, lifting up the circuit board as you go.

  11. Lite-On iHAS324 Eject Button and Power LED Light Replacement: paso 11, imagen 1 de 1
    • Carefully lift the circuit board out of the plastic casing.

  12. Lite-On iHAS324 Eject Button and Power LED Light Replacement: paso 12, imagen 1 de 1
    • Using a solder wick, unsolder either the eject button or Power LED Light. Soldering Guide

    • Then, using a solder iron, replace them.

Conclusión

To reassemble your device, follow these instructions in reverse order.

Equipo

Baylor, Team 5-9, Williams Spring 2015 Miembro de Baylor, Team 5-9, Williams Spring 2015

BU-WILLIAMS-S15S5G9

3 Miembros

10 Guías creadas

0 comentarios

Agregar Comentario

Ver Estadísticas:

Ultimas 24 horas: 1

Ultimos 7 días: 3

Ultimos 30 días: 9

Todo El Tiempo: 699