Saltar al contenido principal
Únete a la Comunidad de Reparación - Crear Cuenta

Les Paul Wireless Guitar Peripheral Fret Buttons Replacement

Qué necesitas

    1. Les Paul Wireless Guitar Peripheral Fret Buttons Replacement, Fret Buttons: paso 1, imagen 1 de 1
      • Pull the Lock on the back of the body to detach the neck from the body.

      Pregunta a FixBot

      Agregar Comentario

    2. Les Paul Wireless Guitar Peripheral Fret Buttons Replacement: paso 2, imagen 1 de 2 Les Paul Wireless Guitar Peripheral Fret Buttons Replacement: paso 2, imagen 2 de 2
      • Remove the 10 screws (each are 1 cm long) on the back of the neck using a T-10 Torx security screwdriver.

      • Remove the back of the neck.

      Pregunta a FixBot

      Agregar Comentario

    3. Les Paul Wireless Guitar Peripheral Fret Buttons Replacement: paso 3, imagen 1 de 2 Les Paul Wireless Guitar Peripheral Fret Buttons Replacement: paso 3, imagen 2 de 2
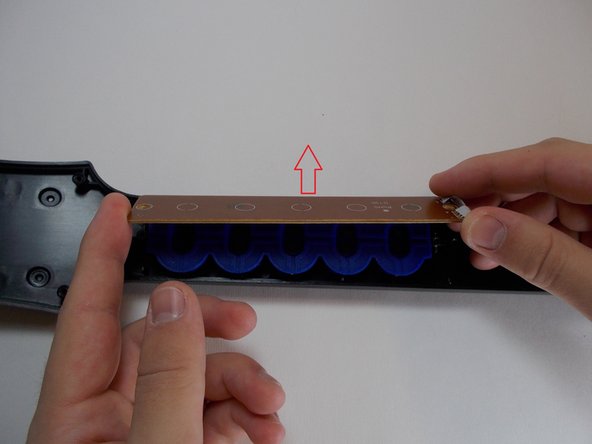
      • Unscrew the two screws on the fret PCB using a PH1 Phillips head screwdriver. Each screw is 0.8 cm.

      • Remove the fret PCB

      • The fret PCB is in very tight. Be careful not to break it.

      • The connector from the neck to the body can easily slide out of place. Make sure it is in position before closing the neck

      Pregunta a FixBot

      Agregar Comentario

    4. Les Paul Wireless Guitar Peripheral Fret Buttons Replacement: paso 4, imagen 1 de 1
      • Remove the blue fret button pad.

      • This pad should not be attached in any way

      Pregunta a FixBot

      Agregar Comentario

    5. Les Paul Wireless Guitar Peripheral Fret Buttons Replacement: paso 5, imagen 1 de 2 Les Paul Wireless Guitar Peripheral Fret Buttons Replacement: paso 5, imagen 2 de 2
      • The fret buttons should now easily slide out.

      Pregunta a FixBot

      Agregar Comentario

Conclusión

To reassemble your device, follow these instructions in reverse order.

Cancelar: No complete esta guía.

7 personas más completaron esta guía.

Chris

Miembro Desde 10/18/13

922 Reputación

6 Guías creadas

1Guía Comentario

There are actually 12 screws in Step2. Just in case anyone is confused by that; starting from the right side we have a pair lined horizontally, pair lined vertically, pair lined horizontally....

The two that are vertically between the other two pairs, are not marked in the photo.

Vynneve - Contestar Compartir

Agregar Comentario

Ver Estadísticas:

Ultimas 24 horas: 5

Ultimos 7 días: 24

Ultimos 30 días: 100

Todo El Tiempo: 22,848