Saltar al contenido principal

Lenovo Yoga 910-13IKB Speakers Replacement

Qué necesitas

  1. Lenovo Yoga 910-13IKB Speakers Replacement, Bottom Panel: paso 1, imagen 1 de 2 Lenovo Yoga 910-13IKB Speakers Replacement, Bottom Panel: paso 1, imagen 2 de 2
    • Before you begin, be sure to turn off your laptop and unplug it from the outlet.

    • Turn the laptop over and remove the ten Torx T5 screws along the perimeter of the bottom panel.

    • Remove the panel.

  2. Lenovo Yoga 910-13IKB Speakers Replacement: paso 2, imagen 1 de 1
    • Remove all 4 screws attached to the battery with a small Phillips head screwdriver.

    • Each screw on the back is M2 x 1.7mm

    • After the screws are taken out, remove the battery.

  3. Lenovo Yoga 910-13IKB Speakers Replacement: paso 3, imagen 1 de 1
    • Remove all 6 screws attached to the trackpad with a small Phillips head screwdriver.

    • Each screw on the back is M2 x 1.7mm

    • Detach the ribbon cable connected to the trackpad using a wedge device.

    • Remove the trackpad using a wedge device

  4. Lenovo Yoga 910-13IKB Speakers Replacement: paso 4, imagen 1 de 1
    • Remove all 6 screws attached to the USB ports on both sides of the device with a small Philips head screwdriver.

    • Detach both ribbon cables attached to each USB port with a wedge device, then detach the USB ports.

  5. Lenovo Yoga 910-13IKB Speakers Replacement: paso 5, imagen 1 de 3 Lenovo Yoga 910-13IKB Speakers Replacement: paso 5, imagen 2 de 3 Lenovo Yoga 910-13IKB Speakers Replacement: paso 5, imagen 3 de 3
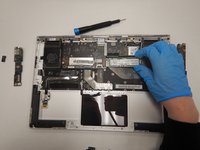
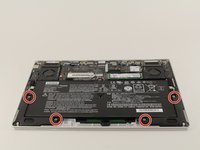
    • Remove all 4 screws attached to SSD stick with a small Phillips head screwdriver.

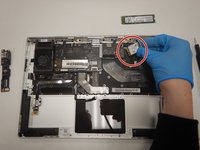
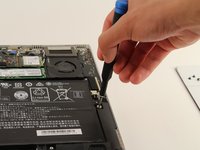
    • Pull the SSD stick directly to the right until it shifts out of place to remove it.

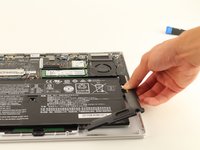
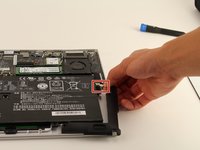
    • The storage chip above it (further away from you) may also simply be detached by pulling it directly to the right until it clicks out.

  6. Lenovo Yoga 910-13IKB Speakers Replacement: paso 6, imagen 1 de 3 Lenovo Yoga 910-13IKB Speakers Replacement: paso 6, imagen 2 de 3 Lenovo Yoga 910-13IKB Speakers Replacement: paso 6, imagen 3 de 3
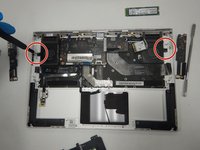
    • Remove all 4 screws attached to both fans, and the back connector strip (long metal piece furthest from you with screws in it) with a small Phillips head screwdriver

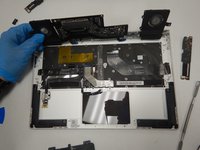
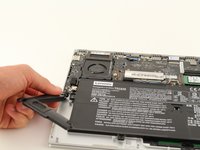
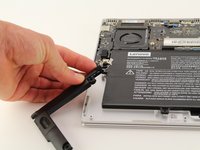
    • Remove the back connector strip using a wedge device to pry it off of the device

    • With the back connector strip removed, pry the fans (which are attached) using a wedge device and the fans will now be maintainable.

  7. Lenovo Yoga 910-13IKB Speakers Replacement, Speakers: paso 7, imagen 1 de 2 Lenovo Yoga 910-13IKB Speakers Replacement, Speakers: paso 7, imagen 2 de 2
    • Remove the four silver 3mm JIS #00 screws holding the speakers in place.

  8. Lenovo Yoga 910-13IKB Speakers Replacement: paso 8, imagen 1 de 2 Lenovo Yoga 910-13IKB Speakers Replacement: paso 8, imagen 2 de 2
    • Lift up the speaker from the corner of the device.

    • Pull gently on the bundled cable connector at the top of the speaker.

    • Pull evenly on the width of the cable so that no individual wire is overly strained.

  9. Lenovo Yoga 910-13IKB Speakers Replacement: paso 9, imagen 1 de 2 Lenovo Yoga 910-13IKB Speakers Replacement: paso 9, imagen 2 de 2
    • Repeat step three for the speaker on the opposite side of the device.

Conclusión

To reassemble your device, follow these instructions in reverse order.

2 personas más completaron esta guía.

Equipo

Cal Poly, Team S1-G5, White Winter 2020 Miembro de Cal Poly, Team S1-G5, White Winter 2020

CPSU-WHITE-W20S1G5

4 Miembros

14 Guías creadas

0 comentarios

Agregar Comentario

Ver Estadísticas:

Ultimas 24 horas: 0

Ultimos 7 días: 8

Ultimos 30 días: 18

Todo El Tiempo: 672