Saltar al contenido principal

Lenovo Yoga 3 14 Speaker Replacement

Qué necesitas

  1. Lenovo Yoga 3 14 Speaker Replacement, Back Case: paso 1, imagen 1 de 1
    • Remove the eleven 6mm T5 Torx screws from the back case.

  2. Lenovo Yoga 3 14 Speaker Replacement: paso 2, imagen 1 de 3 Lenovo Yoga 3 14 Speaker Replacement: paso 2, imagen 2 de 3 Lenovo Yoga 3 14 Speaker Replacement: paso 2, imagen 3 de 3
    • Insert the plastic opening tool into the long side of the case backing and slide it the entire length of the laptop.

    • Gently lift the backing off the laptop.

  3. Lenovo Yoga 3 14 Speaker Replacement, Battery: paso 3, imagen 1 de 1
    • Remove the four 3mm PH#0 screws surrounding the battery.

  4. Lenovo Yoga 3 14 Speaker Replacement: paso 4, imagen 1 de 3 Lenovo Yoga 3 14 Speaker Replacement: paso 4, imagen 2 de 3 Lenovo Yoga 3 14 Speaker Replacement: paso 4, imagen 3 de 3
    • Gently lift the battery and use the plastic opening tool to remove the battery's connection to the laptop.

  5. Lenovo Yoga 3 14 Speaker Replacement, Speaker: paso 5, imagen 1 de 1
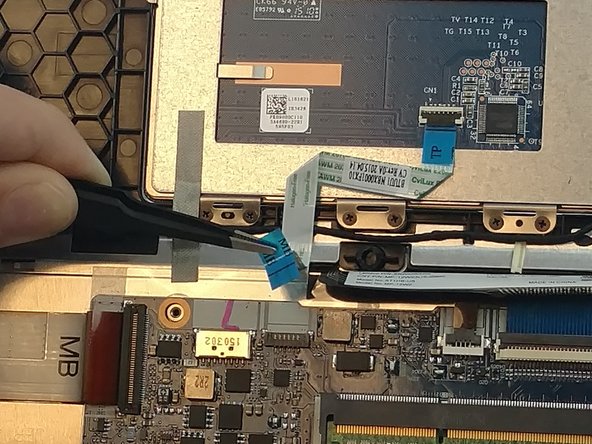
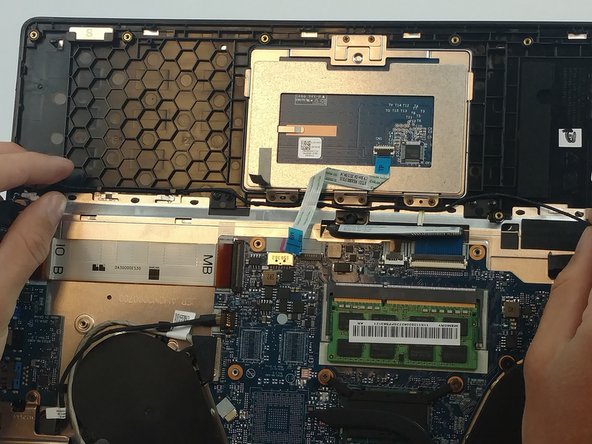
    • Using a pair of tweezers, dissconnect the speakers on the left side of the laptop.
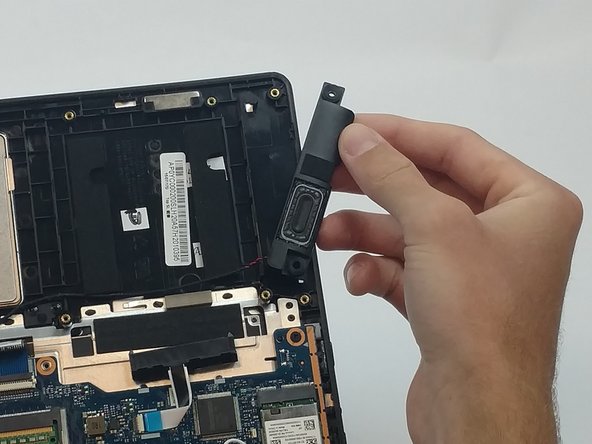
  6. Lenovo Yoga 3 14 Speaker Replacement: paso 6, imagen 1 de 2 Lenovo Yoga 3 14 Speaker Replacement: paso 6, imagen 2 de 2
    • Flip up the black retaining flap on the ZIF connector.

    • Using tweezers, gently disconnect the blue strip that connects the touch pad to the motherboard.

  7. Lenovo Yoga 3 14 Speaker Replacement: paso 7, imagen 1 de 2 Lenovo Yoga 3 14 Speaker Replacement: paso 7, imagen 2 de 2
    • Use tweezers to gently pull off tape that is holding down wires that are connecting the two speakers together.

  8. Lenovo Yoga 3 14 Speaker Replacement: paso 8, imagen 1 de 2 Lenovo Yoga 3 14 Speaker Replacement: paso 8, imagen 2 de 2
    • Both speakers are held in place by plastic pegs. Gently lift the speakers off the casing to remove them.

  9. Lenovo Yoga 3 14 Speaker Replacement: paso 9, imagen 1 de 2 Lenovo Yoga 3 14 Speaker Replacement: paso 9, imagen 2 de 2
    • Simply grip the speaker wires and lift away from laptop to remove.

Conclusión

To reassemble your device, follow these instructions in reverse order.

Equipo

USF Tampa, Team 3-2, Passmore Fall 2016 Miembro de USF Tampa, Team 3-2, Passmore Fall 2016

USFT-PASSMORE-F16S3G2

4 Miembros

7 Guías creadas

0 comentarios

Agregar Comentario

Ver Estadísticas:

Ultimas 24 horas: 0

Ultimos 7 días: 0

Ultimos 30 días: 2

Todo El Tiempo: 1,244