Saltar al contenido principal

Lenovo Thinkpad T440s Fan Replacement

Qué necesitas

  1. Lenovo Thinkpad T440s Fan Replacement, Back Panel: paso 1, imagen 1 de 2 Lenovo Thinkpad T440s Fan Replacement, Back Panel: paso 1, imagen 2 de 2
    • Make sure to power down and turn off your device before proceeding with the repair.

    • Flip your laptop over so that the backside is facing you.

  2. Lenovo Thinkpad T440s Fan Replacement: paso 2, imagen 1 de 1
    • Using a Phillips #1 screwdriver, remove the eight screws securing the backplate.

    • Don’t try to force screws which won't come out. They are held in place by a stopper on the reverse side. This will not prevent you from removing the backplate.

  3. Lenovo Thinkpad T440s Fan Replacement: paso 3, imagen 1 de 2 Lenovo Thinkpad T440s Fan Replacement: paso 3, imagen 2 de 2
    • Using the metal spudger, wedge it in the seam where the backplate meets the front plate and run the tool along the seam to separate the backplate.

  4. Lenovo Thinkpad T440s Fan Replacement: paso 4, imagen 1 de 1
    • Remove the back panel from the device.

  5. Lenovo Thinkpad T440s Fan Replacement, Fan: paso 5, imagen 1 de 2 Lenovo Thinkpad T440s Fan Replacement, Fan: paso 5, imagen 2 de 2
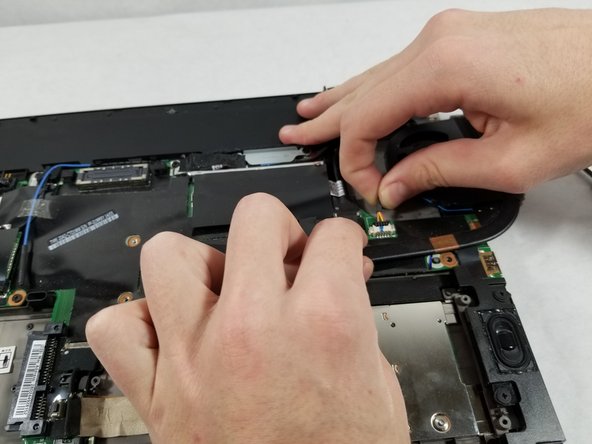
    • Use the Phillips #1 screwdriver to remove the four screws holding in the fan assembly.

  6. Lenovo Thinkpad T440s Fan Replacement: paso 6, imagen 1 de 3 Lenovo Thinkpad T440s Fan Replacement: paso 6, imagen 2 de 3 Lenovo Thinkpad T440s Fan Replacement: paso 6, imagen 3 de 3
    • Lift the fan out of it's compartment to gain access to the cable connection, firmly grab the cable and pull it out of it's housing.

Conclusión

To reassemble your device, follow these instructions in reverse order.

6 personas más completaron esta guía.

Terelle Montalvo

Miembro Desde 10/22/18

1,438 Reputación

8 Guías creadas

Equipo

4 comentarios

It would be helpful to have something about the fan too!

Where to get it, or at least the model number!

Iraj V - Contestar

What about thermal grease?

Oscar Desmonteix - Contestar

Useless info. This is the heatsink (with fan) replacement, NOT fan replacement. The poster is a moron.

Victor Song - Contestar

Victor - The fan and heatsink are attached to one another. How would you propose one replace the fan only? If you have a method, please create your own guide if this one was authored by such a “moron”. Jeez.

tomwedell -

Agregar Comentario

Ver Estadísticas:

Ultimas 24 horas: 4

Ultimos 7 días: 10

Ultimos 30 días: 48

Todo El Tiempo: 5,953