Saltar al contenido principal

Lenovo ThinkPad Yoga 260 Repair Battery Replacement

Qué necesitas

  1. Lenovo ThinkPad Yoga 260 Repair Battery Replacement, Back Cover: paso 1, imagen 1 de 1
    • Ensure the device is off and unplugged.

    • Remove the stylus from its port and set aside.

  2. Lenovo ThinkPad Yoga 260 Repair Battery Replacement: paso 2, imagen 1 de 2 Lenovo ThinkPad Yoga 260 Repair Battery Replacement: paso 2, imagen 2 de 2
    • Using a Phillips #1 screwdriver, gently unscrew the eight 1.3 mm Phillips #1 screws until you hear an audible click.

    • The screws will not separate from the bottom cover when loose.

  3. Lenovo ThinkPad Yoga 260 Repair Battery Replacement: paso 3, imagen 1 de 2 Lenovo ThinkPad Yoga 260 Repair Battery Replacement: paso 3, imagen 2 de 2
    • The bottom cover is attached via several plastic clips located around the edges of the bottom cover.

    • Using a plastic opening tool, gently pry the bottom cover from the laptop.

    • Work the plastic opening tool around the edges of the bottom cover undoing all of the plastic clips, as shown in the picture.

  4. Lenovo ThinkPad Yoga 260 Repair Battery Replacement: paso 4, imagen 1 de 2 Lenovo ThinkPad Yoga 260 Repair Battery Replacement: paso 4, imagen 2 de 2
    • Place your fingers around the edges of the cover and remove it.

  5. Lenovo ThinkPad Yoga 260 Repair Battery Replacement, Battery: paso 5, imagen 1 de 3 Lenovo ThinkPad Yoga 260 Repair Battery Replacement, Battery: paso 5, imagen 2 de 3 Lenovo ThinkPad Yoga 260 Repair Battery Replacement, Battery: paso 5, imagen 3 de 3
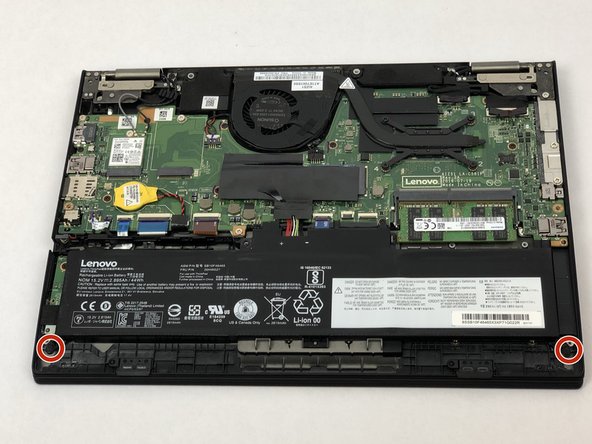
    • Fold back the plastic cover to access the battery connection.

    • Remove the battery connection using your two index fingers.

    • Gently separate the connectors.

  6. Lenovo ThinkPad Yoga 260 Repair Battery Replacement: paso 6, imagen 1 de 3 Lenovo ThinkPad Yoga 260 Repair Battery Replacement: paso 6, imagen 2 de 3 Lenovo ThinkPad Yoga 260 Repair Battery Replacement: paso 6, imagen 3 de 3
    • Unscrew the two 1.3 mm Phillips #1 fasteners using a Phillips #1 screwdriver and set them aside.

    • Lift the battery free from its mounting and remove it.

Conclusión

To reassemble your device, follow these instructions in reverse order.

7 personas más completaron esta guía.

Equipo

USF Tampa, Team S2-G3, Eyestone Spring 2018 Miembro de USF Tampa, Team S2-G3, Eyestone Spring 2018

USFT-EYESTONE-S18S2G3

4 Miembros

5 Guías creadas

0 comentarios

Agregar Comentario

Ver Estadísticas:

Ultimas 24 horas: 1

Ultimos 7 días: 7

Ultimos 30 días: 126

Todo El Tiempo: 7,195