Saltar al contenido principal

Lenovo ThinkPad X1 Yoga Keyboard Replacement

Qué necesitas

  1. Lenovo ThinkPad X1 Yoga Keyboard Replacement, Back Cover: paso 1, imagen 1 de 3 Lenovo ThinkPad X1 Yoga Keyboard Replacement, Back Cover: paso 1, imagen 2 de 3 Lenovo ThinkPad X1 Yoga Keyboard Replacement, Back Cover: paso 1, imagen 3 de 3
    • Be sure to power off and unplug your device before you begin your repair.

    • Flip the computer over so the bottom is facing up.

    • Remove nine 4mm Phillips #1 screws from the bottom of the computer.

    • Use an iFixit opening tool to pry the back cover off of the laptop.

  2. Lenovo ThinkPad X1 Yoga Keyboard Replacement, Speakers: paso 2, imagen 1 de 1
    • Remove the five 4.5mm Phillips #1 screws that secure the battery.

  3. Lenovo ThinkPad X1 Yoga Keyboard Replacement: paso 3, imagen 1 de 1
    • Using a pair of tweezers, push the sides of the white speaker wire toward the battery (where it says Lenovo) to unplug it.

  4. Lenovo ThinkPad X1 Yoga Keyboard Replacement: paso 4, imagen 1 de 3 Lenovo ThinkPad X1 Yoga Keyboard Replacement: paso 4, imagen 2 de 3 Lenovo ThinkPad X1 Yoga Keyboard Replacement: paso 4, imagen 3 de 3
    • Remove the speakers from either side of the battery. The connecting wire will unthread from the sides of the battery.

  5. Lenovo ThinkPad X1 Yoga Keyboard Replacement, Battery: paso 5, imagen 1 de 3 Lenovo ThinkPad X1 Yoga Keyboard Replacement, Battery: paso 5, imagen 2 de 3 Lenovo ThinkPad X1 Yoga Keyboard Replacement, Battery: paso 5, imagen 3 de 3
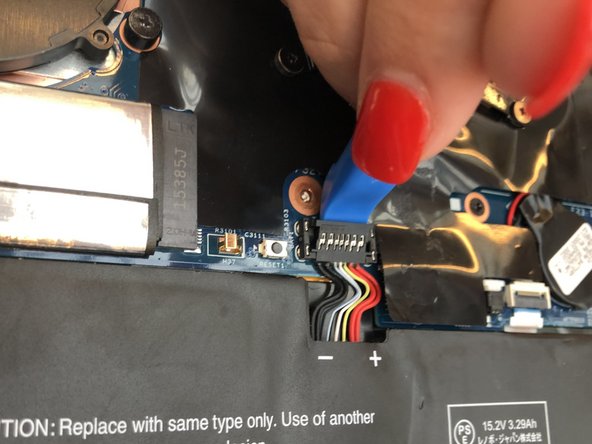
    • Lift the plastic black strip cover that's laying over the battery connector.

    • Use the iFixit opening tool to flip up and disconnect the black battery connector from its motherboard socket.

    • Gently pull the connector away from the battery to pull it out of the slot.

  6. Lenovo ThinkPad X1 Yoga Keyboard Replacement: paso 6, imagen 1 de 1
    • Lift and remove the battery away from the computer.

  7. Lenovo ThinkPad X1 Yoga Keyboard Replacement, Cooling Fan: paso 7, imagen 1 de 1
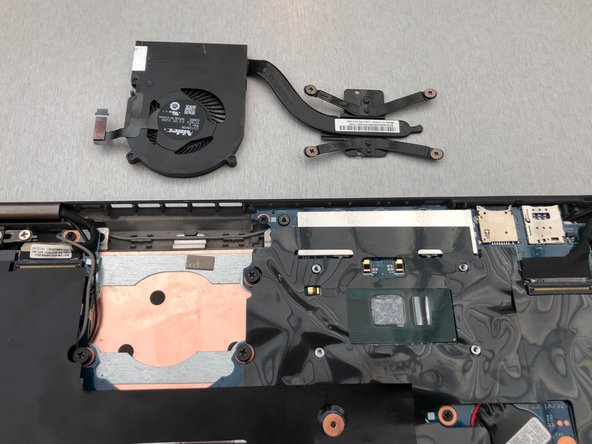
    • Remove four 4.5mm Phillips #1 screws from the corners of the heat sink.

  8. Lenovo ThinkPad X1 Yoga Keyboard Replacement: paso 8, imagen 1 de 3 Lenovo ThinkPad X1 Yoga Keyboard Replacement: paso 8, imagen 2 de 3 Lenovo ThinkPad X1 Yoga Keyboard Replacement: paso 8, imagen 3 de 3
    • Gently peel back the black plastic covering around the fan.

    • You may hear or feel the adhesive pulling away here.

    • Using an iFixit opening tool, flip up the small black cover of the fan plug.

  9. Lenovo ThinkPad X1 Yoga Keyboard Replacement: paso 9, imagen 1 de 2 Lenovo ThinkPad X1 Yoga Keyboard Replacement: paso 9, imagen 2 de 2
    • Using tweezers, pull the plastic strip out.

  10. Lenovo ThinkPad X1 Yoga Keyboard Replacement: paso 10, imagen 1 de 2 Lenovo ThinkPad X1 Yoga Keyboard Replacement: paso 10, imagen 2 de 2
    • Remove the fan from the computer.

  11. Lenovo ThinkPad X1 Yoga Keyboard Replacement, Wireless chip: paso 11, imagen 1 de 1
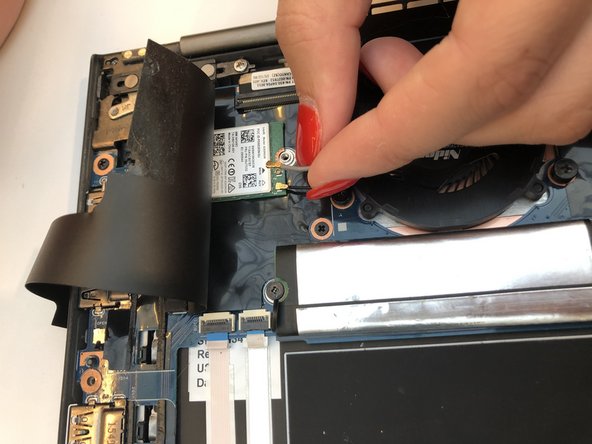
    • Gently peel back the black plastic covering.

    • Remove the single Phillips #1 screw securing the wireless chip in place.

  12. Lenovo ThinkPad X1 Yoga Keyboard Replacement: paso 12, imagen 1 de 2 Lenovo ThinkPad X1 Yoga Keyboard Replacement: paso 12, imagen 2 de 2
    • Use an iFixit opening tool to gently pop the gold caps off their connections.

    • Move these wires out of the way.

  13. Lenovo ThinkPad X1 Yoga Keyboard Replacement: paso 13, imagen 1 de 1
    • Slide the chip out.

  14. Lenovo ThinkPad X1 Yoga Keyboard Replacement, Hard Drive: paso 14, imagen 1 de 2 Lenovo ThinkPad X1 Yoga Keyboard Replacement, Hard Drive: paso 14, imagen 2 de 2
    • Gently peel back the black plastic covering.

    • Remove the single 2mm Phillips #1 screw from the hard drive's silver casing.

  15. Lenovo ThinkPad X1 Yoga Keyboard Replacement: paso 15, imagen 1 de 1
    • Unplug the hard drive from the computer by pulling away from the computer.

  16. Lenovo ThinkPad X1 Yoga Keyboard Replacement, Motherboard: paso 16, imagen 1 de 3 Lenovo ThinkPad X1 Yoga Keyboard Replacement, Motherboard: paso 16, imagen 2 de 3 Lenovo ThinkPad X1 Yoga Keyboard Replacement, Motherboard: paso 16, imagen 3 de 3
    • Using the iFixit opening tool, flip up the eight small covers from the cable connectors.

    • Gently pull the cables out of the slots.

  17. Lenovo ThinkPad X1 Yoga Keyboard Replacement: paso 17, imagen 1 de 2 Lenovo ThinkPad X1 Yoga Keyboard Replacement: paso 17, imagen 2 de 2
    • Using the Phillips #1 screwdriver, remove sixteen 4.5mm screws.

  18. Lenovo ThinkPad X1 Yoga Keyboard Replacement: paso 18, imagen 1 de 1
    • Lift and remove the motherboard away from the computer.

  19. Lenovo ThinkPad X1 Yoga Keyboard Replacement, Keyboard: paso 19, imagen 1 de 2 Lenovo ThinkPad X1 Yoga Keyboard Replacement, Keyboard: paso 19, imagen 2 de 2
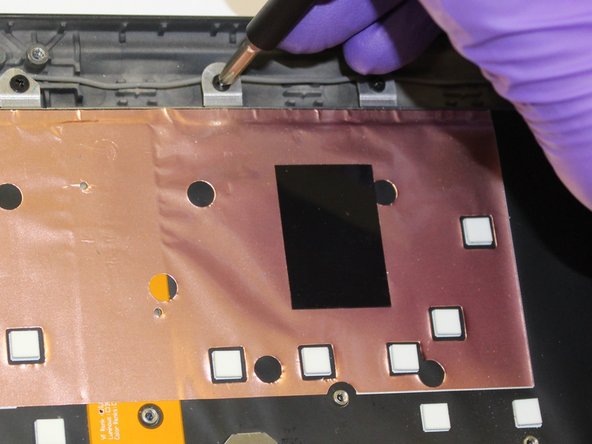
    • Using the Phillips #1 screwdriver, remove 23 (twenty three) 4.5mm screws.

  20. Lenovo ThinkPad X1 Yoga Keyboard Replacement: paso 20, imagen 1 de 1
    • Using the iFixit opening tool, lift the metal frame away from the keyboard.

  21. Lenovo ThinkPad X1 Yoga Keyboard Replacement: paso 21, imagen 1 de 1
    • Lift and remove the keyboard away from the computer.

Conclusión

To reassemble your device, follow these instructions in reverse order.

9 personas más completaron esta guía.

2 comentarios

Samw steps on gen 4, screws just in different places, thie guide worked great! Thanks :)

Ryan B - Contestar

there's no need to remove the heat sink, SSD and wireless cards - you can just remove the motherboard in 1 piece with these still attached.

Slim - Contestar

Agregar Comentario

Ver Estadísticas:

Ultimas 24 horas: 10

Ultimos 7 días: 74

Ultimos 30 días: 374

Todo El Tiempo: 11,862