Saltar al contenido principal

Lenovo ThinkPad X1 Yoga (3rd Gen) SSD Replacement

Qué necesitas

  1. Lenovo ThinkPad X1 Yoga (3rd Gen) SSD Replacement, SSD: paso 1, imagen 1 de 1
    • Restart your laptop.

    • Press the "Enter" key repeatedly. This will bring you to the BIOS.

    • Your laptop should not be plugged in, or charging, for the next steps.

  2. Lenovo ThinkPad X1 Yoga (3rd Gen) SSD Replacement: paso 2, imagen 1 de 2 Lenovo ThinkPad X1 Yoga (3rd Gen) SSD Replacement: paso 2, imagen 2 de 2
    • Use the left and right arrow keys to navigate to the Config section of the BIOS.

    • From the Config section, use the up and down arrow keys to navigate to the Disable Built-in Battery option.

    • Hit the "Enter" key twice to proceed.

    • The battery will now be temporarily disabled, allowing you to safely complete the next steps. To power on your laptop, it must now be plugged in to a charger.

  3. Lenovo ThinkPad X1 Yoga (3rd Gen) SSD Replacement: paso 3, imagen 1 de 3 Lenovo ThinkPad X1 Yoga (3rd Gen) SSD Replacement: paso 3, imagen 2 de 3 Lenovo ThinkPad X1 Yoga (3rd Gen) SSD Replacement: paso 3, imagen 3 de 3
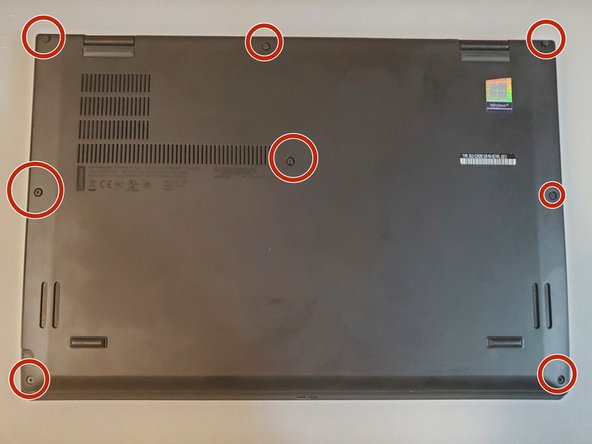
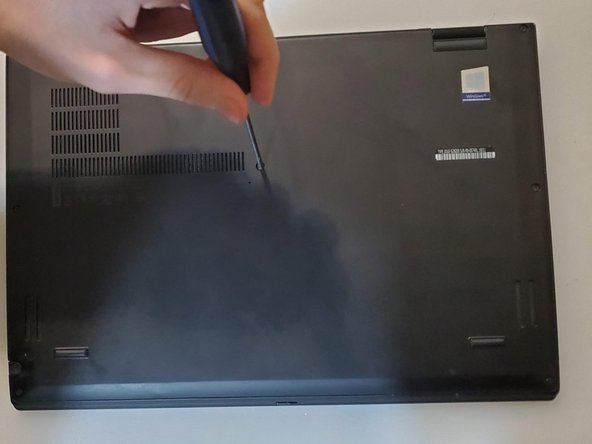
    • Remove the eight 2 mm-long Philips #00 screws on the lower case.

    • These screws are self-contained in the backplate.

  4. Lenovo ThinkPad X1 Yoga (3rd Gen) SSD Replacement: paso 4, imagen 1 de 3 Lenovo ThinkPad X1 Yoga (3rd Gen) SSD Replacement: paso 4, imagen 2 de 3 Lenovo ThinkPad X1 Yoga (3rd Gen) SSD Replacement: paso 4, imagen 3 de 3
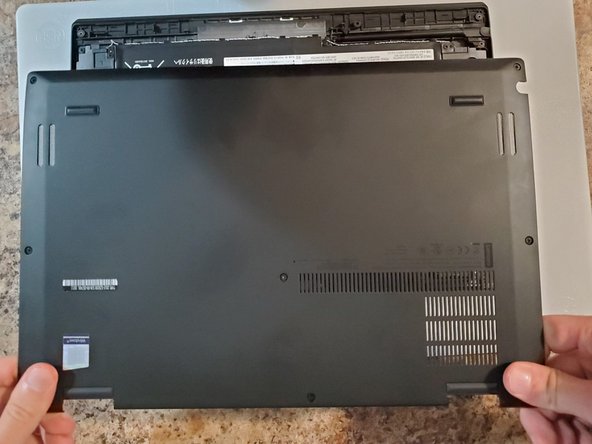
    • Pry the backplate cover away from the laptop using your hands.

    • If you have access to a prying tool, you may use one.

    • Do not bend the backplate. With the screws loosened from the previous step, this panel can be removed with only a little effort.

    • Grasp the plastic shield with your hand and pull it away from the laptop.

    • This will reveal the M.2 slot, where your SSD is installed.

  5. Lenovo ThinkPad X1 Yoga (3rd Gen) SSD Replacement: paso 5, imagen 1 de 3 Lenovo ThinkPad X1 Yoga (3rd Gen) SSD Replacement: paso 5, imagen 2 de 3 Lenovo ThinkPad X1 Yoga (3rd Gen) SSD Replacement: paso 5, imagen 3 de 3
    • Remove the 2.8 mm-long Philips #00 screw located in the M.2 slot.

    • Do not lose this screw! It must be reused later.

    • Gently grasp the SSD from where the screw was located.

    • Pull the SSD to remove it from the M.2 slot. If the SSD does not immediately release, gently wiggle it while pulling.

    • Once you have removed the old hard drive, pull it out of the plastic heatshield.

    • This heatshield will be reused with your new hard drive.

  6. Lenovo ThinkPad X1 Yoga (3rd Gen) SSD Replacement: paso 6, imagen 1 de 2 Lenovo ThinkPad X1 Yoga (3rd Gen) SSD Replacement: paso 6, imagen 2 de 2
    • Push the new SSD into the plastic heatshield. It should fit snugly.

    • Insert the new SSD into the M.2 socket.

    • Screw in the 2.8 mm-long Philips #00 screw to complete installation.

Conclusión

To reassemble your device, follow these instructions in reverse order. Once your laptop is assembled, plug in the laptop to turn it on.

Una persona más ha completado esta guía.

Nicholas Clauser

Miembro Desde 09/19/23

163 Reputación

1 Guía escrita

Equipo

0 comentarios

Agregar Comentario

Ver Estadísticas:

Ultimas 24 horas: 0

Ultimos 7 días: 17

Ultimos 30 días: 77

Todo El Tiempo: 389