Saltar al contenido principal

Lenovo ThinkPad T580 Motherboard Replacement

Qué necesitas

  1. Lenovo ThinkPad T580 Motherboard Replacement, External Battery: paso 1, imagen 1 de 3 Lenovo ThinkPad T580 Motherboard Replacement, External Battery: paso 1, imagen 2 de 3 Lenovo ThinkPad T580 Motherboard Replacement, External Battery: paso 1, imagen 3 de 3
    • Slide the switch on the left side of the battery to the left.

  2. Lenovo ThinkPad T580 Motherboard Replacement: paso 2, imagen 1 de 3 Lenovo ThinkPad T580 Motherboard Replacement: paso 2, imagen 2 de 3 Lenovo ThinkPad T580 Motherboard Replacement: paso 2, imagen 3 de 3
    • Slide the switch on the right side of the battery to the right while applying upward pressure on the battery.

  3. Lenovo ThinkPad T580 Motherboard Replacement: paso 3, imagen 1 de 3 Lenovo ThinkPad T580 Motherboard Replacement: paso 3, imagen 2 de 3 Lenovo ThinkPad T580 Motherboard Replacement: paso 3, imagen 3 de 3
    • Pull the battery directly out of the socket

  4. Lenovo ThinkPad T580 Motherboard Replacement, Bottom Case: paso 4, imagen 1 de 2 Lenovo ThinkPad T580 Motherboard Replacement, Bottom Case: paso 4, imagen 2 de 2
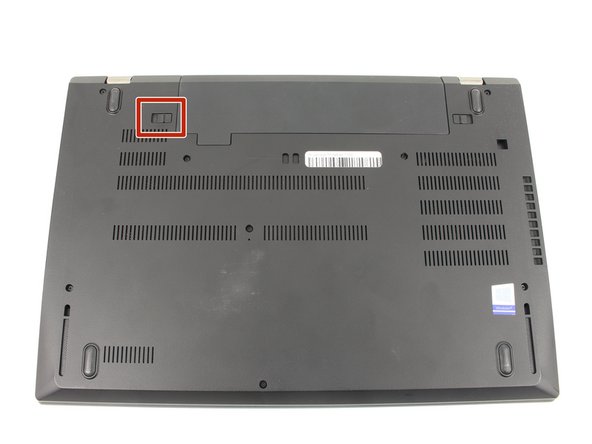
    • Using a Phillips #00 screwdriver, unscrew the eight 3.3 mm captive screws on the bottom of the laptop.

    • The "captive" screws will not come out of the case.

  5. Lenovo ThinkPad T580 Motherboard Replacement: paso 5, imagen 1 de 3 Lenovo ThinkPad T580 Motherboard Replacement: paso 5, imagen 2 de 3 Lenovo ThinkPad T580 Motherboard Replacement: paso 5, imagen 3 de 3
    • Run a Jimmy along the crease of the computer all the way around, twisting it periodically to disengage the clips.

  6. Lenovo ThinkPad T580 Motherboard Replacement: paso 6, imagen 1 de 3 Lenovo ThinkPad T580 Motherboard Replacement: paso 6, imagen 2 de 3 Lenovo ThinkPad T580 Motherboard Replacement: paso 6, imagen 3 de 3
    • Once all the clips are released, remove the bottom cover.

    • You may need to jiggle the case slightly to release the clips around the external battery bay.

  7. Lenovo ThinkPad T580 Motherboard Replacement, Internal Battery: paso 7, imagen 1 de 1
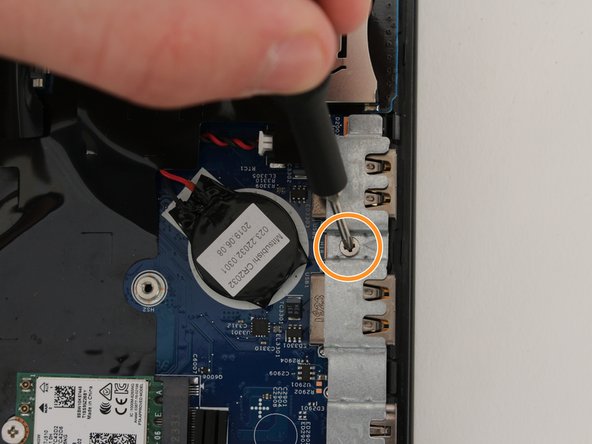
    • Using a Phillips #00 screwdriver, remove five 3.7 mm screws holding down the battery.

  8. Lenovo ThinkPad T580 Motherboard Replacement: paso 8, imagen 1 de 3 Lenovo ThinkPad T580 Motherboard Replacement: paso 8, imagen 2 de 3 Lenovo ThinkPad T580 Motherboard Replacement: paso 8, imagen 3 de 3
    • Unplug and remove the battery connector from the motherboard.

    • Remove the internal battery.

  9. Lenovo ThinkPad T580 Motherboard Replacement, Cooling Fan: paso 9, imagen 1 de 2 Lenovo ThinkPad T580 Motherboard Replacement, Cooling Fan: paso 9, imagen 2 de 2
    • Unplug the cooling fan's cable from the the motherboard.

  10. Lenovo ThinkPad T580 Motherboard Replacement: paso 10, imagen 1 de 3 Lenovo ThinkPad T580 Motherboard Replacement: paso 10, imagen 2 de 3 Lenovo ThinkPad T580 Motherboard Replacement: paso 10, imagen 3 de 3
    • Using a Phillips #00 screwdriver, unscrew five 4.6 mm screws fastening the fan and cooling pipe.

    • The screws are set in the plastic and are not able to be removed from the fan parts.

  11. Lenovo ThinkPad T580 Motherboard Replacement: paso 11, imagen 1 de 1
    • Remove the cooling fan directly upwards from the core.

    • Be sure to clean and replace any thermal paste on the heatsink and CPU before reassembling. You can use our How to Apply Thermal Paste guide if you need any help!

  12. Aviso: los pasos 12-14 provienen de una guía que está marcada como "En progreso".

    Lenovo ThinkPad T580 Motherboard Replacement, Wi-Fi Card: paso 12, imagen 1 de 3 Lenovo ThinkPad T580 Motherboard Replacement, Wi-Fi Card: paso 12, imagen 2 de 3 Lenovo ThinkPad T580 Motherboard Replacement, Wi-Fi Card: paso 12, imagen 3 de 3
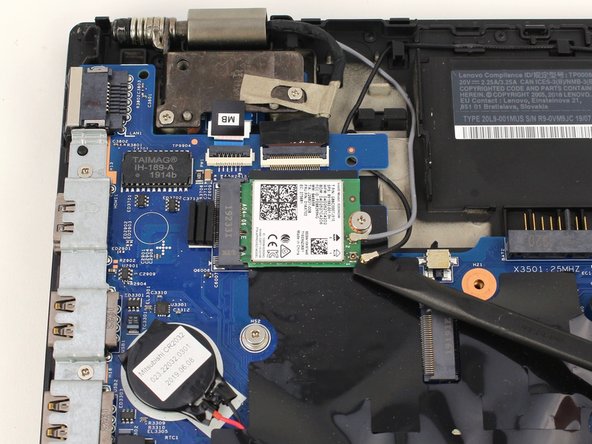
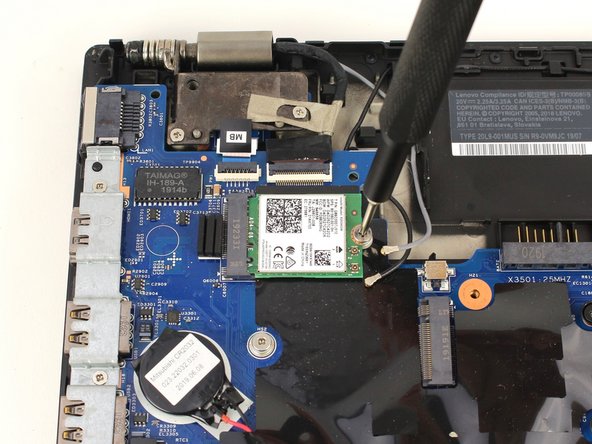
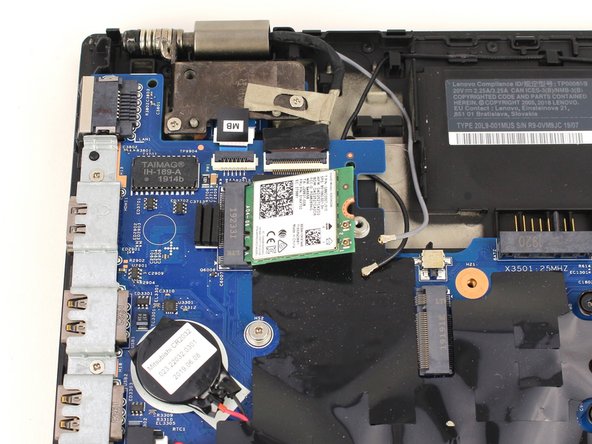
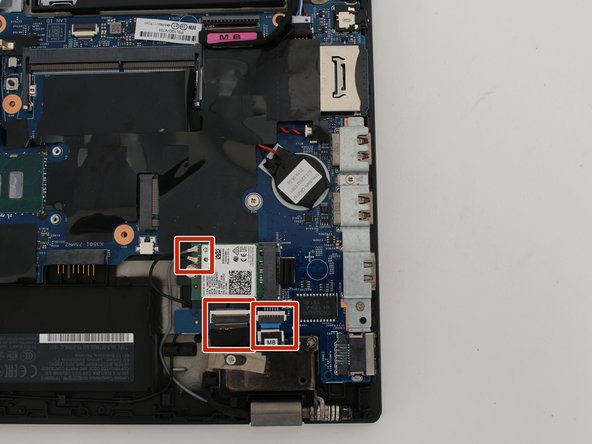
    • Using a spudger, pop off the gray and black coaxial cables from the Wi-Fi card.

  13. Lenovo ThinkPad T580 Motherboard Replacement: paso 13, imagen 1 de 3 Lenovo ThinkPad T580 Motherboard Replacement: paso 13, imagen 2 de 3 Lenovo ThinkPad T580 Motherboard Replacement: paso 13, imagen 3 de 3
    • Using a Phillips #00 screwdriver, remove the 3.6 mm screw from the Wi-Fi card.

  14. Lenovo ThinkPad T580 Motherboard Replacement: paso 14, imagen 1 de 3 Lenovo ThinkPad T580 Motherboard Replacement: paso 14, imagen 2 de 3 Lenovo ThinkPad T580 Motherboard Replacement: paso 14, imagen 3 de 3
    • Slide the Wi-Fi card out from the socket on the motherboard.

  15. Aviso: los pasos 15-17 provienen de una guía que está marcada como "En progreso".

    Lenovo ThinkPad T580 Motherboard Replacement, RAM: paso 15, imagen 1 de 3 Lenovo ThinkPad T580 Motherboard Replacement, RAM: paso 15, imagen 2 de 3 Lenovo ThinkPad T580 Motherboard Replacement, RAM: paso 15, imagen 3 de 3
    • Pull the two tabs on either side of the RAM card outwards with your fingers.

  16. Lenovo ThinkPad T580 Motherboard Replacement: paso 16, imagen 1 de 3 Lenovo ThinkPad T580 Motherboard Replacement: paso 16, imagen 2 de 3 Lenovo ThinkPad T580 Motherboard Replacement: paso 16, imagen 3 de 3
    • The RAM module should pop up to rest at an angle to the motherboard.

    • Pull the Wi-Fi card out from the port by the edges of the card.

    • Try to remove and insert the card at the same angle at which it rests with respect to the motherboard.

  17. Lenovo ThinkPad T580 Motherboard Replacement: paso 17, imagen 1 de 2 Lenovo ThinkPad T580 Motherboard Replacement: paso 17, imagen 2 de 2
    • Remove the RAM module from the laptop.

    • Repeat the same process for the second RAM module if your computer included one.

  18. Lenovo ThinkPad T580 Motherboard Replacement, Unfasten the keyboard: paso 18, imagen 1 de 1
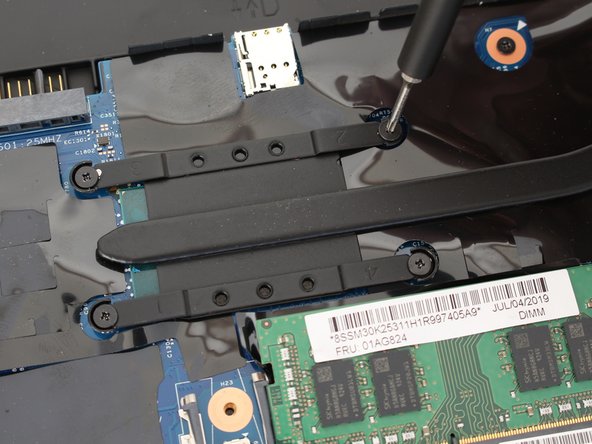
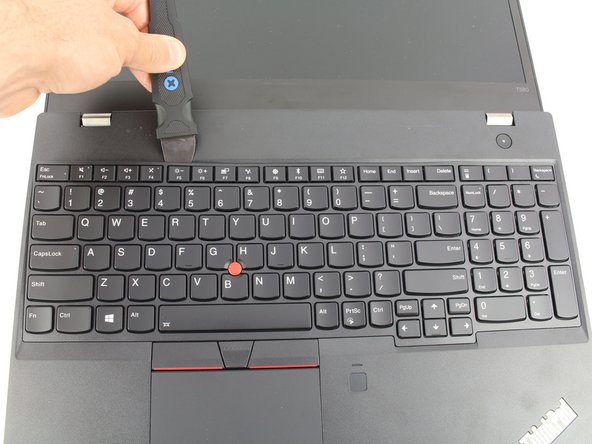
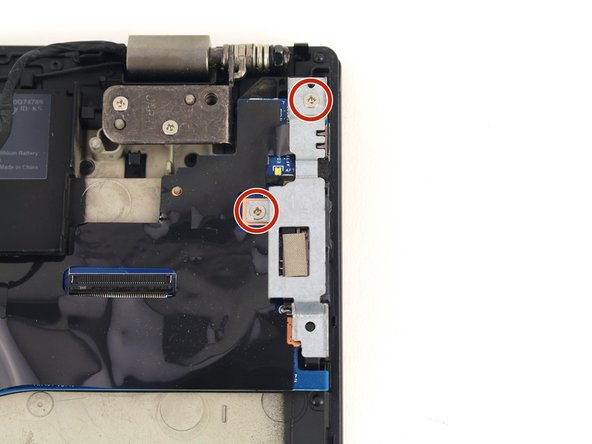
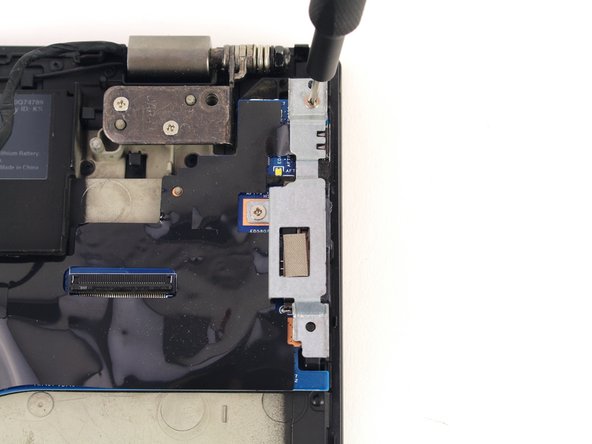
    • Use a Phillips #00 screwdriver to unscrew the three 3.3 mm captive screws securing the keyboard.

  19. Lenovo ThinkPad T580 Motherboard Replacement: paso 19, imagen 1 de 3 Lenovo ThinkPad T580 Motherboard Replacement: paso 19, imagen 2 de 3 Lenovo ThinkPad T580 Motherboard Replacement: paso 19, imagen 3 de 3
    • Use a Jimmy to pry under the top left corner of the keyboard.

    • You may head a "click" or "pop" as the clips of the keyboard disengage.

  20. Lenovo ThinkPad T580 Motherboard Replacement: paso 20, imagen 1 de 3 Lenovo ThinkPad T580 Motherboard Replacement: paso 20, imagen 2 de 3 Lenovo ThinkPad T580 Motherboard Replacement: paso 20, imagen 3 de 3
    • Continue prying along the top edge of the keyboard, releasing the clips as you go.

    • Once the top edge has been fully released, grab the top edge and hinge the keyboard upwards on the bottom edge.

  21. Lenovo ThinkPad T580 Motherboard Replacement: paso 21, imagen 1 de 3 Lenovo ThinkPad T580 Motherboard Replacement: paso 21, imagen 2 de 3 Lenovo ThinkPad T580 Motherboard Replacement: paso 21, imagen 3 de 3
    • Pull the keyboard away from you, releasing the tabs along the bottom edge.

    • Be sure not to pull on the keyboard too excessively, as it is still connected to the motherboard via two ribbon cables.

    • Flip the keyboard over to rest face down over the trackpad.

  22. Lenovo ThinkPad T580 Motherboard Replacement: paso 22, imagen 1 de 3 Lenovo ThinkPad T580 Motherboard Replacement: paso 22, imagen 2 de 3 Lenovo ThinkPad T580 Motherboard Replacement: paso 22, imagen 3 de 3
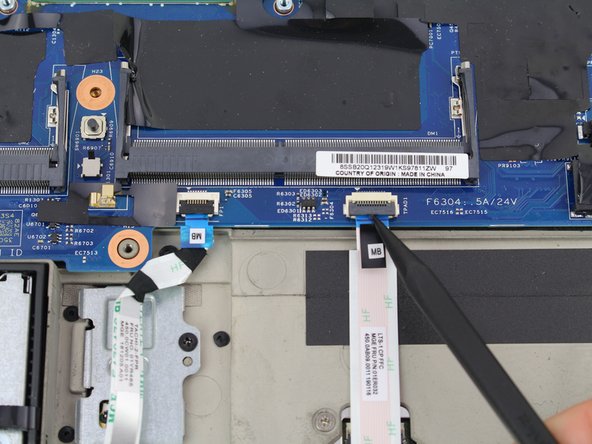
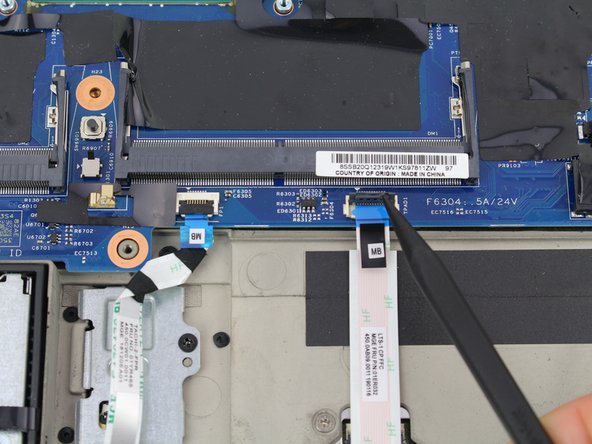
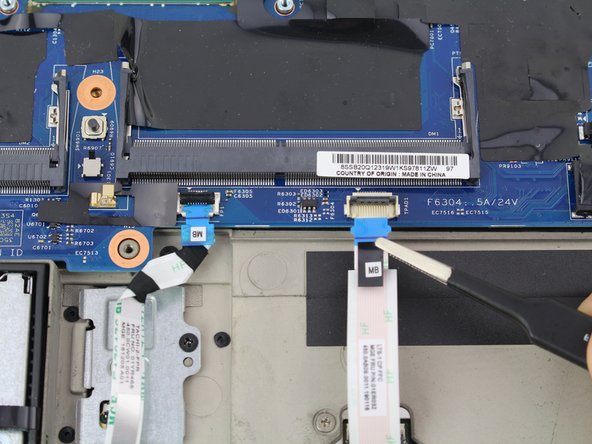
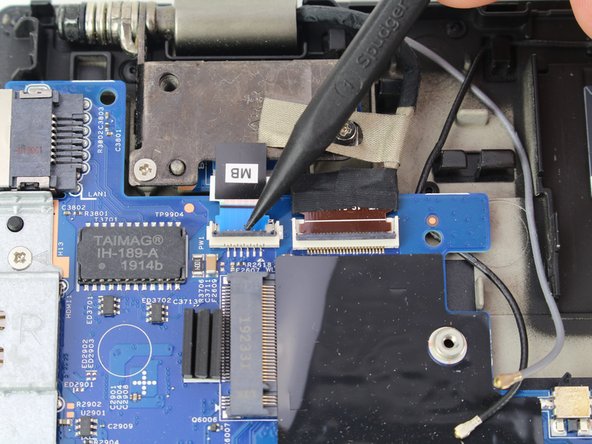
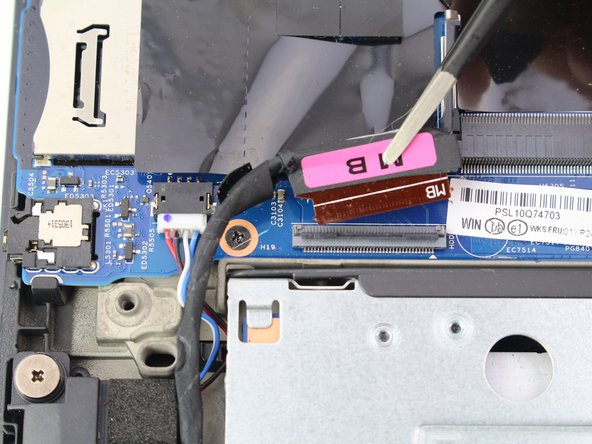
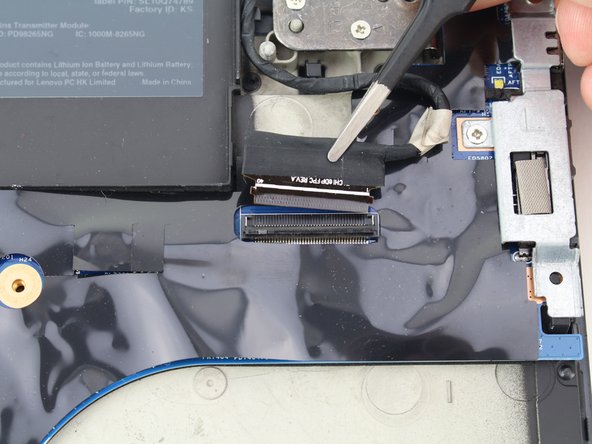
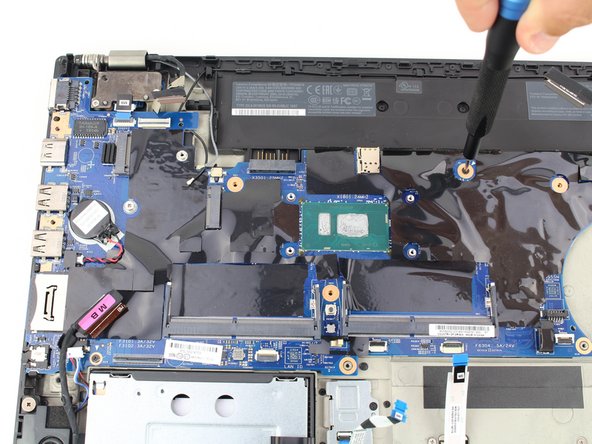
    • Use a spudger to lift up the two black, hinged locking flaps on the ZIF connectors on the motherboard.

  23. Lenovo ThinkPad T580 Motherboard Replacement: paso 23, imagen 1 de 3 Lenovo ThinkPad T580 Motherboard Replacement: paso 23, imagen 2 de 3 Lenovo ThinkPad T580 Motherboard Replacement: paso 23, imagen 3 de 3
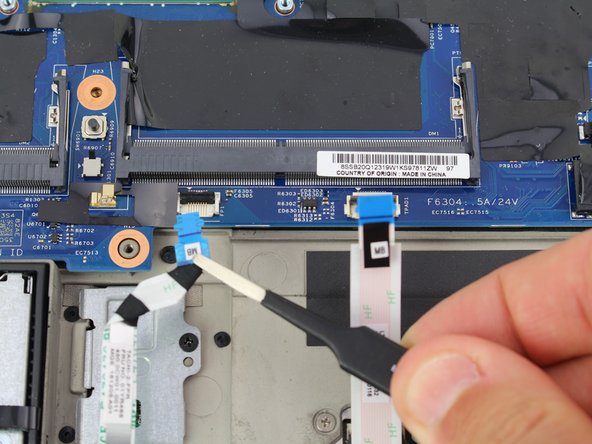
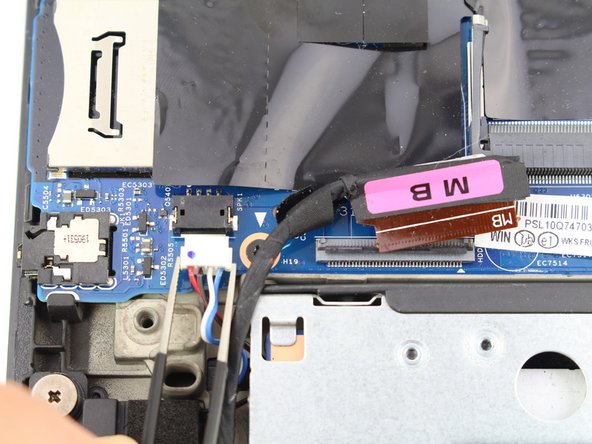
    • Use a pair of blunt nose tweezers to pull the two keyboard ribbon cables out from the ZIF connectors.

  24. Lenovo ThinkPad T580 Motherboard Replacement: paso 24, imagen 1 de 1
    • Remove the keyboard.

  25. Lenovo ThinkPad T580 Motherboard Replacement, Motherboard: paso 25, imagen 1 de 2 Lenovo ThinkPad T580 Motherboard Replacement, Motherboard: paso 25, imagen 2 de 2
    • Disconnect all the attached cables.

  26. Lenovo ThinkPad T580 Motherboard Replacement: paso 26, imagen 1 de 3 Lenovo ThinkPad T580 Motherboard Replacement: paso 26, imagen 2 de 3 Lenovo ThinkPad T580 Motherboard Replacement: paso 26, imagen 3 de 3
    • Using a Phillips #00 screwdriver, unscrew the three 3.3 mm motherboard screws.

    • Using a Phillips #00 screwdriver, take out the port clamps and the three 3.6 mm screws.

  27. Lenovo ThinkPad T580 Motherboard Replacement: paso 27, imagen 1 de 3 Lenovo ThinkPad T580 Motherboard Replacement: paso 27, imagen 2 de 3 Lenovo ThinkPad T580 Motherboard Replacement: paso 27, imagen 3 de 3
    • Flip up the two ZIF cables for the trackpad and fingerprint sensor with the pointed end of a plastic spudger.

  28. Lenovo ThinkPad T580 Motherboard Replacement: paso 28, imagen 1 de 3 Lenovo ThinkPad T580 Motherboard Replacement: paso 28, imagen 2 de 3 Lenovo ThinkPad T580 Motherboard Replacement: paso 28, imagen 3 de 3
    • Pull out the two ribbon cables with a pair of blunt nose tweezers.

  29. Lenovo ThinkPad T580 Motherboard Replacement: paso 29, imagen 1 de 3 Lenovo ThinkPad T580 Motherboard Replacement: paso 29, imagen 2 de 3 Lenovo ThinkPad T580 Motherboard Replacement: paso 29, imagen 3 de 3
    • Using a spudger, flip up the locking tabs of the two ZIF connectors on the upper left corner of the motherboard.

    • Pull out each of the ribbon cables using a pair of blunt nose tweezers.

  30. Lenovo ThinkPad T580 Motherboard Replacement: paso 30, imagen 1 de 3 Lenovo ThinkPad T580 Motherboard Replacement: paso 30, imagen 2 de 3 Lenovo ThinkPad T580 Motherboard Replacement: paso 30, imagen 3 de 3
    • Flip up the locking tab of the ZIF connector on the bottom left of the motherboard.

    • Pull out the ribbon cable and speaker cable from their connectors using a pair of blunt nose tweezers.

  31. Lenovo ThinkPad T580 Motherboard Replacement: paso 31, imagen 1 de 3 Lenovo ThinkPad T580 Motherboard Replacement: paso 31, imagen 2 de 3 Lenovo ThinkPad T580 Motherboard Replacement: paso 31, imagen 3 de 3
    • Using a spudger, flip up the locking tab of the ZIF connector in the top right corner of the motherboard.

    • Pull the ribbon cable out from the connector with a pair of blunt nose tweezers.

  32. Lenovo ThinkPad T580 Motherboard Replacement: paso 32, imagen 1 de 3 Lenovo ThinkPad T580 Motherboard Replacement: paso 32, imagen 2 de 3 Lenovo ThinkPad T580 Motherboard Replacement: paso 32, imagen 3 de 3
    • Using a Phillips #00 screwdriver, remove the four 3.6 mm screws holding down the port brackets on the right and left sides of the motherboard.

  33. Lenovo ThinkPad T580 Motherboard Replacement: paso 33, imagen 1 de 3 Lenovo ThinkPad T580 Motherboard Replacement: paso 33, imagen 2 de 3 Lenovo ThinkPad T580 Motherboard Replacement: paso 33, imagen 3 de 3
    • Pull off each of the port brackets.

  34. Lenovo ThinkPad T580 Motherboard Replacement: paso 34, imagen 1 de 2 Lenovo ThinkPad T580 Motherboard Replacement: paso 34, imagen 2 de 2
    • Remove the two 3.3 mm screws from the motherboard with a Phillips #00 screwdriver.

  35. Lenovo ThinkPad T580 Motherboard Replacement: paso 35, imagen 1 de 3 Lenovo ThinkPad T580 Motherboard Replacement: paso 35, imagen 2 de 3 Lenovo ThinkPad T580 Motherboard Replacement: paso 35, imagen 3 de 3
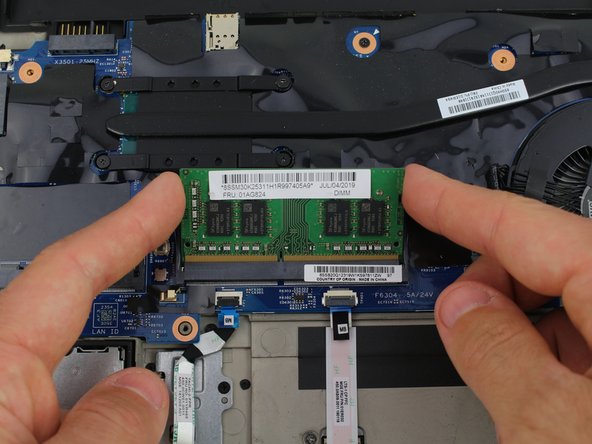
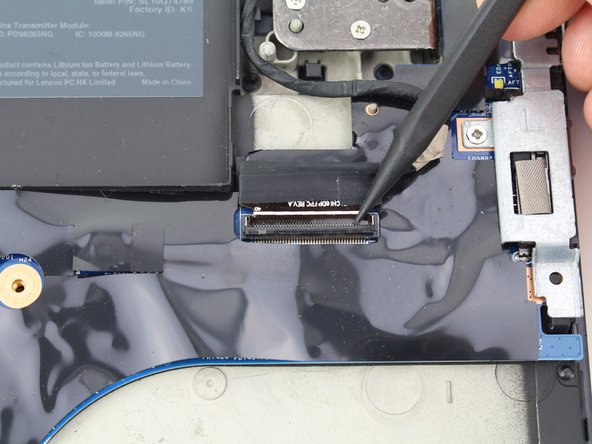
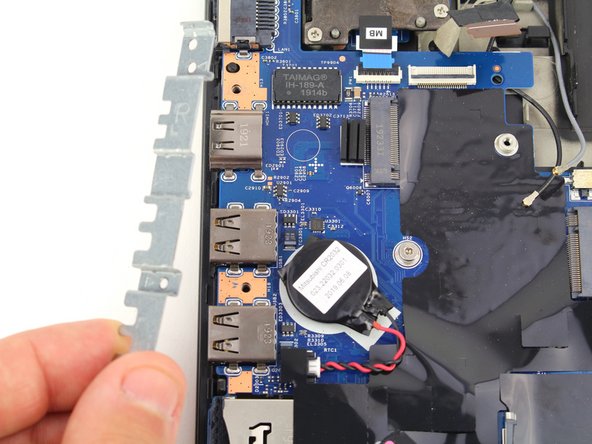
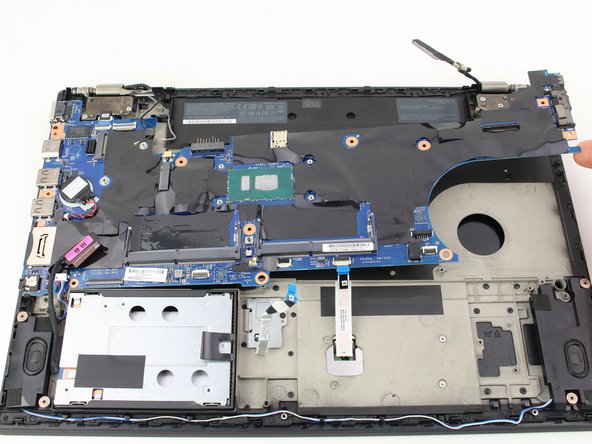
    • Lift up and remove the motherboard.

    • If your replacement motherboard does not include a CMOS battery, you may need to move it over from your old motherboard. You can follow this CMOS Battery Replacement guide if you need help!

Conclusión

To reassemble your device, follow these instructions in reverse order.

Ben Elkayam

Miembro Desde 01/23/20

942 Reputación

8 Guías creadas

Equipo

Cal Poly, Team S18-G6, White Winter 2020 Miembro de Cal Poly, Team S18-G6, White Winter 2020

CPSU-WHITE-W20S18G6

4 Miembros

24 Guías creadas

0 comentarios

Agregar Comentario

Ver Estadísticas:

Ultimas 24 horas: 3

Ultimos 7 días: 21

Ultimos 30 días: 69

Todo El Tiempo: 3,119