Saltar al contenido principal

Esta guía ha sufrido modificaciones. Revisa la última versión sin revisar.

Lenovo ThinkPad Edge E420s Glass Screen Replacement

Qué necesitas

  1. Lenovo ThinkPad Edge E420s Glass Screen Replacement, Hard Drive: paso 1, imagen 1 de 1
    • There is no external access to the battery. Please make sure the at the battery has been drained or disabled through BIOS before beginning.

    • Flip the device over.

  2. Lenovo ThinkPad Edge E420s Glass Screen Replacement: paso 2, imagen 1 de 1
    • Use a Phillips #00 screwdriver to remove one M2 x 3mm screw from the side of the device.

  3. Lenovo ThinkPad Edge E420s Glass Screen Replacement: paso 3, imagen 1 de 3 Lenovo ThinkPad Edge E420s Glass Screen Replacement: paso 3, imagen 2 de 3 Lenovo ThinkPad Edge E420s Glass Screen Replacement: paso 3, imagen 3 de 3
    • Swing the cover out slightly like a hinge.

    • Pull the cover directly away from the case towards the base of the laptop.

    • Lift the cover up and away from the device to remove it.

    • You may hear a slight pop when you pull the cover off.

  4. Lenovo ThinkPad Edge E420s Glass Screen Replacement: paso 4, imagen 1 de 1
    • Use the clear tab to slide the hard drive out of the device.

  5. Lenovo ThinkPad Edge E420s Glass Screen Replacement: paso 5, imagen 1 de 3 Lenovo ThinkPad Edge E420s Glass Screen Replacement: paso 5, imagen 2 de 3 Lenovo ThinkPad Edge E420s Glass Screen Replacement: paso 5, imagen 3 de 3
    • To replace the hard drive, remove the four M2 × 4mm wafer-headed screws on the sides of the hard drive case using a Phillips #00 screwdriver.

    • Slide the old hard drive directly out.

    • When reassembling, make sure the hard drive is securely in the case before beginning.

  6. Lenovo ThinkPad Edge E420s Glass Screen Replacement, Top Case: paso 6, imagen 1 de 2 Lenovo ThinkPad Edge E420s Glass Screen Replacement, Top Case: paso 6, imagen 2 de 2
    • Use a Phillips #0 screwdriver to remove eight M2 × 3 mm screws near the front opening and scattered across the bottom of the laptop.

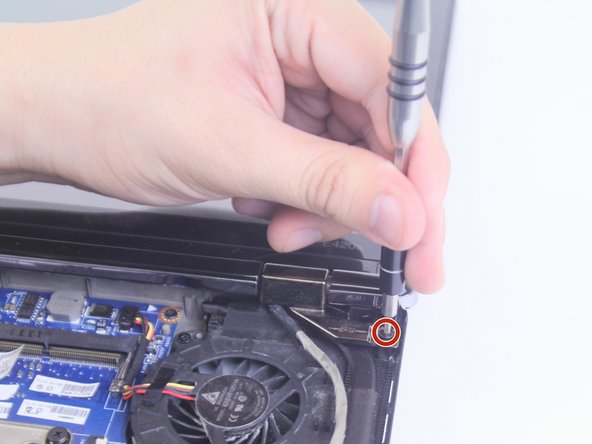
    • Remove three M2x3 mm screws using a Phillips #00 screwdriver from the base of the laptop near the opening.

  7. Lenovo ThinkPad Edge E420s Glass Screen Replacement: paso 7, imagen 1 de 1
    • Remove the M3 x 2mm screw from the hole left by the hard drive using a Phillips #00 screwdriver.

  8. Lenovo ThinkPad Edge E420s Glass Screen Replacement: paso 8, imagen 1 de 2 Lenovo ThinkPad Edge E420s Glass Screen Replacement: paso 8, imagen 2 de 2
    • Flip over the device.

    • Open the device normally.

  9. Lenovo ThinkPad Edge E420s Glass Screen Replacement: paso 9, imagen 1 de 1
    • Wedge the plastic opening tool between the upper and lower halves of the lower case.

    • Lift the end of the opening tool slowly until the case separates.

    • Hearing a small popping or cracking noise during this step is normal

  10. Lenovo ThinkPad Edge E420s Glass Screen Replacement: paso 10, imagen 1 de 1
    • Lift the upper half of the case up slowly.

    • Be sure not to yank any of the wires connected to the case as this could damage them.

  11. Lenovo ThinkPad Edge E420s Glass Screen Replacement: paso 11, imagen 1 de 3 Lenovo ThinkPad Edge E420s Glass Screen Replacement: paso 11, imagen 2 de 3 Lenovo ThinkPad Edge E420s Glass Screen Replacement: paso 11, imagen 3 de 3
    • Locate and disconnect the 4 ribbon wires from the top case.

    • Locate and disconnect the two additional connecting wires.

    • Some wires may be connected by a clamp. In order to remove the clamp, press upwards on the lever attached to the connector

    • Be careful to not yank on the wires when disconnecting them as they are easily damaged.

  12. Lenovo ThinkPad Edge E420s Glass Screen Replacement: paso 12, imagen 1 de 1
    • Lift the unattached case away from the device and place it to the side.

    • When reassembling ensure that all parts of the case are properly aligned.

  13. Lenovo ThinkPad Edge E420s Glass Screen Replacement, Glass Screen: paso 13, imagen 1 de 2 Lenovo ThinkPad Edge E420s Glass Screen Replacement, Glass Screen: paso 13, imagen 2 de 2
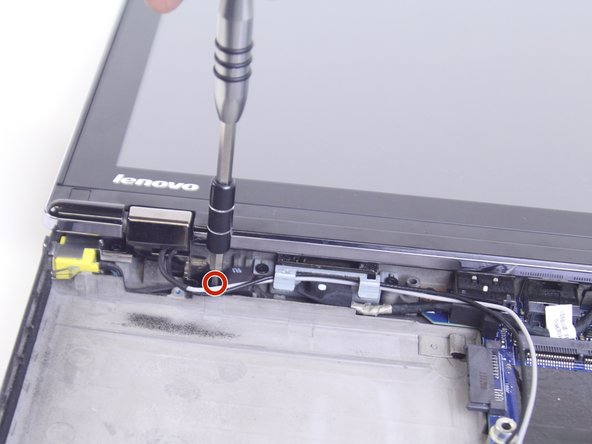
    • Unscrew the two M2 x 3mm screws near the hinges using a Phillips #00 screwdriver.

  14. Lenovo ThinkPad Edge E420s Glass Screen Replacement: paso 14, imagen 1 de 3 Lenovo ThinkPad Edge E420s Glass Screen Replacement: paso 14, imagen 2 de 3 Lenovo ThinkPad Edge E420s Glass Screen Replacement: paso 14, imagen 3 de 3
    • Slide the black and grey wires out from underneath the plastic tab with the plastic opening tool.

    • Disconnect the black and grey wires connecting the screen and the motherboard.

  15. Lenovo ThinkPad Edge E420s Glass Screen Replacement: paso 15, imagen 1 de 1
    • Pull out the fabric covered wire connecting the Screen to the motherboard underneath the cooling fan.

    • Make sure to pull parallel to the slot the wire is connected to, otherwise you may damage or completely break it.

  16. Lenovo ThinkPad Edge E420s Glass Screen Replacement: paso 16, imagen 1 de 1
    • Lift the screen away from the device.

Conclusión

To reassemble your device, follow these instructions in reverse order.

0 comentarios

Agregar Comentario

Ver Estadísticas:

Ultimas 24 horas: 0

Ultimos 7 días: 1

Ultimos 30 días: 2

Todo El Tiempo: 548