Saltar al contenido principal

Lenovo Ideapad 120s-14IAP Touchpad Replacement

Qué necesitas

  1. Lenovo Ideapad 120s-14IAP Touchpad Replacement, Back Cover: paso 1, imagen 1 de 1
    • Be sure to power off and unplug your device before you begin your repair.

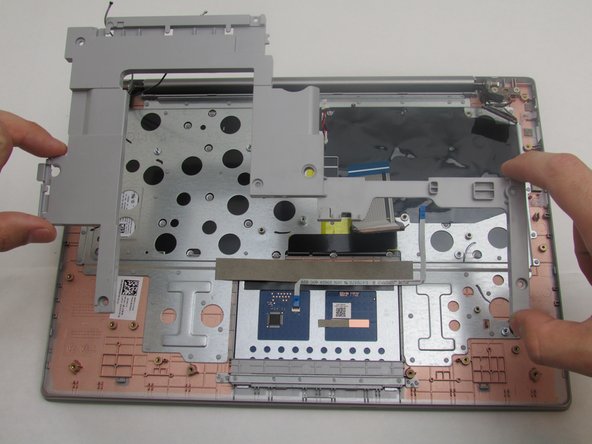
    • Orient the laptop so the top is laying flat on your work surface.

    • Remove ten 1.5mm Torx T5 screws from the back of the laptop.

  2. Lenovo Ideapad 120s-14IAP Touchpad Replacement: paso 2, imagen 1 de 1
    • Insert the plastic opening tool or a Jimmy along the edge of the back cover and gently pry.

    • Run the tool all the way around the edge of the back cover and remove the back cover once it is no longer secure.

    • Remove the back cover.

  3. Lenovo Ideapad 120s-14IAP Touchpad Replacement, USB Daughterboard: paso 3, imagen 1 de 2 Lenovo Ideapad 120s-14IAP Touchpad Replacement, USB Daughterboard: paso 3, imagen 2 de 2
    • Use a spudger to lift the black fastener and disconnect the ribbon cable from the USB daughterboard.

  4. Lenovo Ideapad 120s-14IAP Touchpad Replacement: paso 4, imagen 1 de 1
    Herramienta utilizada en este paso:
    Tweezers
    $4.99
    • Using tweezers, disconnect the speaker on the left from the USB daugterboard.

    • Remove two 2.5 mm Phillips #0 screws from the daughterboard.

    • Remove the daughterboard from the laptop.

  5. Lenovo Ideapad 120s-14IAP Touchpad Replacement, Motherboard: paso 5, imagen 1 de 3 Lenovo Ideapad 120s-14IAP Touchpad Replacement, Motherboard: paso 5, imagen 2 de 3 Lenovo Ideapad 120s-14IAP Touchpad Replacement, Motherboard: paso 5, imagen 3 de 3
    • Using a spudger, disconnect the keyboard ribbon cable from the motherboard.

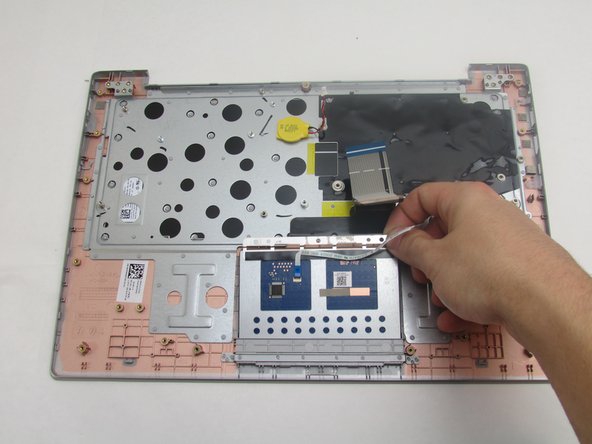
    • Pull on the plastic film to remove the display connection cable.

  6. Lenovo Ideapad 120s-14IAP Touchpad Replacement: paso 6, imagen 1 de 1
    Herramienta utilizada en este paso:
    Tweezers
    $4.99
    • Using tweezers, disconnect the connections for the right speaker.

    • Using tweezers, disconnect the connections for the battery.

    • Using tweezers, disconnect the connections for the CMOS battery.

  7. Lenovo Ideapad 120s-14IAP Touchpad Replacement: paso 7, imagen 1 de 1
    • Remove the wireless card by disconnecting the two antenna cables and removing the 2.5 mm Phillips #0 screw.

  8. Lenovo Ideapad 120s-14IAP Touchpad Replacement: paso 8, imagen 1 de 2 Lenovo Ideapad 120s-14IAP Touchpad Replacement: paso 8, imagen 2 de 2
    • Remove seven 2.5 mm Phillips #0 screws from the motherboard.

    • Slide the motherboard out of the laptop chassis.

  9. Lenovo Ideapad 120s-14IAP Touchpad Replacement, Touchpad: paso 9, imagen 1 de 2 Lenovo Ideapad 120s-14IAP Touchpad Replacement, Touchpad: paso 9, imagen 2 de 2
    • Remove five 2.5 mm Phillips #0 screws from around the battery.

    • Lift the battery out of the laptop.

  10. Lenovo Ideapad 120s-14IAP Touchpad Replacement: paso 10, imagen 1 de 2 Lenovo Ideapad 120s-14IAP Touchpad Replacement: paso 10, imagen 2 de 2
    • Remove four 2.0 mm Phillips #0 screws from the speaker assemblies.

    • The speakers can now be lifted up.

  11. Lenovo Ideapad 120s-14IAP Touchpad Replacement: paso 11, imagen 1 de 2 Lenovo Ideapad 120s-14IAP Touchpad Replacement: paso 11, imagen 2 de 2
    • Remove six 2.5 mm Phillips #0 screws from the battery bracket.

    • Lift the battery bracket out of the laptop.

  12. Lenovo Ideapad 120s-14IAP Touchpad Replacement: paso 12, imagen 1 de 2 Lenovo Ideapad 120s-14IAP Touchpad Replacement: paso 12, imagen 2 de 2
    • Remove six 5.0 mm Phillips #0 screws from the screen hinges.

    • You can now lift the bottom cover and separate each half of the laptop.

  13. Lenovo Ideapad 120s-14IAP Touchpad Replacement: paso 13, imagen 1 de 3 Lenovo Ideapad 120s-14IAP Touchpad Replacement: paso 13, imagen 2 de 3 Lenovo Ideapad 120s-14IAP Touchpad Replacement: paso 13, imagen 3 de 3
    • The touchpad retention screws are hidden beneath a strip of adhesive. Gently peel the adhesive away to access them.

    • Remove three 2.0 mm Phillips #0 screws from the touchpad retention bracket.

    • The touchpad now slides up and can be removed.

Conclusión

To reassemble your device, follow these instructions in reverse order.

Una persona más ha completado esta guía.

0Guía Comentarios

Agregar Comentario

Ver Estadísticas:

Ultimas 24 horas: 0

Ultimos 7 días: 1

Ultimos 30 días: 8

Todo El Tiempo: 988