Saltar al contenido principal

Lenovo IdeaPad 330-15IGM Speaker Units Replacement

Qué necesitas

  1. Lenovo IdeaPad 330-15IGM Speaker Units Replacement, Back Cover: paso 1, imagen 1 de 3 Lenovo IdeaPad 330-15IGM Speaker Units Replacement, Back Cover: paso 1, imagen 2 de 3 Lenovo IdeaPad 330-15IGM Speaker Units Replacement, Back Cover: paso 1, imagen 3 de 3
    • Press and hold the power button to power off the computer.

  2. Lenovo IdeaPad 330-15IGM Speaker Units Replacement: paso 2, imagen 1 de 1
    • Remove thirteen 6.5 mm screws from the laptop cover using a Phillips #00 screwdriver.

  3. Lenovo IdeaPad 330-15IGM Speaker Units Replacement: paso 3, imagen 1 de 1
    • Use your hands to remove the back cover from the laptop.

  4. Lenovo IdeaPad 330-15IGM Speaker Units Replacement, Battery: paso 4, imagen 1 de 1
    • Remove four 5.7 mm screws that hold the battery unit in place using a Phillips #00 screwdriver.

  5. Lenovo IdeaPad 330-15IGM Speaker Units Replacement: paso 5, imagen 1 de 3 Lenovo IdeaPad 330-15IGM Speaker Units Replacement: paso 5, imagen 2 de 3 Lenovo IdeaPad 330-15IGM Speaker Units Replacement: paso 5, imagen 3 de 3
    • Detach the cable connecting the battery to the motherboard.

  6. Lenovo IdeaPad 330-15IGM Speaker Units Replacement: paso 6, imagen 1 de 1
    • Remove the battery from the laptop.

  7. Lenovo IdeaPad 330-15IGM Speaker Units Replacement, Speaker Units: paso 7, imagen 1 de 2 Lenovo IdeaPad 330-15IGM Speaker Units Replacement, Speaker Units: paso 7, imagen 2 de 2
    • Carefully disconnect the speaker from the motherboard.

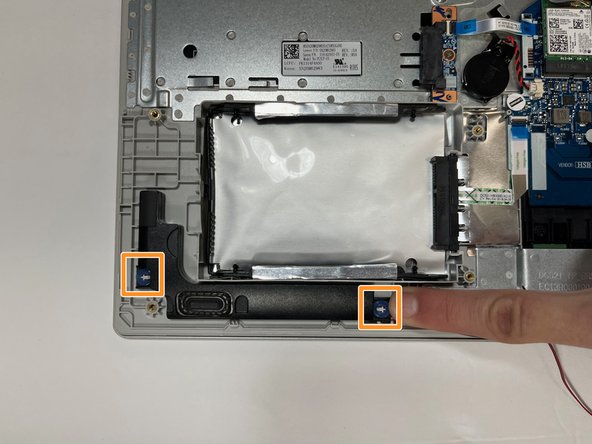
    • Each speaker unit has blue stoppers that allow it to remain in place. In order to remove the unit, you must nudge the blue stoppers off of the plastic piece it is attached to. Repeat for each speaker.

  8. Lenovo IdeaPad 330-15IGM Speaker Units Replacement: paso 8, imagen 1 de 3 Lenovo IdeaPad 330-15IGM Speaker Units Replacement: paso 8, imagen 2 de 3 Lenovo IdeaPad 330-15IGM Speaker Units Replacement: paso 8, imagen 3 de 3
    • Remove the unit from the chassis and carefully remove the cable that connects the two speaker units together.

    • This cable is vital since it is the only thing that connects the speaker units and allows them to share audio from the motherboard.

Conclusión

To reassemble your device, follow these instructions in reverse order.

Equipo

Gateway, Team 1-2, Class Fall 2022 Miembro de Gateway, Team 1-2, Class Fall 2022

GCC-CLASS-F22S1G2

4 Miembros

5 Guías creadas

0 comentarios

Agregar Comentario

Ver Estadísticas:

Ultimas 24 horas: 0

Ultimos 7 días: 0

Ultimos 30 días: 2

Todo El Tiempo: 96