Saltar al contenido principal

Lenovo IdeaPad 3-14IIL05 Cooling Fan Replacement

Qué necesitas

  1. Lenovo IdeaPad 3-14IIL05 Cooling Fan Replacement, Back Panel: paso 1, imagen 1 de 3 Lenovo IdeaPad 3-14IIL05 Cooling Fan Replacement, Back Panel: paso 1, imagen 2 de 3 Lenovo IdeaPad 3-14IIL05 Cooling Fan Replacement, Back Panel: paso 1, imagen 3 de 3
    • Flip the laptop with the screen side facing down and the back panel facing you.

    • Remove the six 1.2 mm screws and the four 0.6 mm screws using a Phillips #1 screwdriver.

    • Make sure to separate the different sizes from each other.

  2. Lenovo IdeaPad 3-14IIL05 Cooling Fan Replacement, Cooling Fan: paso 2, imagen 1 de 2 Lenovo IdeaPad 3-14IIL05 Cooling Fan Replacement, Cooling Fan: paso 2, imagen 2 de 2
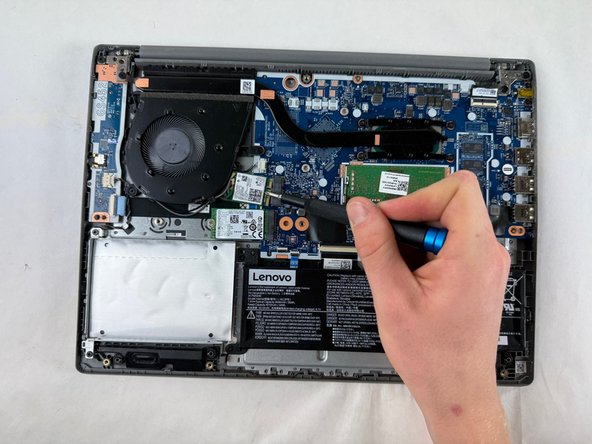
    • Remove the single screw from the Wi-Fi card.

    • Detach the wires from the Wi-Fi card.

  3. Lenovo IdeaPad 3-14IIL05 Cooling Fan Replacement: paso 3, imagen 1 de 1
    • Remove the two screws from the fan.

    • The screw closest to the wire clip connection to the motherboard is longer than the other screws.

Conclusión

To reassemble your device, follow these instructions in reverse order.

Joseph Stanton

Miembro Desde 10/18/24

169 Reputación

2 Guías creadas

Equipo

UMass Dartmouth, Team 1-3, Konn Fall 2024 Miembro de UMass Dartmouth, Team 1-3, Konn Fall 2024

UMASSD-KONN-F24S1G3

Miembros de 5

5 Guías creadas

0Guía Comentarios

Agregar Comentario

Ver Estadísticas:

Ultimas 24 horas: 0

Ultimos 7 días: 1

Ultimos 30 días: 15

Todo El Tiempo: 70