Saltar al contenido principal

Lenovo IdeaPad 110-17IKB Screen Replacement

Qué necesitas

  1. Lenovo IdeaPad 110-17IKB Screen Replacement, Lower Case: paso 1, imagen 1 de 1
    • First, before you do anything, make sure the computer has been turned off and unplugged.

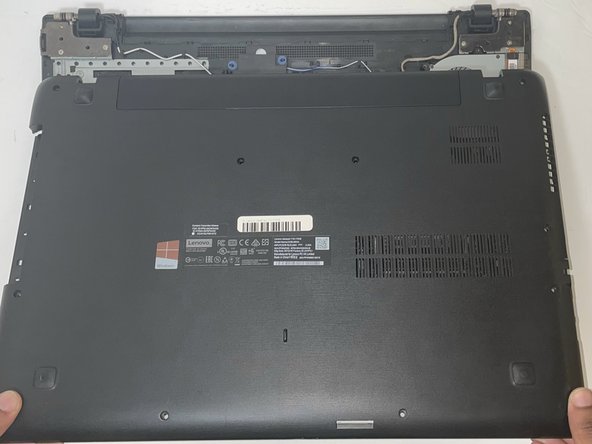
    • Place the the computer bottom facing up. Unscrew the eleven 6 mm screws using a Phillips #0 screwdriver.

  2. Lenovo IdeaPad 110-17IKB Screen Replacement: paso 2, imagen 1 de 2 Lenovo IdeaPad 110-17IKB Screen Replacement: paso 2, imagen 2 de 2
    • Use an opening tool to gently disconnect the clips on the side of the back panel.

    • DO NOT try to force open the panel, as this may cause damage to it.

  3. Lenovo IdeaPad 110-17IKB Screen Replacement: paso 3, imagen 1 de 2 Lenovo IdeaPad 110-17IKB Screen Replacement: paso 3, imagen 2 de 2
    • Pry out the optical drive opposite of the laptop.

    • Since the screws have already been removed, you will not need to worry about any more screws on the optical drive.

  4. Lenovo IdeaPad 110-17IKB Screen Replacement: paso 4, imagen 1 de 3 Lenovo IdeaPad 110-17IKB Screen Replacement: paso 4, imagen 2 de 3 Lenovo IdeaPad 110-17IKB Screen Replacement: paso 4, imagen 3 de 3
    • Release the remaining clasp and remove the lower case.

  5. Lenovo IdeaPad 110-17IKB Screen Replacement, Screen: paso 5, imagen 1 de 3 Lenovo IdeaPad 110-17IKB Screen Replacement, Screen: paso 5, imagen 2 de 3 Lenovo IdeaPad 110-17IKB Screen Replacement, Screen: paso 5, imagen 3 de 3
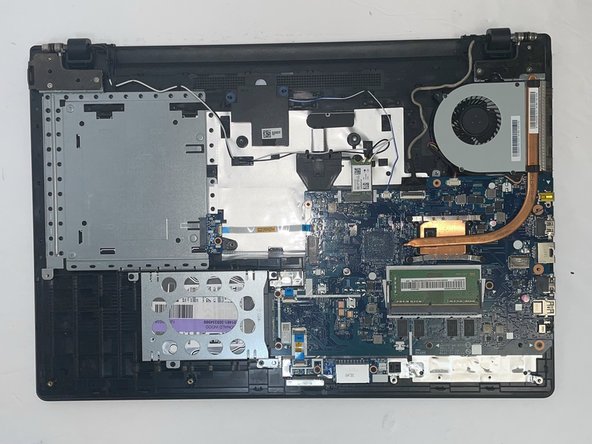
    • Open the laptop, make sure it is facing you.

    • Using a opening pick, detach the clips around screen that is holding the bezels in place.

    • Remove all bezels.

  6. Lenovo IdeaPad 110-17IKB Screen Replacement: paso 6, imagen 1 de 3 Lenovo IdeaPad 110-17IKB Screen Replacement: paso 6, imagen 2 de 3 Lenovo IdeaPad 110-17IKB Screen Replacement: paso 6, imagen 3 de 3
    • Remove all four 3 mm screws with the a Phillips #0 screwdriver.

  7. Lenovo IdeaPad 110-17IKB Screen Replacement: paso 7, imagen 1 de 1
    • Carefully disconnect the cable connector from the connecting port.

Conclusión

To reassemble your device, follow these instructions in reverse order.

Una persona más ha completado esta guía.

Cameron Mounce

Miembro Desde 09/05/23

668 Reputación

5 Guías creadas

Equipo

Gateway, Team 1-3, Pee Fall 2023 Miembro de Gateway, Team 1-3, Pee Fall 2023

GCC-PEE-F23S1G3

4 Miembros

7 Guías creadas

0 comentarios

Agregar Comentario

Ver Estadísticas:

Ultimas 24 horas: 0

Ultimos 7 días: 0

Ultimos 30 días: 3

Todo El Tiempo: 48