Saltar al contenido principal

Lenovo Horizon 2s Fan and Heat-sink Replacement

Qué necesitas

  1. Lenovo Horizon 2s Fan and Heat-sink Replacement, Rear Case: paso 1, imagen 1 de 3 Lenovo Horizon 2s Fan and Heat-sink Replacement, Rear Case: paso 1, imagen 2 de 3 Lenovo Horizon 2s Fan and Heat-sink Replacement, Rear Case: paso 1, imagen 3 de 3
    • Flip the device so the rear case is facing upward.

    • With the plastic opening tool carefully pry the plastic piece shown in the picture, until it is completely removed from the case.

  2. Lenovo Horizon 2s Fan and Heat-sink Replacement: paso 2, imagen 1 de 2 Lenovo Horizon 2s Fan and Heat-sink Replacement: paso 2, imagen 2 de 2
    • Using your fingers, carefully remove the rubber boot from the right side of the rear case.

    • With the Phillips #1 head, remove the screw placed directly under the rubber boot.

  3. Lenovo Horizon 2s Fan and Heat-sink Replacement: paso 3, imagen 1 de 1
    • Using the plastic opening tool, push the display screen on the device forward until it separates from the rear casing.

  4. Lenovo Horizon 2s Fan and Heat-sink Replacement: paso 4, imagen 1 de 1
    • Using the plastic opening tool, carefully pry around the perimeter of the screen until the entire screen is completely separated from the rear casing.

  5. Lenovo Horizon 2s Fan and Heat-sink Replacement: paso 5, imagen 1 de 3 Lenovo Horizon 2s Fan and Heat-sink Replacement: paso 5, imagen 2 de 3 Lenovo Horizon 2s Fan and Heat-sink Replacement: paso 5, imagen 3 de 3
    • Before completely separating the screen from the rear casing you will carefully detach two wires that are connected to both sides of the device. This will allow you to completely separate the rear casing from screen.

  6. Lenovo Horizon 2s Fan and Heat-sink Replacement, HDD: paso 6, imagen 1 de 2 Lenovo Horizon 2s Fan and Heat-sink Replacement, HDD: paso 6, imagen 2 de 2
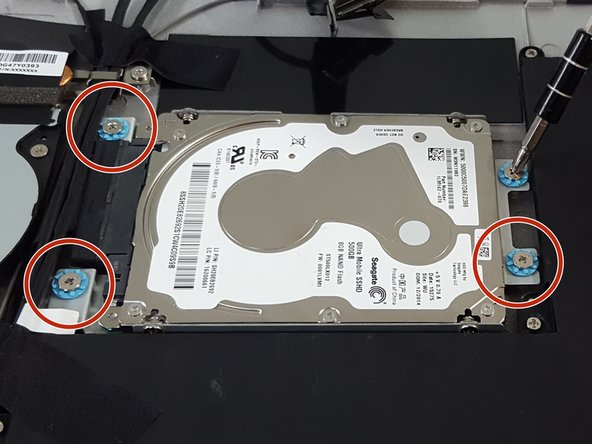
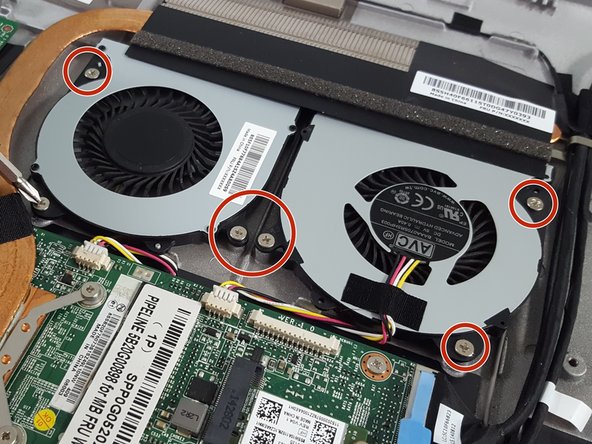
    • Using your Philips head screw driver with the number 1 head. Carefully unscrew the four M2-6mm screws that are circled in the picture.

  7. Lenovo Horizon 2s Fan and Heat-sink Replacement: paso 7, imagen 1 de 1
    • Now carefully lift the hard-drive that is still attached to the boot from the rear casing.

  8. Lenovo Horizon 2s Fan and Heat-sink Replacement: paso 8, imagen 1 de 2 Lenovo Horizon 2s Fan and Heat-sink Replacement: paso 8, imagen 2 de 2
    • Now that the hard-drive is detached from the rear casing you will still have to detach the hard-drive from its boot. Again using the Philips screwdriver with the number one head. Carefully unscrew the four M2-6mm screws that are circled in the picture.

  9. Lenovo Horizon 2s Fan and Heat-sink Replacement: paso 9, imagen 1 de 1
    • Now that the screws are detached. You can now carefully lift the hard-drive from the metal boot.

  10. Lenovo Horizon 2s Fan and Heat-sink Replacement, Battery: paso 10, imagen 1 de 1
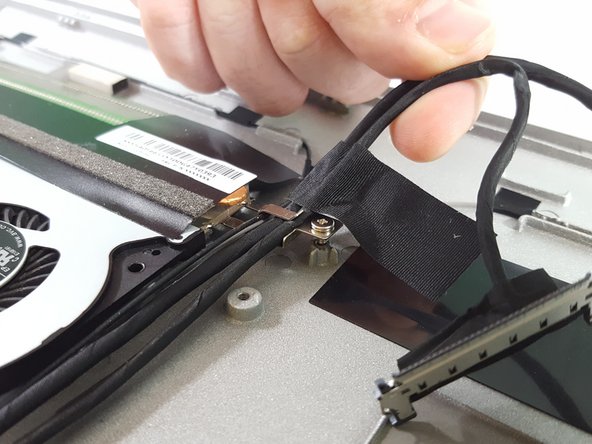
    • Using your fingers carefully and slowly disconnect the wire shown here from the motherboard.

  11. Lenovo Horizon 2s Fan and Heat-sink Replacement: paso 11, imagen 1 de 2 Lenovo Horizon 2s Fan and Heat-sink Replacement: paso 11, imagen 2 de 2
    • Using the Philips screw driver with the number 1 head. Carefully unscrew the six M2- 6mm screws that are circled in the picture.

  12. Lenovo Horizon 2s Fan and Heat-sink Replacement: paso 12, imagen 1 de 1
    • Carefully lift the battery from the rear casing.

  13. Lenovo Horizon 2s Fan and Heat-sink Replacement, Fan and Heat-sink: paso 13, imagen 1 de 2 Lenovo Horizon 2s Fan and Heat-sink Replacement, Fan and Heat-sink: paso 13, imagen 2 de 2
    • With the Phillips screw driver using the number one head. Carefully unscrew the the M2-6mm wire fastener, so the wires shown in the picture can be released from the rear casing.

  14. Lenovo Horizon 2s Fan and Heat-sink Replacement: paso 14, imagen 1 de 1
    • With the Phillips screwdriver using the number one head carefully unscrew the four M2 6mm screws circled in the picture.

  15. Lenovo Horizon 2s Fan and Heat-sink Replacement: paso 15, imagen 1 de 1
    • With the screws detached carefully lift the heat sink off the CPU on the motherboard.

  16. Lenovo Horizon 2s Fan and Heat-sink Replacement: paso 16, imagen 1 de 2 Lenovo Horizon 2s Fan and Heat-sink Replacement: paso 16, imagen 2 de 2
    • With a Phillips #1 screwdriver, unscrew the six M2 6mm screws located around the fans, as shown.

  17. Lenovo Horizon 2s Fan and Heat-sink Replacement: paso 17, imagen 1 de 1
    • Carefully remove the power plugs connecting the fans to the motherboard.

  18. Lenovo Horizon 2s Fan and Heat-sink Replacement: paso 18, imagen 1 de 1
    • Lift the fans carefully out of the casing.

Conclusión

To reassemble your device, follow these instructions in reverse order.

Cody Rubel

Miembro Desde 09/25/17

214 Reputación

1 Guía escrita

Equipo

USF Tampa, Team S3-G6, Cannon Fall 2017 Miembro de USF Tampa, Team S3-G6, Cannon Fall 2017

USFT-CANNON-F17S3G6

3 Miembros

12 Guías creadas

0 comentarios

Agregar Comentario

Ver Estadísticas:

Ultimas 24 horas: 0

Ultimos 7 días: 3

Ultimos 30 días: 8

Todo El Tiempo: 722