Saltar al contenido principal
Únete a la Comunidad de Reparación - Crear Cuenta

Lenovo G50-80 80E5 Motherboard Replacement

Qué necesitas

  1. Lenovo G50-80 80E5 Motherboard Replacement, Motherboard: paso 1, imagen 1 de 2 Lenovo G50-80 80E5 Motherboard Replacement, Motherboard: paso 1, imagen 2 de 2
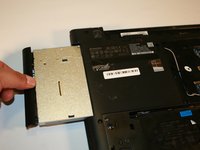
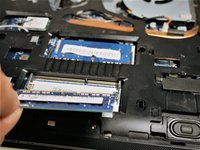
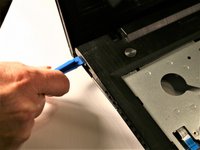
    • From the underside of the laptop, press the two battery tabs inward to remove the battery. Lift the battery to remove.

    Pregunta a FixBot

    Agregar Comentario

  2. Lenovo G50-80 80E5 Motherboard Replacement: paso 2, imagen 1 de 2 Lenovo G50-80 80E5 Motherboard Replacement: paso 2, imagen 2 de 2
    • Remove the three #00x5.5mm screws from the bottom front under panel and then slide the main access panel forward and out.

    Pregunta a FixBot

    Agregar Comentario

  3. Lenovo G50-80 80E5 Motherboard Replacement: paso 3, imagen 1 de 1
    • Remove the two #00x4.5mm screws from the hard drive and then slide the drive to the side and remove the hard drive.

    Pregunta a FixBot

    Agregar Comentario

  4. Lenovo G50-80 80E5 Motherboard Replacement: paso 4, imagen 1 de 2 Lenovo G50-80 80E5 Motherboard Replacement: paso 4, imagen 2 de 2
    • Remove the three #00x5.5mm screws from the fan unit, unplug the fan wiring connector and then remove the fan unit.

    Pregunta a FixBot

    Agregar Comentario

  5. Lenovo G50-80 80E5 Motherboard Replacement: paso 5, imagen 1 de 1
    Herramienta utilizada en este paso:
    Tweezers
    $4.99
    • Use tweezers to carefully remove the white and black wires from the WiFi card. Thread the wires back out of it's channel and hold to the side.

    Pregunta a FixBot

    Agregar Comentario

  6. Lenovo G50-80 80E5 Motherboard Replacement: paso 6, imagen 1 de 1
    • Unplug the two ribbon cables from under the fan unit area.

    Pregunta a FixBot

    Agregar Comentario

  7. Lenovo G50-80 80E5 Motherboard Replacement: paso 7, imagen 1 de 2 Lenovo G50-80 80E5 Motherboard Replacement: paso 7, imagen 2 de 2
    • Remove the CD Drive fixing screw (#00x5.5mm) and slide the drive out from it's slot.

    Pregunta a FixBot

    Agregar Comentario

  8. Lenovo G50-80 80E5 Motherboard Replacement: paso 8, imagen 1 de 3 Lenovo G50-80 80E5 Motherboard Replacement: paso 8, imagen 2 de 3 Lenovo G50-80 80E5 Motherboard Replacement: paso 8, imagen 3 de 3
    • Release the RAM fixing clip from both ends of each RAM chip. Once released, slide out each RAM chip.

    Pregunta a FixBot

    Agregar Comentario

  9. Lenovo G50-80 80E5 Motherboard Replacement: paso 9, imagen 1 de 3 Lenovo G50-80 80E5 Motherboard Replacement: paso 9, imagen 2 de 3 Lenovo G50-80 80E5 Motherboard Replacement: paso 9, imagen 3 de 3
    • Remove the three #00x5.5mm screws holding the keyboard.

    Pregunta a FixBot

    Agregar Comentario

  10. Lenovo G50-80 80E5 Motherboard Replacement: paso 10, imagen 1 de 1
    • Remove the six perimeter #00x5.5mm screws holding the palm rest.

    Pregunta a FixBot

    Agregar Comentario

  11. Lenovo G50-80 80E5 Motherboard Replacement: paso 11, imagen 1 de 1
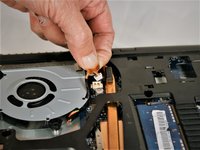
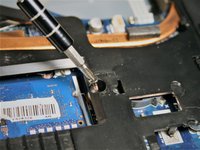
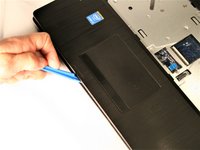
    • Flip the laptop over, lift the screen and with a plastic spudger begin to remove the keyboard. Start at the top left corner and work from left to right lifting the keyboard. Once the top section is free, lift the keyboard up and away from yourself. Remove the ribbon cable connection and set the keyboard aside.

    Pregunta a FixBot

    Agregar Comentario

  12. Lenovo G50-80 80E5 Motherboard Replacement: paso 12, imagen 1 de 3 Lenovo G50-80 80E5 Motherboard Replacement: paso 12, imagen 2 de 3 Lenovo G50-80 80E5 Motherboard Replacement: paso 12, imagen 3 de 3
    • Disconnect the two ribbon cables then using a plastic spudger, begin to separate the the palm rest from the chassis. Start along the front left edge and work left to right to separate each half. Separate the left and right sides in the same fashion.

    Pregunta a FixBot

    Agregar Comentario

  13. Lenovo G50-80 80E5 Motherboard Replacement: paso 13, imagen 1 de 2 Lenovo G50-80 80E5 Motherboard Replacement: paso 13, imagen 2 de 2
    • Disconnect the CD Drive ribbon cable and the auxiliary board cable. Disconnect the speaker cable and then remove the CD Drive board fixing screw (#00x4.5mm). Remove the auxiliary board fixing screw and then remove the auxiliary board.

    Pregunta a FixBot

    Agregar Comentario

  14. Lenovo G50-80 80E5 Motherboard Replacement: paso 14, imagen 1 de 3 Lenovo G50-80 80E5 Motherboard Replacement: paso 14, imagen 2 de 3 Lenovo G50-80 80E5 Motherboard Replacement: paso 14, imagen 3 de 3
    • Remove the three motherboard fixing screws (#00x5.5mm) and remove the motherboard.

    Pregunta a FixBot

    Agregar Comentario

Conclusión

To reassemble your device, follow these instructions in reverse order.

Cancelar: No complete esta guía.

4 personas más completaron esta guía.

Sean Mullin

Miembro Desde 10/17/17

244 Reputación

1 Guía escrita

Equipo

UMass Dartmouth, Team S1-G6, Simcock Fall 2017 Miembro de UMass Dartmouth, Team S1-G6, Simcock Fall 2017

UMASSD-SIMCOCK-F17S1G6

Miembros de 4

10 Guías creadas

0Guía Comentarios

Agregar Comentario

Ver Estadísticas:

Ultimas 24 horas: 1

Ultimos 7 días: 16

Ultimos 30 días: 64

Todo El Tiempo: 9,197