Saltar al contenido principal

Lenovo G50-70 RAM Replacement

Qué necesitas

  1. Lenovo G50-70 RAM Replacement, Battery: paso 1, imagen 1 de 3 Lenovo G50-70 RAM Replacement, Battery: paso 1, imagen 2 de 3 Lenovo G50-70 RAM Replacement, Battery: paso 1, imagen 3 de 3
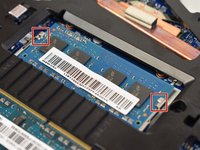
    • Push the left switch (labeled 1) to the left to show red underneath. This will unlock battery.

    • Push the right switch (labeled 2) to the right. This will eject battery.

  2. Lenovo G50-70 RAM Replacement: paso 2, imagen 1 de 1
    • Rotate the battery away from the laptop.

  3. Lenovo G50-70 RAM Replacement, Back Access Panel: paso 3, imagen 1 de 2 Lenovo G50-70 RAM Replacement, Back Access Panel: paso 3, imagen 2 de 2
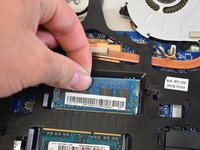
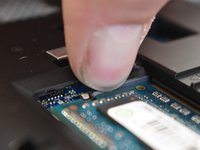
    • Remove the three 6mm Phillips #0 screws holding the back access panel on.

  4. Lenovo G50-70 RAM Replacement: paso 4, imagen 1 de 2 Lenovo G50-70 RAM Replacement: paso 4, imagen 2 de 2
    • Slide the cover toward you to unlatch it.

    • The edge of the panel will slide away from the laptop so it can be lifted.

  5. Lenovo G50-70 RAM Replacement, RAM: paso 5, imagen 1 de 1
    • The battery should be disconnected before taking off any internal parts.

  6. Lenovo G50-70 RAM Replacement: paso 6, imagen 1 de 2 Lenovo G50-70 RAM Replacement: paso 6, imagen 2 de 2
    • Start by removing top RAM stick held in by two spring clips on either side.

    • Press both spring clips away from RAM stick simultaneously.

  7. Lenovo G50-70 RAM Replacement: paso 7, imagen 1 de 2 Lenovo G50-70 RAM Replacement: paso 7, imagen 2 de 2
    • When both spring clips are pressed open, RAM stick should pop up. If it doesn't pop up on its own, you can pull it up. If spring clips are properly removed, you shouldn't encounter any resistance.

    • Lift RAM stick away from plug.

  8. Lenovo G50-70 RAM Replacement: paso 8, imagen 1 de 2 Lenovo G50-70 RAM Replacement: paso 8, imagen 2 de 2
    • Lower RAM stick is removed the same way as the first. Pull two spring clips on either side away from RAM stick to release it.

    • Spring clips on lower RAM stick look slightly different than the clips on upper ram sticks; however, they operate in the same way.

Conclusión

To reassemble your device, follow these instructions in reverse order.

6 personas más completaron esta guía.

0 comentarios

Agregar Comentario

Ver Estadísticas:

Ultimas 24 horas: 0

Ultimos 7 días: 8

Ultimos 30 días: 31

Todo El Tiempo: 2,994