Saltar al contenido principal

Lenovo G50-70 Fan Replacement

Qué necesitas

  1. Lenovo G50-70 Fan Replacement, Battery: paso 1, imagen 1 de 3 Lenovo G50-70 Fan Replacement, Battery: paso 1, imagen 2 de 3 Lenovo G50-70 Fan Replacement, Battery: paso 1, imagen 3 de 3
    • Push the left switch (labeled 1) to the left to show red underneath. This will unlock battery.

    • Push the right switch (labeled 2) to the right. This will eject battery.

  2. Lenovo G50-70 Fan Replacement: paso 2, imagen 1 de 1
    • Rotate the battery away from the laptop.

  3. Lenovo G50-70 Fan Replacement, Back Access Panel: paso 3, imagen 1 de 2 Lenovo G50-70 Fan Replacement, Back Access Panel: paso 3, imagen 2 de 2
    • Remove the three 6mm Phillips #0 screws holding the back access panel on.

  4. Lenovo G50-70 Fan Replacement: paso 4, imagen 1 de 2 Lenovo G50-70 Fan Replacement: paso 4, imagen 2 de 2
    • Slide the cover toward you to unlatch it.

    • The edge of the panel will slide away from the laptop so it can be lifted.

  5. Lenovo G50-70 Fan Replacement, Fan: paso 5, imagen 1 de 2 Lenovo G50-70 Fan Replacement, Fan: paso 5, imagen 2 de 2
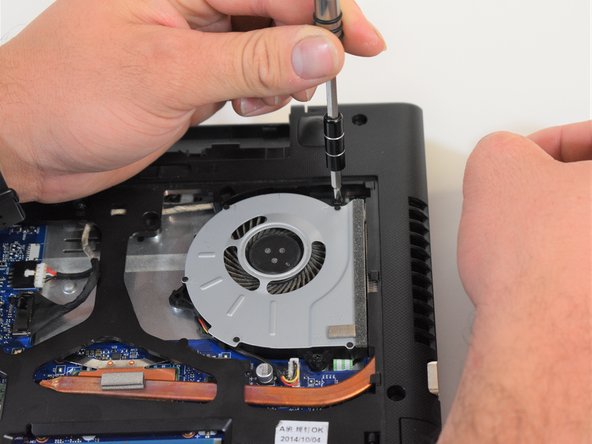
    • Remove the three 6mm Phillips #0 screws on the perimeter of the fan.

  6. Lenovo G50-70 Fan Replacement: paso 6, imagen 1 de 2 Lenovo G50-70 Fan Replacement: paso 6, imagen 2 de 2
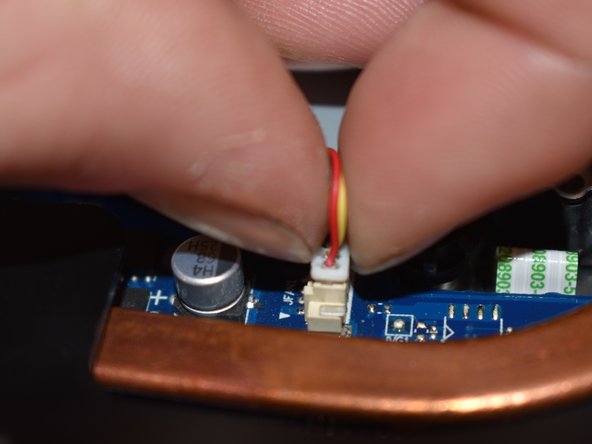
    • The fan is plugged into the motherboard next to the copper heat sync.

    • Unplug the bundled wire connector by pulling up on the white plug.

    • Do not pull up by the wires.

  7. Lenovo G50-70 Fan Replacement: paso 7, imagen 1 de 2 Lenovo G50-70 Fan Replacement: paso 7, imagen 2 de 2
    • Lift fan out of case.

Conclusión

To reassemble your device, follow these instructions in reverse order.

6 personas más completaron esta guía.

Un comentario

can it take a .5 amp fan??

Basil Jabir - Contestar

Agregar Comentario

Ver Estadísticas:

Ultimas 24 horas: 1

Ultimos 7 días: 1

Ultimos 30 días: 4

Todo El Tiempo: 2,162