Saltar al contenido principal

Lego Dimensions Starter Pack LED Chip Replacement

Qué necesitas

  1. Lego Dimensions Starter Pack LED Chip Replacement, Top Cover Parts: paso 1, imagen 1 de 2 Lego Dimensions Starter Pack LED Chip Replacement, Top Cover Parts: paso 1, imagen 2 de 2
    • Be careful not to crack the cover.

    • Use the metal spudger to gently pry open the corners of the top cover.

  2. Lego Dimensions Starter Pack LED Chip Replacement: paso 2, imagen 1 de 1
    • Be careful not to crack the top cover.

    • Use the metal spudger to gently pry up the center of the top cover.

  3. Lego Dimensions Starter Pack LED Chip Replacement: paso 3, imagen 1 de 1
    • Pull the top cover off.

  4. Lego Dimensions Starter Pack LED Chip Replacement: paso 4, imagen 1 de 1
    • Lift up the circular illumination stand and remove it from the toy pad.

  5. Lego Dimensions Starter Pack LED Chip Replacement: paso 5, imagen 1 de 1
    • Lift up the white L-shaped pieces and remove them from the toy pad.

  6. Lego Dimensions Starter Pack LED Chip Replacement, USB Cable: paso 6, imagen 1 de 1
    • Pull the white connector away from the motherboard, keeping the white connector parallel to the board.

    • You may need to use a plastic opening tool or spudger to help separate the connector. Avoid pulling firmly on the wires themselves.

    • Remove the USB cable from the toy pad.

  7. Lego Dimensions Starter Pack LED Chip Replacement, LED Chip: paso 7, imagen 1 de 1
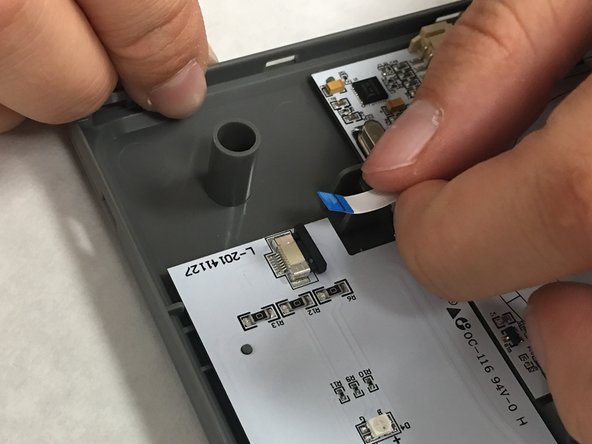
    • Pull the black connector of the ribbon away from the LED chip, keeping the connector parallel to the board.

    • Disconnect the connector on the other LED chip as well, if replacing both LED chips or the motherboard

  8. Lego Dimensions Starter Pack LED Chip Replacement: paso 8, imagen 1 de 1
    • Pull the ribbon away from the black connector of the LED chips.

    • Disconnect the ribbon from the other LED chip as well, if replacing both LED chips or the motherboard.

  9. Lego Dimensions Starter Pack LED Chip Replacement: paso 9, imagen 1 de 1
    • Lift up both LED chips. As you are lifting, pull towards the motherboard to release it from the toy pad cover.

  10. Lego Dimensions Starter Pack LED Chip Replacement: paso 10, imagen 1 de 1
    • Lift up the motherboard, and remove the motherboard and LED chips from the toy pad.

  11. Lego Dimensions Starter Pack LED Chip Replacement: paso 11, imagen 1 de 1
    • Flip the motherboard and LED chips over.

    • Desolder the LED chip from the motherboard.

    • Desolder both LED chips, if replacing both LED chips or the motherboard

    • Separate the LED chip(s) from the motherboard.

    • Refer to this guide for soldering and desoldering tips.

Conclusión

To reassemble your device, follow these instructions in reverse order.

Una persona más ha completado esta guía.

Alyssa Lach

Miembro Desde 11/06/17

509 Reputación

4 Guías creadas

Equipo

IUPUI, Team S5-G2, Baechle Fall 2017 Miembro de IUPUI, Team S5-G2, Baechle Fall 2017

IUPUI-BAECHLE-F17S5G2

2 Miembros

8 Guías creadas

0 comentarios

Agregar Comentario

Ver Estadísticas:

Ultimas 24 horas: 0

Ultimos 7 días: 1

Ultimos 30 días: 17

Todo El Tiempo: 1,188