Saltar al contenido principal

Esta guía ha sufrido modificaciones. Revisa la última versión sin revisar.

Leapfrog My Own Leaptop Speaker Replacement Guide

Qué necesitas

  1. Leapfrog My Own Leaptop Speaker Replacement Guide, Battery: paso 1, imagen 1 de 1
    • Flip over device so that back portion of the device is facing you.

  2. Leapfrog My Own Leaptop Speaker Replacement Guide: paso 2, imagen 1 de 1
    • Unscrew the one 10mm screw that holds the battery cover in place with a a PH1 phillips head screwdriver.

    • Please note that the screw cannot be removed as it is attached to the battery cover.

    PH2 works better.

    me262 - Contestar

  3. Leapfrog My Own Leaptop Speaker Replacement Guide: paso 3, imagen 1 de 2 Leapfrog My Own Leaptop Speaker Replacement Guide: paso 3, imagen 2 de 2
    • Carefully pry the batteries out with a plastic opening tool prying from the non spring side.

    • Remove the three AA batteries.

    • Note the direction of the batteries for when reassembling.

  4. Leapfrog My Own Leaptop Speaker Replacement Guide, Speaker: paso 4, imagen 1 de 1
    • Remove the eleven 10mm screws from the back of the device with a a PH1 phillips head screwdriver.

    PH2 works better.

    me262 - Contestar

  5. Leapfrog My Own Leaptop Speaker Replacement Guide: paso 5, imagen 1 de 1
    • Carefully remove back of the device.

    • Make sure not to rip the wires when lifting the cover off.

  6. Leapfrog My Own Leaptop Speaker Replacement Guide: paso 6, imagen 1 de 2 Leapfrog My Own Leaptop Speaker Replacement Guide: paso 6, imagen 2 de 2
    • Unscrew the two 7.5 mm screws to the left and right of the speaker with a PH1 phillips head screwdriver.

    • Remove the cover and place to the side.

  7. Leapfrog My Own Leaptop Speaker Replacement Guide: paso 7, imagen 1 de 2 Leapfrog My Own Leaptop Speaker Replacement Guide: paso 7, imagen 2 de 2
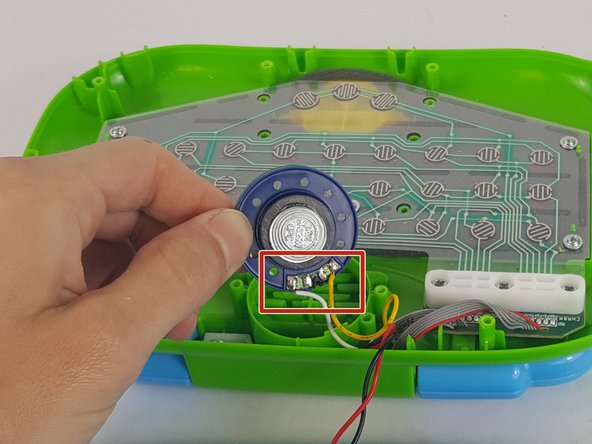
    • Once the cover is removed, gently lift up the speaker making sure not to rip or break the wires.

    • If you are disassembling the device to clean the speaker, clean it at this point with a soft, lightly dampened cloth.

    • Gently turn the speaker over and carefully desolder the white and yellow wires from the speaker.

    What do you do when you "disolder" the cables?

    Iris T - Contestar

    What do you do if the yellow wire is already broken off the silver part? How do you reapply it?

    Erika Mata - Contestar

    Our white wire is halfway off, so I’m wondering if it can be soldered back on

    Carissa holland -

    Speaker measurements (measured with digital caliper):

    0.25 W / 16 ohm / 35.5mm diameter (anything smaller will work, but will rattle around)

    Yellow wire to leftmost solder point, White wire to rightmost solder point.

    Embossed on speaker: 16ohm / M-0.25W / CPC

    me262 - Contestar

    Also remember to back out the screws to where you hear a “click” before screwing them in (this finds the previous threads so you won’t make new threads in the screwposts).

    me262 - Contestar

Conclusión

To reassemble your device, follow these instructions in reverse order.

Any issues that cannot be resolved with any portion of this wiki please contact Leapfrog Customer Serivce

3 personas más completaron esta guía.

Equipo

USF Tampa, Team 14-6, Lacy Spring 2016 Miembro de USF Tampa, Team 14-6, Lacy Spring 2016

USFT-LACY-S16S14G6

4 Miembros

6 Guías creadas

5 comentarios

Thanks for this very useful instruction. Where can I buy a replacement speaker?

-Don

Don La - Contestar

I agree, but I also second the question...where can I buy a replacement speaker?

Jimmy Liang - Contestar

Where could I purchase a replacement speaker?

Zuzi - Contestar

Where could I buy the replacement speaker in Malaysia?

stanley.met - Contestar

Where can I buy replacement speaker in Malaysia? Appreciate yr reply

ribenabona - Contestar

Agregar Comentario

Ver Estadísticas:

Ultimas 24 horas: 1

Ultimos 7 días: 10

Ultimos 30 días: 33

Todo El Tiempo: 6,700