Saltar al contenido principal

Leapfrog My Own Leaptop Speaker Replacement Guide

Qué necesitas

  1. Leapfrog My Own Leaptop Speaker Replacement Guide, Battery: paso 1, imagen 1 de 1
    • Flip over device so that back portion of the device is facing you.

  2. Leapfrog My Own Leaptop Speaker Replacement Guide: paso 2, imagen 1 de 1
    • Unscrew the one 10mm screw that holds the battery cover in place with a a PH1 phillips head screwdriver.

    • Please note that the screw cannot be removed as it is attached to the battery cover.

    PH2 works better.

    me262 - Contestar

  3. Leapfrog My Own Leaptop Speaker Replacement Guide: paso 3, imagen 1 de 2 Leapfrog My Own Leaptop Speaker Replacement Guide: paso 3, imagen 2 de 2
    • Carefully pry the batteries out with a plastic opening tool prying from the non spring side.

    • Remove the three AA batteries.

    • Note the direction of the batteries for when reassembling.

  4. Leapfrog My Own Leaptop Speaker Replacement Guide, Speaker: paso 4, imagen 1 de 1
    • Remove the eleven 10mm screws from the back of the device with a a PH1 phillips head screwdriver.

    PH2 works better.

    me262 - Contestar

  5. Leapfrog My Own Leaptop Speaker Replacement Guide: paso 5, imagen 1 de 1
    • Carefully remove back of the device.

    • Make sure not to rip the wires when lifting the cover off.

  6. Leapfrog My Own Leaptop Speaker Replacement Guide: paso 6, imagen 1 de 2 Leapfrog My Own Leaptop Speaker Replacement Guide: paso 6, imagen 2 de 2
    • Unscrew the two 7.5 mm screws to the left and right of the speaker with a PH1 phillips head screwdriver.

    • Remove the cover and place to the side.

  7. Leapfrog My Own Leaptop Speaker Replacement Guide: paso 7, imagen 1 de 2 Leapfrog My Own Leaptop Speaker Replacement Guide: paso 7, imagen 2 de 2
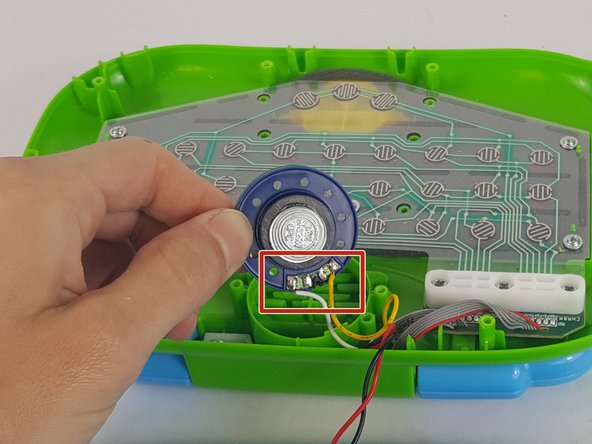
    • Once the cover is removed, gently lift up the speaker making sure not to rip or break the wires.

    • If you are disassembling the device to clean the speaker, clean it at this point with a soft, lightly dampened cloth.

    • Gently turn the speaker over and carefully desolder the white and yellow wires from the speaker.

    What do you do when you "disolder" the cables?

    Iris T - Contestar

    What do you do if the yellow wire is already broken off the silver part? How do you reapply it?

    Erika Mata - Contestar

    Our white wire is halfway off, so I’m wondering if it can be soldered back on

    Carissa holland -

    Speaker measurements (measured with digital caliper):

    0.25 W / 16 ohm / 35.5mm diameter (anything smaller will work, but will rattle around)

    Yellow wire to leftmost solder point, White wire to rightmost solder point.

    Embossed on speaker: 16ohm / M-0.25W / CPC

    me262 - Contestar

    Also remember to back out the screws to where you hear a “click” before screwing them in (this finds the previous threads so you won’t make new threads in the screwposts).

    me262 - Contestar

Conclusión

To reassemble your device, follow these instructions in reverse order.

Any issues that cannot be resolved with any portion of this wiki please contact Leapfrog Customer Serivce

3 personas más completaron esta guía.

Equipo

USF Tampa, Team 14-6, Lacy Spring 2016 Miembro de USF Tampa, Team 14-6, Lacy Spring 2016

USFT-LACY-S16S14G6

4 Miembros

6 Guías creadas

5 comentarios

Thanks for this very useful instruction. Where can I buy a replacement speaker?

-Don

Don La - Contestar

I agree, but I also second the question...where can I buy a replacement speaker?

Jimmy Liang - Contestar

Where could I purchase a replacement speaker?

Zuzi - Contestar

Where could I buy the replacement speaker in Malaysia?

stanley.met - Contestar

Where can I buy replacement speaker in Malaysia? Appreciate yr reply

ribenabona - Contestar

Agregar Comentario

Ver Estadísticas:

Ultimas 24 horas: 1

Ultimos 7 días: 10

Ultimos 30 días: 33

Todo El Tiempo: 6,700